
- ReactiveCocoa代码实践之-UI组件的RAC信号操作
- Android应用中使用ViewPager和ViewPager指示器来制作Tab标签
- Android客户端软件开发_1、软件的演示以及和其他软件的比较
- Android编程实现系统重启与关机的方法
- 如何调用百度地图API实现手机自动定位
- Android反编译代码和防止反编译
- [Android开发视频教学]01_30_代码编写(二)
- Android模拟器中安装apk的方法
- Android基于google Zxing实现各类二维码扫描效果
- android编程判断应用是否具有某个权限的方法
- Android应用开发中View绘制的一些优化点解析
- Android设置铃声实现代码
- Android夜间模式最佳实践
- Android从服务器获取图片的实例方法
- Android常用命令集锦(图文并茂适应于初学者)
- Android使用http请求手机号码归属地查询代码分享
- Android中使用am命令实现在命令行启动程序详解
- Android学习项目之简易版微信为例(二)
- android编程之XML文件解析方法详解(附源码)
- Android使用控件ImageView加载图片的方法
- Android中的Intent对象完全解析
- Android程序设计之AIDL实例详解
- Android开发中CheckBox的简单用法示例
- Android RadioGroup和RadioButton控件简单用法示例
- Android实现广告图片轮播效果
- 深入浅析Android坐标系统
- Android控件系列之RadioButton与RadioGroup使用方法
- Android 模拟器(JAVA)与C++ socket 通讯 分享
- Android录音应用实例教程
- android开发基础教程―三种方式实现xml文件解析
Android仿美团下拉菜单(商品选购)实例代码
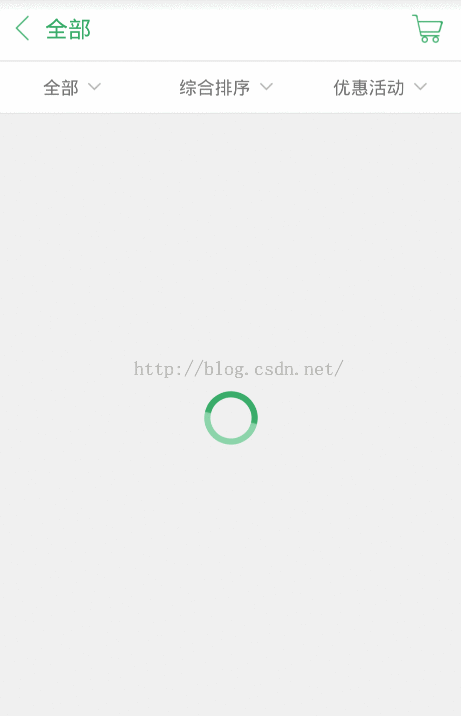
美团电商应用平台大家使用非常频繁,下面小编通过本文给大家介绍电商应用平台中常用的选择类别下拉列表的实现。先给大家展示下效果图:
一、下拉列表的实现
其实实现方法有很多,这时实现的也没有什么技术含量,只是总结下自己在项目中的做法,也提供一个思路。
首先是列表的数据,一般数据都是从后台读过来,这里因为没有后台,所以写死在客户端:
private void initMenuData() {
menuData = new ArrayList<map<string, string="">>();
String[] menuStr = new String[] { "全部", "粮油", "衣服", "图书", "电子产品",
"酒水饮料", "水果" };
Map<string, string=""> map;
for (int i = , len = menuStr.length; i < len; ++i) {
map = new HashMap<string, string="">();
map.put("name", menuStr[i]);
menuData.add(map);
}
menuData = new ArrayList<map<string, string="">>();
String[] menuStr = new String[] { "综合排序", "配送费最低" };
Map<string, string=""> map;
for (int i = , len = menuStr.length; i < len; ++i) {
map = new HashMap<string, string="">();
map.put("name", menuStr[i]);
menuData.add(map);
}
menuData = new ArrayList<map<string, string="">>();
String[] menuStr = new String[] { "优惠活动", "特价活动", "免配送费",
"可在线支付" };
Map<string, string=""> map3;
for (int i = 0, len = menuStr3.length; i < len; ++i) {
map3 = new HashMap<string, string="">();
map3.put("name", menuStr3[i]);
menuData3.add(map3);
}
}</string,></string,></map<string,></string,></string,></map<string,></string,></string,></map<string,>
就是做了简单的封装。弹出列表的实现考虑使用Popwindow。
popMenu = new PopupWindow(contentView,
LinearLayout.LayoutParams.MATCH_PARENT,
LinearLayout.LayoutParams.MATCH_PARENT);
popMenu.setOutsideTouchable(true);
popMenu.setBackgroundDrawable(new BitmapDrawable());
popMenu.setFocusable(true);
popMenu.setAnimationStyle(R.style.popwin_anim_style);
popMenu.setOnDismissListener(new OnDismissListener() {
public void onDismiss() {
productTv.setTextColor(Color.parseColor("#5a5959"));
sortTv.setTextColor(Color.parseColor("#5a5959"));
activityTv.setTextColor(Color.parseColor("#5a5959"));
}
});
接着将数据封装到adapter中:
menuAdapter1 = new SimpleAdapter(this, menuData1,
R.layout.item_listview_popwin, new String[] { "name" },
new int[] { R.id.listview_popwind_tv });
menuAdapter2 = new SimpleAdapter(this, menuData2,
R.layout.item_listview_popwin, new String[] { "name" },
new int[] { R.id.listview_popwind_tv });
menuAdapter3 = new SimpleAdapter(this, menuData3,
R.layout.item_listview_popwin, new String[] { "name" },
new int[] { R.id.listview_popwind_tv });
设置点击标题头弹出列表,并改变标题头的颜色
public void onClick(View v) {
// TODO Auto-generated method stub
switch (v.getId()) {
case R.id.supplier_list_product:
productTv.setTextColor(Color.parseColor("#ac"));
popListView.setAdapter(menuAdapter);
popMenu.showAsDropDown(product, , );
menuIndex = ;
break;
case R.id.supplier_list_sort:
sortTv.setTextColor(Color.parseColor("#ac"));
popListView.setAdapter(menuAdapter);
popMenu.showAsDropDown(product, , );
menuIndex = ;
break;
case R.id.supplier_list_activity:
activityTv.setTextColor(Color.parseColor("#ac"));
popListView.setAdapter(menuAdapter);
popMenu.showAsDropDown(product, , );
menuIndex = ;
break;
}
}
showAsDropDown是为了让popwindow定位在Product这个选择标题的正下方。从而实现上面那种方式。
最后完整的贴出代码,还是蛮简单的。最后也会提供代码下载链接。
public class MainActivity extends Activity implements
OnClickListener {
private ListView listView, popListView;
private ProgressBar progressBar;
private List<map<string, string="">> menuData1, menuData2, menuData3;
private PopupWindow popMenu;
private SimpleAdapter menuAdapter1, menuAdapter2, menuAdapter3;
private LinearLayout product, sort, activity;
private ImageView cartIv;
private TextView productTv, sortTv, activityTv, titleTv;
private int green, grey;
private String currentProduct, currentSort, currentActivity;
private int menuIndex = 0;
private Intent intent;
@Override
protected void onCreate(Bundle savedInstanceState) {
super.onCreate(savedInstanceState);
setContentView(R.layout.activity_supplier_list);
findView();
initMenuData();
initPopMenu();
}
private void initMenuData() {
menuData1 = new ArrayList<map<string, string="">>();
String[] menuStr1 = new String[] { "全部", "粮油", "衣服", "图书", "电子产品",
"酒水饮料", "水果" };
Map<string, string=""> map1;
for (int i = 0, len = menuStr1.length; i < len; ++i) {
map1 = new HashMap<string, string="">();
map1.put("name", menuStr1[i]);
menuData1.add(map1);
}
menuData2 = new ArrayList<map<string, string="">>();
String[] menuStr2 = new String[] { "综合排序", "配送费最低" };
Map<string, string=""> map2;
for (int i = 0, len = menuStr2.length; i < len; ++i) {
map2 = new HashMap<string, string="">();
map2.put("name", menuStr2[i]);
menuData2.add(map2);
}
menuData3 = new ArrayList<map<string, string="">>();
String[] menuStr3 = new String[] { "优惠活动", "特价活动", "免配送费",
"可在线支付" };
Map<string, string=""> map3;
for (int i = 0, len = menuStr3.length; i < len; ++i) {
map3 = new HashMap<string, string="">();
map3.put("name", menuStr3[i]);
menuData3.add(map3);
}
}
@Override
public void onClick(View v) {
// TODO Auto-generated method stub
switch (v.getId()) {
case R.id.supplier_list_product:
productTv.setTextColor(Color.parseColor("#39ac69"));
popListView.setAdapter(menuAdapter1);
popMenu.showAsDropDown(product, 0, 2);
menuIndex = 0;
break;
case R.id.supplier_list_sort:
sortTv.setTextColor(Color.parseColor("#39ac69"));
popListView.setAdapter(menuAdapter2);
popMenu.showAsDropDown(product, 0, 2);
menuIndex = 1;
break;
case R.id.supplier_list_activity:
activityTv.setTextColor(Color.parseColor("#39ac69"));
popListView.setAdapter(menuAdapter3);
popMenu.showAsDropDown(product, 0, 2);
menuIndex = 2;
break;
}
}
protected void findView() {
listView = (ListView) findViewById(R.id.supplier_list_lv);
product = (LinearLayout) findViewById(R.id.supplier_list_product);
sort = (LinearLayout) findViewById(R.id.supplier_list_sort);
activity = (LinearLayout) findViewById(R.id.supplier_list_activity);
productTv = (TextView) findViewById(R.id.supplier_list_product_tv);
sortTv = (TextView) findViewById(R.id.supplier_list_sort_tv);
activityTv = (TextView) findViewById(R.id.supplier_list_activity_tv);
titleTv = (TextView) findViewById(R.id.supplier_list_title_tv);
cartIv = (ImageView) findViewById(R.id.supplier_list_cart_iv);
progressBar = (ProgressBar) findViewById(R.id.progress);
product.setOnClickListener(this);
sort.setOnClickListener(this);
activity.setOnClickListener(this);
cartIv.setOnClickListener(this);
}
private void initPopMenu() {
initMenuData();
View contentView = View.inflate(this, R.layout.popwin_supplier_list,
null);
popMenu = new PopupWindow(contentView,
LinearLayout.LayoutParams.MATCH_PARENT,
LinearLayout.LayoutParams.MATCH_PARENT);
popMenu.setOutsideTouchable(true);
popMenu.setBackgroundDrawable(new BitmapDrawable());
popMenu.setFocusable(true);
popMenu.setAnimationStyle(R.style.popwin_anim_style);
popMenu.setOnDismissListener(new OnDismissListener() {
public void onDismiss() {
productTv.setTextColor(Color.parseColor("#5a5959"));
sortTv.setTextColor(Color.parseColor("#5a5959"));
activityTv.setTextColor(Color.parseColor("#5a5959"));
}
});
popListView = (ListView) contentView
.findViewById(R.id.popwin_supplier_list_lv);
contentView.findViewById(R.id.popwin_supplier_list_bottom)
.setOnClickListener(new OnClickListener() {
public void onClick(View arg0) {
popMenu.dismiss();
}
});
menuAdapter1 = new SimpleAdapter(this, menuData1,
R.layout.item_listview_popwin, new String[] { "name" },
new int[] { R.id.listview_popwind_tv });
menuAdapter2 = new SimpleAdapter(this, menuData2,
R.layout.item_listview_popwin, new String[] { "name" },
new int[] { R.id.listview_popwind_tv });
menuAdapter3 = new SimpleAdapter(this, menuData3,
R.layout.item_listview_popwin, new String[] { "name" },
new int[] { R.id.listview_popwind_tv });
popListView.setOnItemClickListener(new OnItemClickListener() {
public void onItemClick(AdapterView arg0, View arg1, int pos,
long arg3) {
popMenu.dismiss();
if (menuIndex == 0) {
currentProduct = menuData1.get(pos).get("name");
titleTv.setText(currentProduct);
productTv.setText(currentProduct);
Toast.makeText(MainActivity.this, currentProduct, Toast.LENGTH_SHORT).show();
} else if (menuIndex == 1) {
currentSort = menuData2.get(pos).get("name");
titleTv.setText(currentSort);
sortTv.setText(currentSort);
Toast.makeText(MainActivity.this, currentSort, Toast.LENGTH_SHORT).show();
} else {
currentActivity = menuData3.get(pos).get("name");
titleTv.setText(currentActivity);
activityTv.setText(currentActivity);
Toast.makeText(MainActivity.this, currentActivity, Toast.LENGTH_SHORT).show();
}
}
});
}
}</string,></string,></map<string,></string,></string,></map<string,></string,></string,></map<string,></map<string,>
二、加载圆形ProgressBar的显示
就是效果图中的那种加载ProgressBar,圆形ProgresBar可以用原生的Bar来实现,但样式单一,之前我做这种效果第一时间总是考虑到帧动画,但用这种方式需要有很多图片来链接起来,这样一来实现麻烦,二来图片多了占内存。下面用改变原生ProgressBar的动画来实现这种效果,非常简单:
<progressbar android:id="@+id/progress" android:indeterminatedrawable="@drawable/shape_progress" android:indeterminateduration="1000" android:layout_centerinparent="true" android:layout_height="wrap_content" android:layout_width="wrap_content"></progressbar>
indeterminateDrawable是加载背景图片,indeterminateDuration是旋转的速度。这里的思路是用xml来画一张图,它是环形的,且环形圈中有渐变颜色。如下:
<rotate android:fromdegrees="" android:pivotx="%" android:pivoty="%" android:todegrees="" xmlns:android="http://schemas.android.com/apk/res/android">
<shape android:innerradiusratio="" android:shape="ring" android:thicknessratio="" android:uselevel="false">
<gradient android:centercolor="#cdaa" android:centery="." android:endcolor="#ffffff" android:startcolor="#ac" android:type="sweep" android:uselevel="false">
</gradient></shape>
</rotate>
rotate设置旋转动画,360度旋转。shape="ring"设置背景为圆。android:innerRadiusRatio="3"设置内环半径,android:thicknessRatio="10"设置外环半径。最后为了让环中颜色有渐变效果,使用gradient来设置。gradient可以有三种渐变方式,线性,辐射,扫描。这里type要设置成扫描。然后设置中心点,开始颜色和结束颜色,就能实现上面的那种效果了。
以上内容是小编给大家介绍的Android仿美团下拉菜单(商品选购)实例代码,希望对大家有所帮助!
- 上一篇文章: Android WaveView实现水流波动效果
- 下一篇文章: Android实现通讯录效果――获取手机号码和姓名
- 从Cocos2d-x2迁移到Cocos2d-x3的过程分享
- Android Mms之:接收信息流程(图文详解)
- Android开发框架之自定义ZXing二维码扫描界
- Android检测Cursor泄漏的原理以及使用方法
- Android动态加载Activity原理详解
- Android 物理游戏之重力系统开发示例代码
- Android平台中实现数据存储的5种方式