
�������ڵ�λ�ã� �������� >> �������� >> ��վ���� >> app�������� >> Android���� >> Androidʵ�ֶ�ȡ�������ᣩͼƬ�����м���
- Android���ʵ�ֻ�ȡ��������״̬���ĸ߶ȡ���Ļ��С��ģ��Home���ķ���
- �����תAndroidʸ��ͼVectorDrawable
- Androidʵ��ListView�첽����ͼƬ�ķ���
- Android���ʵ�ֽ�Ӧ��ǿ�ư�װ���ֻ��ڴ�ķ���
- Android��buttonʵ��onclicklistener�¼������ַ�ʽ
- Androidʵ����map�ϻ���·�ߵķ���
- Android���ʵ��Gallery��ÿ�λ���ֻ��ʾһҳ�ķ���
- ����Android��ʹ���Զ��������ʵ�ַ���
- Android����֮������÷�ʵ�����(����uc,opera,qq�����������ҳ)
- AndroidӦ����ͼƬ���ʱʵ���Զ��л����ܵķ������
- AndroidӦ�õ�LinearLayout��Ƕ��RelativeLayout�IJ����÷�
- Android��ȡ�ֻ���ص����÷�ʵ��
- Android��ȡ��ǰ�ֻ��������ͣ�2g��3g��4g��wifi���Լ��ֻ��ͺš��汾�Ŵ���
- Android�����������˷�����xml����ʾ��
- Android�е�AppWidget���Ž̳�
- android����Դ�ļ��ж�ȡ�ļ�������ʾ�ķ���
- Android ������Ļ����ת����תIntent Bundle
- Androidʵ�������б��ĵ����������һ�������ܡ���demoԴ�����ء�
- Androidͨ��Ӧ�ó�����ݷ�ʽ�ķ���
- Androidʵ�����İ�ƴ������
- Android ViewPager�������ֵ���ҳ(��̬����)
- ʹ��AndroidStudio�ϴ������ļ���SVN Server�Ľ���취
- Android��XML��ʽ��̬���ɡ�����ҳ��ķ���
- android ������������Ч��ʵ��˼·
- Android����Ĭ���������ָ��Url�ķ���ʵ��
- Android����֮RelativeLayout��FrameLayout�÷�����
- Android��η�ֹapk��������(�����Ͷ��ɹ�)
- ReactiveCocoa����ʵ��֮-����˼��
- android WakeLockʹ�÷�������ʵ��
- ģ�����ŵ�����AndroidӦ���м۸�����������̶���Ч��
Androidʵ�ֶ�ȡ�������ᣩͼƬ�����м���
������˵һ��˼·����androidϵͳ�о��Դ���ͼƬ���е�Ӧ�ã����ԣ�����ֻ��Ҫ�����ǻ�ȡ������Ƭ����ͼƬ����Ӧ�ã��ٽ����кõ���Ƭ���ص������Լ��Ľ�����ʾ��ok��
�ڿ���һЩAPP�Ĺ����У����ǿ����漰��ͷ��Ĵ�����������ֻ���������ȡͷ���ó��Լ���Ҫ��ͷ�����û��ϴ�ͷ��ȡ�����һЩ��ص�����Ҳ�Ƕʤ��������ʵ��Ӧ������������ڸ������⣬û��һ�������Ľ�����������ڽ�����Ŀ�������о���һ�£�Ŀǰ������û��ʲô���⡣
��������ֻ���ۻ�ȡ�����������ã��ϴ����̸����Լ���ҵ���������ӡ�����һ������ͼ��
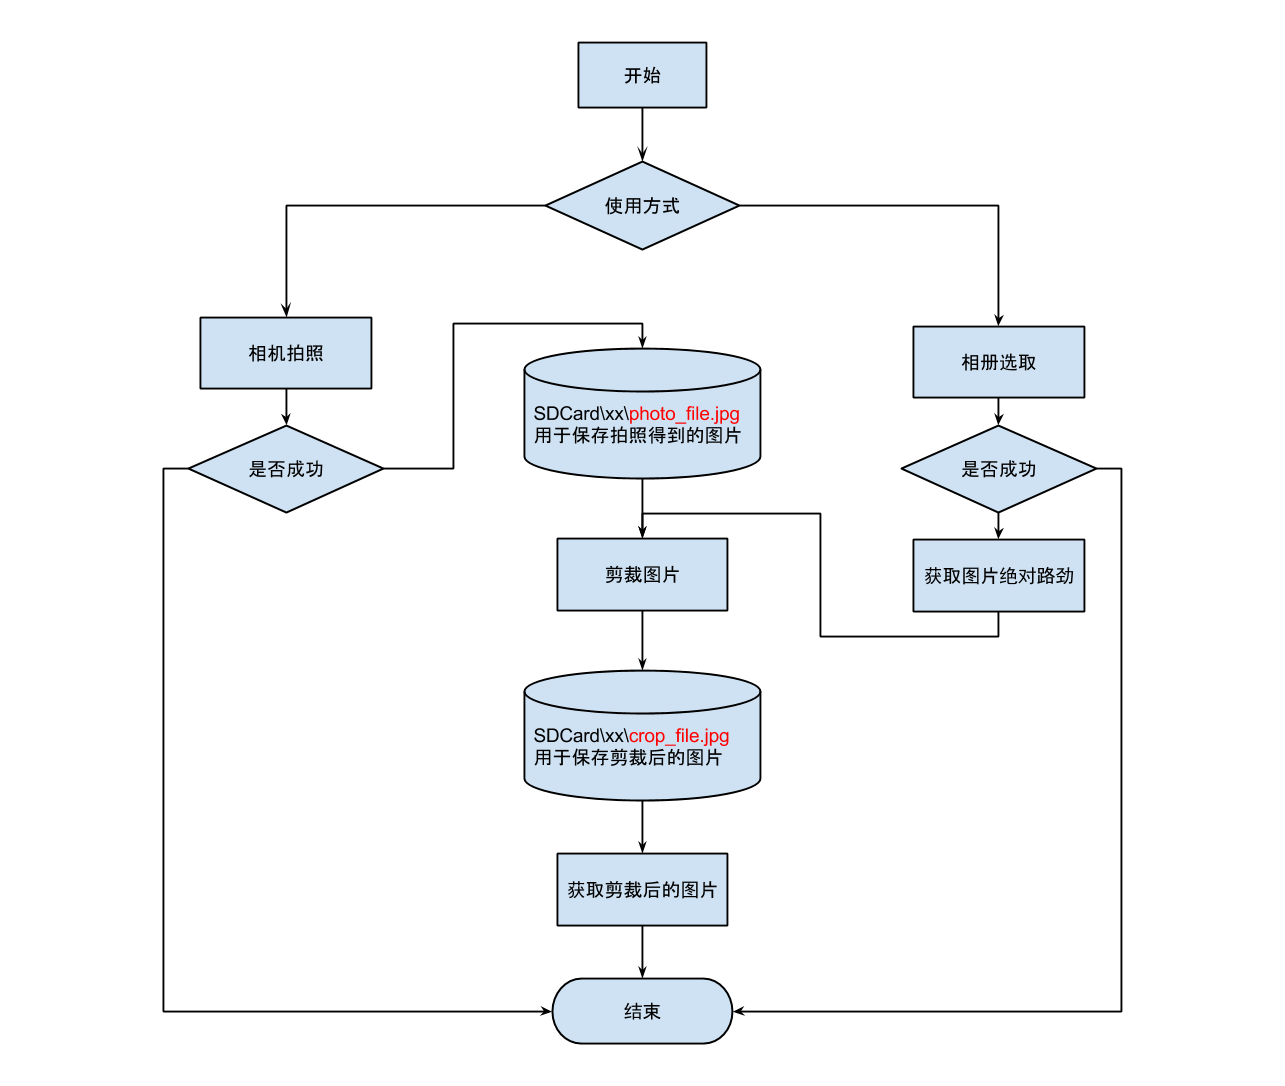
��ͼ����Google Drive�Ļ�ͼ�����Ƶģ����ò���̾Google�������߱༭�����������ǿ�ðɣ��Ҿ���Google���Բзۣ��ص����⣬��������Ƶ�˼·��������������ϸ������
1�����ͼƬ��;���Ǿ����֣���һ��������㣬�ڶ��Ǵӱ�������ȡ��
2������SD���ϴ�����һ���ļ��У�����������Uri��һ�������ڱ�������ʱ��õ�ԭʼͼƬ��һ���DZ�����ú��ͼƬ��֮ǰ�ҿ��ǹ���ͬһ��Uri������ͼƬ��������ʵ��������һ�����⣬�����պ��м��ã���ô�´δ�SD���õ��������ձ���Ĵ�ͼ��������ʧ��֮ǰ���õ�ͼƬ��������Ϊ���ش�ͼ�����ڴ���������ڴ˿��ǣ���ѡ��������Uri���ֱ𱣴�ͼƬ��
3���������ʱ������ʹ��Intent����ϵͳ�������������������õ�SDCard\xx\photo_file.jpg�������Ǵ���Ƭ�Σ�
//����ϵͳ��� Intent intentCamera = new Intent(MediaStore.ACTION_IMAGE_CAPTURE); //�����ս��������photo_file��Uri�У�������������� intentCamera.putExtra(MediaStore.EXTRA_OUTPUT, imagePhotoUri); startActivityForResult(intentCamera, PHOTO_REQUEST_CAREMA);
�ڻص�ʱ��������Ҫ��photo_file.jpg����ϵͳ���߽��м��ã�������������õ�SDCard\xx\crop_file.jpg�������Ǵ���Ƭ�Σ�
case PHOTO_REQUEST_CAREMA:
����if (resultCode == RESULT_OK) {
��������//��������㱣���Uri��ȡ��ͼƬ������ϵͳ���ù���
��������if (imagePhotoUri != null) {
������������CropUtils.cropImageUri(this, imagePhotoUri, imageUri, ibUserIcon.getWidth(), ibUserIcon.getHeight(), PHOTO_REQUEST_CUT);
��������} else {
������������ToastUtils.show(this, "û�еõ�����ͼƬ");
��������}
����} else if (resultCode == RESULT_CANCELED) {
��������ToastUtils.show(this, "ȡ������");
����} else {
��������ToastUtils.show(this, "����ʧ��");
����}
����break;
//����ϵͳ�ļ��ô���ͼƬ��������imageUri��
public static void cropImageUri(Activity activity, Uri orgUri, Uri desUri, int width, int height, int requestCode) {
����Intent intent = new Intent("com.android.camera.action.CROP");
����intent.setDataAndType(orgUri, "image/*");
����intent.putExtra("crop", "true");
����intent.putExtra("aspectX", 1);
����intent.putExtra("aspectY", 1);
����intent.putExtra("outputX", width);
����intent.putExtra("outputY", height);
����intent.putExtra("scale", true);
����//�����е�ͼƬ���浽Ŀ��Uri��
����intent.putExtra(MediaStore.EXTRA_OUTPUT, desUri);
����intent.putExtra("return-data", false);
����intent.putExtra("outputFormat", Bitmap.CompressFormat.JPEG.toString());
����intent.putExtra("noFaceDetection", true);
����activity.startActivityForResult(intent, requestCode);
}
���������Ҫ�ڻص���ȡ��crop_file.jpg����Ϊ����ʱ����ͼƬ�Ѿ�������ѹ��������Ҳ���õ����ڴ�����⣬���������ṩ������������һ����ֱ�ӻ�ȡԭʼͼƬ��Bitmap���ڶ����ǻ�ȡԭʼͼƬ������Բ�Σ����Ŵ�������˶Ժ��߱Ƚϸ���Ȥ�������������Ǵ���Ƭ�Σ�
case PHOTO_REQUEST_CUT:
����if (resultCode == RESULT_OK) {
����Bitmap bitmap = decodeUriiAsBimap(this,imageCropUri)
����} else if (resultCode == RESULT_CANCELED) {
��������ToastUtils.show(this, "ȡ������ͼƬ");
����} else {
��������ToastUtils.show(this, "����ʧ��");
����}
����break;
//��Uri�л�ȡBitmap��ʽ��ͼƬ
private static Bitmap decodeUriAsBitmap(Context context, Uri uri) {
����Bitmap bitmap;
����try {
��������bitmap = BitmapFactory.decodeStream(context.getContentResolver().openInputStream(uri));
����} catch (FileNotFoundException e) {
��������e.printStackTrace();
��������return null;
����}
����return bitmap;
}
//��ȡԲ��ͼƬ
public static Bitmap getRoundedCornerBitmap(Bitmap bitmap) {
����if (bitmap == null) {
����return null;
����}
����Bitmap output = Bitmap.createBitmap(bitmap.getWidth(), bitmap.getHeight(), Bitmap.Config.ARGB_8888);
����Canvas canvas = new Canvas(output);
����final Paint paint = new Paint();
����/* ȥ��� */
����paint.setAntiAlias(true);
����paint.setFilterBitmap(true);
����paint.setDither(true);
����// ��֤�Ƿ��Σ����Ҵ����Ļ�
����int width = bitmap.getWidth();
����int height = bitmap.getHeight();
����int w;
����int deltaX = 0;
����int deltaY = 0;
����if (width <= height) {
��������w = width;
��������deltaY = height - w;
����} else {
��������w = height;
��������deltaX = width - w;
����}
����final Rect rect = new Rect(deltaX, deltaY, w, w);
����final RectF rectF = new RectF(rect);
����paint.setAntiAlias(true);
����canvas.drawARGB(0, 0, 0, 0);
����// Բ�Σ�����ֻ��һ��
����int radius = (int) (Math.sqrt(w * w * 2.0d) / 2);
����canvas.drawRoundRect(rectF, radius, radius, paint);
����paint.setXfermode(new PorterDuffXfermode(PorterDuff.Mode.SRC_IN));
����canvas.drawBitmap(bitmap, rect, rect, paint);
����return output;
}
4������ȡʱ����Ҳ�����ѵĵط���Android 4.4���µİ汾��������ȡ��ͼƬUri�ܹ���������ϵͳ���ù��ߣ�����ֱ�Ӵ�ѡȡ����Ǵ������ͼƬ��Intent������Ч���dz�������������Android 4.4�������ϵİ汾����ȡ����Uri����������ϵͳ���ù��ߣ���ֱ�ӵ��³����������Ҳ���о��˺ܾã��ŷ������ߵ�Uri�кܴ������Google�ٷ��ĵ����ÿ�����ʹ��Intent.ACTION_GET_CONTENT������ǰ��Action�����Ҿ�������Ȼʹ����ǰ��Action�����᷵��һ�����͵�Uri���Ҹ��˲²�����ΪGoogle�����е����ݻ�ȡ��������һ��ͳһ��Uri�����в��ԣ���ָ������ͨ��һ�������ͱ�ü��ˣ��Ұ��������͵�Uri���·�װһ�Σ��õ���Ϊ"file:\\..."���ľ���·��������ϵͳ���ù����У���Ȼ�ɹ��ˣ�ֻ�������װ���̼�����ѣ������˺ܶ����ϣ����ڻ����õ��ˡ�����˵�¾��岽�裺
��һ������ϵͳ��ᣬ�����Ǵ���Ƭ�Σ�
//����ϵͳ���
����Intent photoPickerIntent = new Intent(Intent.ACTION_GET_CONTENT);
����photoPickerIntent.setType("image/*");
����startActivityForResult(photoPickerIntent, PHOTO_REQUEST_GALLERY);
�ڶ����ڻص��У����·�װUri��������ϵͳ���ù��߽�������õ�crop_file.jpg������ϵͳ���ù��ߴ��������ջ�ȡ�IJ������Ѿ�����������Ͳ��ظ����쳵���ˣ��ص������·�װUri�Ĵ��룬�����Ǵ���Ƭ�Σ�
case PHOTO_REQUEST_GALLERY:
����if (resultCode == RESULT_OK) {
��������//�����ѡȡ�ɹ�����Ҫ��Uri���ó�ͼƬ�ľ���·�����ٵ��ü���
��������Uri newUri = Uri.parse("file:///" + CropUtils.getPath(this, data.getData()));
��������if (newUri != null) {
������������CropUtils.cropImageUri(this, newUri, imageUri, ibUserIcon.getWidth(),
������������ibUserIcon.getHeight(), PHOTO_REQUEST_CUT);
��������} else {
������������ToastUtils.show(this, "û�еõ����ͼƬ");
��������}
����} else if (resultCode == RESULT_CANCELED) {
��������ToastUtils.show(this, "�����ѡȡȡ��");
����} else {
��������ToastUtils.show(this, "�����ѡȡʧ��");
����}
����break;
@SuppressLint("NewApi")
public static String getPath(final Context context, final Uri uri) {
final boolean isKitKat = Build.VERSION.SDK_INT >= Build.VERSION_CODES.KITKAT;
// DocumentProvider
if (isKitKat && DocumentsContract.isDocumentUri(context, uri)) {
����// ExternalStorageProvider
����if (isExternalStorageDocument(uri)) {
��������final String docId = DocumentsContract.getDocumentId(uri);
��������final String[] split = docId.split(":");
��������final String type = split[0];
��������if ("primary".equalsIgnoreCase(type)) {
������������return Environment.getExternalStorageDirectory() + "/"+ split[1];
��������}
����}
����// DownloadsProvider
����else if (isDownloadsDocument(uri)) {
��������final String id = DocumentsContract.getDocumentId(uri);
��������final Uri contentUri = ContentUris.withAppendedId(Uri.parse("content://downloads/public_downloads"),Long.valueOf(id));
��������return getDataColumn(context, contentUri, null, null);
����}
����// MediaProvider
����else if (isMediaDocument(uri)) {
��������final String docId = DocumentsContract.getDocumentId(uri);
��������final String[] split = docId.split(":");
��������final String type = split[0];
��������Uri contentUri = null;
��������if ("image".equals(type)) {
������������contentUri = MediaStore.Images.Media.EXTERNAL_CONTENT_URI;
��������} else if ("video".equals(type)) {
������������contentUri = MediaStore.Video.Media.EXTERNAL_CONTENT_URI;
��������} else if ("audio".equals(type)) {
������������contentUri = MediaStore.Audio.Media.EXTERNAL_CONTENT_URI;
��������}
��������final String selection = "_id=?";
��������final String[] selectionArgs = new String[]{split[1]};
��������return getDataColumn(context, contentUri, selection,selectionArgs);
��������}
����}
����// MediaStore (and general)
����else if ("content".equalsIgnoreCase(uri.getScheme())) {
��������return getDataColumn(context, uri, null, null);
����}
����// File
����else if ("file".equalsIgnoreCase(uri.getScheme())) {
��������return uri.getPath();
����}
����return null;
}
/**
* Get the value of the data column for this Uri. This is useful for
* MediaStore Uris, and other file-based ContentProviders.
*
* @param context The context.
* @param uri The Uri to query.
* @param selection (Optional) Filter used in the query.
* @param selectionArgs (Optional) Selection arguments used in the query.
* @return The value of the _data column, which is typically a file path.
*/
private static String getDataColumn(Context context, Uri uri,String selection, String[] selectionArgs) {
����Cursor cursor = null;
����final String column = "_data";
����final String[] projection = {column};
����try {
��������cursor = context.getContentResolver().query(uri, projection,selection, selectionArgs, null);
��������if (cursor != null && cursor.moveToFirst()) {
������������final int column_index = cursor.getColumnIndexOrThrow(column);
������������return cursor.getString(column_index);
��������}
����} finally {
��������if (cursor != null)
������������cursor.close();
����}
����return null;
}
/**
* @param uri The Uri to check.
* @return Whether the Uri authority is ExternalStorageProvider.
*/
private static boolean isExternalStorageDocument(Uri uri) {
����return "com.android.externalstorage.documents".equals(uri.getAuthority());
}
/**
* @param uri The Uri to check.
* @return Whether the Uri authority is DownloadsProvider.
*/
private static boolean isDownloadsDocument(Uri uri) {
����return "com.android.providers.downloads.documents".equals(uri.getAuthority());
}
/**
* @param uri The Uri to check.
* @return Whether the Uri authority is MediaProvider.
*/
private static boolean isMediaDocument(Uri uri) {
����return "com.android.providers.media.documents".equals(uri.getAuthority());
}
������ϵͳ���ù��ߵ��ø����ջ�ȡ����һ�£���μ��ϵĴ��롣
5�����в�����ɣ���Nexus 5�豸�е�����ϵͳ�в���ͨ������С�ס����ǵ�һЩ�豸�б���Ҳ�����������������豸�ϴ���ȱ�ݣ�һ��Ҫ�������ҷ�����лл��
���½�β����һ�����ѵ�����ʾ���������Һܶ�IJο�
package com.only.android.app;
import java.io.File;
import android.app.Activity;
import android.app.AlertDialog;
import android.content.DialogInterface;
import android.content.Intent;
import android.graphics.Bitmap;
import android.graphics.BitmapFactory;
import android.net.Uri;
import android.os.Bundle;
import android.os.SystemClock;
import android.provider.MediaStore;
import android.view.View;
import android.widget.Button;
import android.widget.ImageView;
import com.only.android.R;
public class CopyOfImageScaleActivity extends Activity implements View.OnClickListener {
/** Called when the activity is first created. */
private Button selectImageBtn;
private ImageView imageView;
private File sdcardTempFile;
private AlertDialog dialog;
private int crop = 180;
@Override
public void onCreate(Bundle savedInstanceState) {
super.onCreate(savedInstanceState);
setContentView(R.layout.imagescale);
selectImageBtn = (Button) findViewById(R.id.selectImageBtn);
imageView = (ImageView) findViewById(R.id.imageView);
selectImageBtn.setOnClickListener(this);
sdcardTempFile = new File("/mnt/sdcard/", "tmp_pic_" + SystemClock.currentThreadTimeMillis() + ".jpg");
}
@Override
public void onClick(View v) {
if (v == selectImageBtn) {
if (dialog == null) {
dialog = new AlertDialog.Builder(this).setItems(new String[] { "���", "���" }, new DialogInterface.OnClickListener() {
@Override
public void onClick(DialogInterface dialog, int which) {
if (which == 0) {
Intent intent = new Intent("android.media.action.IMAGE_CAPTURE");
intent.putExtra("output", Uri.fromFile(sdcardTempFile));
intent.putExtra("crop", "true");
intent.putExtra("aspectX", 1);// �ü������
intent.putExtra("aspectY", 1);
intent.putExtra("outputX", crop);// ���ͼƬ��С
intent.putExtra("outputY", crop);
startActivityForResult(intent, 101);
} else {
Intent intent = new Intent("android.intent.action.PICK");
intent.setDataAndType(MediaStore.Images.Media.INTERNAL_CONTENT_URI, "image/*");
intent.putExtra("output", Uri.fromFile(sdcardTempFile));
intent.putExtra("crop", "true");
intent.putExtra("aspectX", 1);// �ü������
intent.putExtra("aspectY", 1);
intent.putExtra("outputX", crop);// ���ͼƬ��С
intent.putExtra("outputY", crop);
startActivityForResult(intent, 100);
}
}
}).create();
}
if (!dialog.isShowing()) {
dialog.show();
}
}
}
@Override
protected void onActivityResult(int requestCode, int resultCode, Intent intent) {
if (resultCode == RESULT_OK) {
Bitmap bmp = BitmapFactory.decodeFile(sdcardTempFile.getAbsolutePath());
imageView.setImageBitmap(bmp);
}
}
}
����ن���һ�䣬������Ȼ�Ѿ�ʵ���ˣ�����ʵ�ʴ��뻹�ǿ��Խ�һ���Ż��ģ�����Ȥ��ͯЬ�ǿ��ԸĽ��¡�
- ��һƪ���£� androidʵ�ֻ�ȡ���ߺ�����Ip��ַ�ķ���
- ��һƪ���£� Android����߳����� ���������֣����£�
- jarsigner����ǩ��apk����װ�Ľ������
- Android��̻���Ч��֮Gallery��ͼ�����
- Android�����̳�֮��ʶAndroid App
- Android�ͻ�����������_5��������ģ�����ϸ
- Android����֮�㲥����dz��
- Androidʵ���������������� �����б�spinne
- Android�б��������ߵĻ��Ʒ���ʾ������