
- Android中通过MediaStore获取音乐文件信息方法
- listview改变选中行的字体颜色实例介绍
- Android编程实现手绘及保存为图片的方法(附demo源码下载)
- Android RecyclerView实现下拉刷新和上拉加载
- android textview 显示html方法解析
- 安卓新漏洞影响95%的设备 攻击力恐怖
- Android实现整理PackageManager获取所有安装程序信息
- Android颜色编辑器的制作中遇到的问题分析
- Android顶栏定时推送消息
- Android中引用其他程序的文本资源超简单方法
- android开发教程之view组件添加边框示例
- android Textview文字监控(Textview使用方法)
- Android编程实现Home键的屏蔽,捕获与修改方法
- 基于Android XML解析与保存的实现
- Android拦截外拨电话程序示例
- Android Bitmap和Drawable相互转换的简单代码
- Android 和 windows C/C++/QT通讯时字节存储
- Android开发笔记之Android中数据的存储方式(一)
- android TextView不用ScrollViewe也可以滚动的方法
- Android中使用GridLayout网格布局来制作简单的计算器App
- 详解Android中处理崩溃异常
- Android中断线程的处理方法
- Android图片压缩上传之基础篇
- 自定义TextView跑马灯效果可控制启动/停止/速度/焦点
- Android编程之图片颜色处理方法
- Android下拉刷新上拉加载更多左滑动删除
- 自定义Adapter并通过布局泵LayoutInflater抓取layout模板编辑每一个item实现思路
- Android实现文字和图片混排(文字环绕图片)效果
- Android Activity生命周期详解
- Android编程中ViewPage判断左右滑动方向的方法
Android系统联系人全特效实现(上)分组导航和挤压动画(附源码)
作者:佚名 Android开发编辑:admin 更新时间:2022-07-23
记得在我刚接触Android的时候对系统联系人中的特效很感兴趣,它会根据手机中联系人姓氏的首字母进行分组,并在界面的最顶端始终显示一个当前的分组。如下图所示:
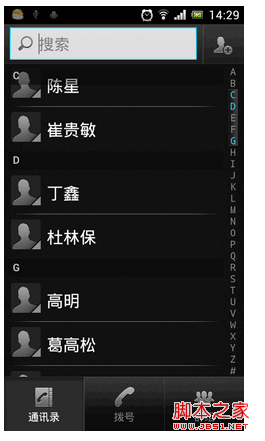
最让我感兴趣的是,当后一个分组和前一个分组相碰时,会产生一个上顶的挤压动画。那个时候我思考了各种方法想去实现这种特效,可是限于功夫不到家,都未能成功。如今两年多过去了,自己也成长了很多,再回头去想想这个功能,突然发现已经有了思路,于是立刻记录下来与大家分享。
首先讲一下需要提前了解的知识点,这里我们最需要用到的就是SectionIndexer,它能够有效地帮助我们对分组进行控制。由于SectionIndexer是一个接口,你可以自定义一个子类来实现SectionIndexer,不过自己再写一个SectionIndexer的实现太麻烦了,这里我们直接使用Android提供好的实现AlphabetIndexer,用它来实现联系人分组功能已经足够了。
AlphabetIndexer的构造函数需要传入三个参数,第一个参数是cursor,第二个参数是sortedColumnIndex整型,第三个参数是alphabet字符串。其中cursor就是把我们从数据库中查出的游标传进去,sortedColumnIndex就是指明我们是使用哪一列进行排序的,而alphabet则是指定字母表排序规则,比如:"ABCDEFGHIJKLMNOPQRSTUVWXYZ"。有了AlphabetIndexer,我们就可以通过它的getPositionForSection和getSectionForPosition方法,找出当前位置所在的分组,和当前分组所在的位置,从而实现类似于系统联系人的分组导航和挤压动画效果,关于AlphabetIndexer更详细的详解,请参考官方文档。
那么我们应该怎样对联系人进行排序呢?前面也提到过,有一个sortedColumnIndex参数,这个sortedColumn到底在哪里呢?我们来看一下系统联系人的raw_contacts这张表(/data/data/com.android.providers.contacts/databases/contacts2.db),这个表结构比较复杂,里面有二十多个列,其中有一列名叫sort_key,这就是我们要找的了!如下图所示:
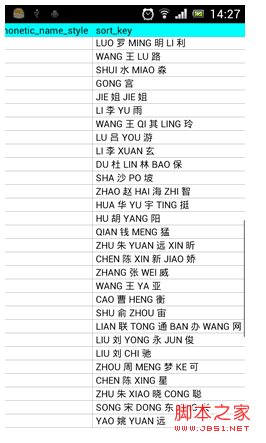
可以看到,这一列非常人性化地帮我们记录了汉字所对应的拼音,这样我们就可以通过这一列的值轻松为联系人进行排序了。
下面我们就来开始实现,新建一个Android项目,命名为ContactsDemo。首先我们还是先来完成布局文件,打开或新建activity_main.xml作为程序的主布局文件,在里面加入如下代码:
复制代码 代码如下:
<RelativeLayout xmlns:android="http://schemas.android.com/apk/res/android"
xmlns:tools="http://schemas.android.com/tools"
android:layout_width="match_parent"
android:layout_height="match_parent"
android:orientation="vertical" >
<ListView
android:id="@+id/contacts_list_view"
android:layout_width="fill_parent"
android:layout_height="wrap_content"
android:layout_alignParentTop="true"
android:fadingEdge="none" >
</ListView>
<LinearLayout
android:id="@+id/title_layout"
android:layout_width="fill_parent"
android:layout_height="18dip"
android:layout_alignParentTop="true"
android:background="#303030" >
<TextView
android:id="@+id/title"
android:layout_width="wrap_content"
android:layout_height="wrap_content"
android:layout_gravity="center_horizontal"
android:layout_marginLeft="10dip"
android:textColor="#ffffff"
android:textSize="13sp" />
</LinearLayout>
</RelativeLayout>
布局文件很简单,里面放入了一个ListView,用于展示联系人信息。另外还在头部放了一个LinearLayout,里面包含了一个TextView,它的作用是在界面头部始终显示一个当前分组。
然后新建一个contact_item.xml的布局,这个布局用于在ListView中的每一行进行填充,代码如下:
复制代码 代码如下:
<LinearLayout xmlns:android="http://schemas.android.com/apk/res/android"
android:layout_width="match_parent"
android:layout_height="match_parent"
android:orientation="vertical" >
<LinearLayout
android:id="@+id/sort_key_layout"
android:layout_width="fill_parent"
android:layout_height="18dip"
android:background="#303030" >
<TextView
android:id="@+id/sort_key"
android:layout_width="wrap_content"
android:layout_height="wrap_content"
android:layout_gravity="center_horizontal"
android:layout_marginLeft="10dip"
android:textColor="#ffffff"
android:textSize="13sp" />
</LinearLayout>
<LinearLayout
android:id="@+id/name_layout"
android:layout_width="fill_parent"
android:layout_height="50dip" >
<ImageView
android:layout_width="wrap_content"
android:layout_height="wrap_content"
android:layout_gravity="center_vertical"
android:layout_marginLeft="10dip"
android:layout_marginRight="10dip"
android:src="@drawable/icon" />
<TextView
android:id="@+id/name"
android:layout_width="wrap_content"
android:layout_height="wrap_content"
android:layout_gravity="center_vertical"
android:textColor="#ffffff"
android:textSize="22sp" />
</LinearLayout>
</LinearLayout>
在这个布局文件中,首先是放入了一个和前面完成一样的分组布局,因为不仅界面头部需要展示分组,在每个分组内的第一个无素之前都需要展示分组布局。然后是加入一个简单的LinearLayout,里面包含了一个ImageView用于显示联系人头像,还包含一个TextView用于显示联系人姓名。
这样我们的布局文件就全部写完了,下面开始来真正地实现功能。
先从简单的开始,新建一个Contact实体类:
复制代码 代码如下:
public class Contact {
/**
* 联系人姓名
*/
private String name;
/**
* 排序字母
*/
private String sortKey;
public String getName() {
return name;
}
public void setName(String name) {
this.name = name;
}
public String getSortKey() {
return sortKey;
}
public void setSortKey(String sortKey) {
this.sortKey = sortKey;
}
}
这个实体类很简单,只包含了联系人姓名和排序键。
接下来完成联系人列表适配器的编写,新建一个ContactAdapter类继承自ArrayAdapter,加入如下代码:
复制代码 代码如下:
public class ContactAdapter extends ArrayAdapter<Contact> {
/**
* 需要渲染的item布局文件
*/
private int resource;
/**
* 字母表分组工具
*/
private SectionIndexer mIndexer;
public ContactAdapter(Context context, int textViewResourceId, List<Contact> objects) {
super(context, textViewResourceId, objects);
resource = textViewResourceId;
}
@Override
public View getView(int position, View convertView, ViewGroup parent) {
Contact contact = getItem(position);
LinearLayout layout = null;
if (convertView == null) {
layout = (LinearLayout) LayoutInflater.from(getContext()).inflate(resource, null);
} else {
layout = (LinearLayout) convertView;
}
TextView name = (TextView) layout.findViewById(R.id.name);
LinearLayout sortKeyLayout = (LinearLayout) layout.findViewById(R.id.sort_key_layout);
TextView sortKey = (TextView) layout.findViewById(R.id.sort_key);
name.setText(contact.getName());
int section = mIndexer.getSectionForPosition(position);
if (position == mIndexer.getPositionForSection(section)) {
sortKey.setText(contact.getSortKey());
sortKeyLayout.setVisibility(View.VISIBLE);
} else {
sortKeyLayout.setVisibility(View.GONE);
}
return layout;
}
/**
* 给当前适配器传入一个分组工具。
*
* @param indexer
*/
public void setIndexer(SectionIndexer indexer) {
mIndexer = indexer;
}
}
上面的代码中,最重要的就是getView方法,在这个方法中,我们使用SectionIndexer的getSectionForPosition方法,通过当前的position值拿到了对应的section值,然后再反向通过刚刚拿到的section值,调用getPositionForSection方法,取回新的position值。如果当前的position值和新的position值是相等的,那么我们就可以认为当前position的项是某个分组下的第一个元素,我们应该将分组布局显示出来,而其它的情况就应该将分组布局隐藏。
最后我们来编写程序的主界面,打开或新建MainActivity作为程序的主界面,代码如下所示:
复制代码 代码如下:
public class MainActivity extends Activity {
/**
* 分组的布局
*/
private LinearLayout titleLayout;
/**
* 分组上显示的字母
*/
private TextView title;
/**
* 联系人ListView
*/
private ListView contactsListView;
/**
* 联系人列表适配器
*/
private ContactAdapter adapter;
/**
* 用于进行字母表分组
*/
private AlphabetIndexer indexer;
/**
* 存储所有手机中的联系人
*/
private List<Contact> contacts = new ArrayList<Contact>();
/**
* 定义字母表的排序规则
*/
private String alphabet = "#ABCDEFGHIJKLMNOPQRSTUVWXYZ";
/**
* 上次第一个可见元素,用于滚动时记录标识。
*/
private int lastFirstVisibleItem = -1;
@Override
protected void onCreate(Bundle savedInstanceState) {
super.onCreate(savedInstanceState);
setContentView(R.layout.activity_main);
adapter = new ContactAdapter(this, R.layout.contact_item, contacts);
titleLayout = (LinearLayout) findViewById(R.id.title_layout);
title = (TextView) findViewById(R.id.title);
contactsListView = (ListView) findViewById(R.id.contacts_list_view);
Uri uri = ContactsContract.CommonDataKinds.Phone.CONTENT_URI;
Cursor cursor = getContentResolver().query(uri,
new String[] { "display_name", "sort_key" }, null, null, "sort_key");
if (cursor.moveToFirst()) {
do {
String name = cursor.getString(0);
String sortKey = getSortKey(cursor.getString(1));
Contact contact = new Contact();
contact.setName(name);
contact.setSortKey(sortKey);
contacts.add(contact);
} while (cursor.moveToNext());
}
startManagingCursor(cursor);
indexer = new AlphabetIndexer(cursor, 1, alphabet);
adapter.setIndexer(indexer);
if (contacts.size() > 0) {
setupContactsListView();
}
}
/**
* 为联系人ListView设置监听事件,根据当前的滑动状态来改变分组的显示位置,从而实现挤压动画的效果。
*/
private void setupContactsListView() {
contactsListView.setAdapter(adapter);
contactsListView.setOnScrollListener(new OnScrollListener() {
@Override
public void onScrollStateChanged(AbsListView view, int scrollState) {
}
@Override
public void onScroll(AbsListView view, int firstVisibleItem, int visibleItemCount,
int totalItemCount) {
int section = indexer.getSectionForPosition(firstVisibleItem);
int nextSecPosition = indexer.getPositionForSection(section + 1);
if (firstVisibleItem != lastFirstVisibleItem) {
MarginLayoutParams params = (MarginLayoutParams) titleLayout.getLayoutParams();
params.topMargin = 0;
titleLayout.setLayoutParams(params);
title.setText(String.valueOf(alphabet.charAt(section)));
}
if (nextSecPosition == firstVisibleItem + 1) {
View childView = view.getChildAt(0);
if (childView != null) {
int titleHeight = titleLayout.getHeight();
int bottom = childView.getBottom();
MarginLayoutParams params = (MarginLayoutParams) titleLayout
.getLayoutParams();
if (bottom < titleHeight) {
float pushedDistance = bottom - titleHeight;
params.topMargin = (int) pushedDistance;
titleLayout.setLayoutParams(params);
} else {
if (params.topMargin != 0) {
params.topMargin = 0;
titleLayout.setLayoutParams(params);
}
}
}
}
lastFirstVisibleItem = firstVisibleItem;
}
});
}
/**
* 获取sort key的首个字符,如果是英文字母就直接返回,否则返回#。
*
* @param sortKeyString
* 数据库中读取出的sort key
* @return 英文字母或者#
*/
private String getSortKey(String sortKeyString) {
String key = sortKeyString.substring(0, 1).toUpperCase();
if (key.matches("[A-Z]")) {
return key;
}
return "#";
}
}
可以看到,在onCreate方法中,我们从系统联系人数据库中去查询联系人的姓名和排序键,之后将查询返回的cursor直接传入AlphabetIndexer作为第一个参数。由于我们一共就查了两列,排序键在第二列,所以我们第二个sortedColumnIndex参数传入1。第三个alphabet参数这里传入了"#ABCDEFGHIJKLMNOPQRSTUVWXYZ"字符串,因为可能有些联系人的姓名不在字母表范围内,我们统一用#来表示这部分联系人。
然后我们在setupContactsListView方法中监听了ListView的滚动,在onScroll方法中通过getSectionForPosition方法获取第一个可见元素的分组值,然后给该分组值加1,再通过getPositionForSection方法或者到下一个分组中的第一个元素,如果下个分组的第一个元素值等于第一个可见元素的值加1,那就说明下个分组的布局要和界面顶部分组布局相碰了。之后再通过ListView的getChildAt(0)方法,获取到界面上显示的第一个子View,再用view.getBottom获取底部距离父窗口的位置,对比分组布局的高度来对顶部分组布局进行纵向偏移,就可以实现挤压动画的效果了。
最后给出AndroidManifest.xml的代码,由于要读取手机联系人,因此需要加上android.permission.READ_CONTACTS的声明:
复制代码 代码如下:
<manifest xmlns:android="http://schemas.android.com/apk/res/android"
package="com.example.contactsdemo"
android:versionCode="1"
android:versionName="1.0" >
<uses-sdk
android:minSdkVersion="8"
android:targetSdkVersion="8" />
<uses-permission android:name="android.permission.READ_CONTACTS"></uses-permission>
<application
android:allowBackup="true"
android:icon="@drawable/ic_launcher"
android:label="@string/app_name"
android:theme="@android:style/Theme.NoTitleBar"
>
<activity
android:name="com.example.contactsdemo.MainActivity"
android:label="@string/app_name" >
<intent-filter>
<action android:name="android.intent.action.MAIN" />
<category android:name="android.intent.category.LAUNCHER" />
</intent-filter>
</activity>
</application>
</manifest>
现在我们来运行一下程序,效果如下图所示:

目前的话,分组导航和挤压动画效果都已经完成了,看起来感觉还是挺不错的,下一篇文章我会带领大家继续完善这个程序,加入字母表快速滚动功能。
好了,今天的讲解到此结束,有疑问的朋友请在下面留言。
源码下载,请点击这里
最让我感兴趣的是,当后一个分组和前一个分组相碰时,会产生一个上顶的挤压动画。那个时候我思考了各种方法想去实现这种特效,可是限于功夫不到家,都未能成功。如今两年多过去了,自己也成长了很多,再回头去想想这个功能,突然发现已经有了思路,于是立刻记录下来与大家分享。
首先讲一下需要提前了解的知识点,这里我们最需要用到的就是SectionIndexer,它能够有效地帮助我们对分组进行控制。由于SectionIndexer是一个接口,你可以自定义一个子类来实现SectionIndexer,不过自己再写一个SectionIndexer的实现太麻烦了,这里我们直接使用Android提供好的实现AlphabetIndexer,用它来实现联系人分组功能已经足够了。
AlphabetIndexer的构造函数需要传入三个参数,第一个参数是cursor,第二个参数是sortedColumnIndex整型,第三个参数是alphabet字符串。其中cursor就是把我们从数据库中查出的游标传进去,sortedColumnIndex就是指明我们是使用哪一列进行排序的,而alphabet则是指定字母表排序规则,比如:"ABCDEFGHIJKLMNOPQRSTUVWXYZ"。有了AlphabetIndexer,我们就可以通过它的getPositionForSection和getSectionForPosition方法,找出当前位置所在的分组,和当前分组所在的位置,从而实现类似于系统联系人的分组导航和挤压动画效果,关于AlphabetIndexer更详细的详解,请参考官方文档。
那么我们应该怎样对联系人进行排序呢?前面也提到过,有一个sortedColumnIndex参数,这个sortedColumn到底在哪里呢?我们来看一下系统联系人的raw_contacts这张表(/data/data/com.android.providers.contacts/databases/contacts2.db),这个表结构比较复杂,里面有二十多个列,其中有一列名叫sort_key,这就是我们要找的了!如下图所示:
可以看到,这一列非常人性化地帮我们记录了汉字所对应的拼音,这样我们就可以通过这一列的值轻松为联系人进行排序了。
下面我们就来开始实现,新建一个Android项目,命名为ContactsDemo。首先我们还是先来完成布局文件,打开或新建activity_main.xml作为程序的主布局文件,在里面加入如下代码:
复制代码 代码如下:
<RelativeLayout xmlns:android="http://schemas.android.com/apk/res/android"
xmlns:tools="http://schemas.android.com/tools"
android:layout_width="match_parent"
android:layout_height="match_parent"
android:orientation="vertical" >
<ListView
android:id="@+id/contacts_list_view"
android:layout_width="fill_parent"
android:layout_height="wrap_content"
android:layout_alignParentTop="true"
android:fadingEdge="none" >
</ListView>
<LinearLayout
android:id="@+id/title_layout"
android:layout_width="fill_parent"
android:layout_height="18dip"
android:layout_alignParentTop="true"
android:background="#303030" >
<TextView
android:id="@+id/title"
android:layout_width="wrap_content"
android:layout_height="wrap_content"
android:layout_gravity="center_horizontal"
android:layout_marginLeft="10dip"
android:textColor="#ffffff"
android:textSize="13sp" />
</LinearLayout>
</RelativeLayout>
布局文件很简单,里面放入了一个ListView,用于展示联系人信息。另外还在头部放了一个LinearLayout,里面包含了一个TextView,它的作用是在界面头部始终显示一个当前分组。
然后新建一个contact_item.xml的布局,这个布局用于在ListView中的每一行进行填充,代码如下:
复制代码 代码如下:
<LinearLayout xmlns:android="http://schemas.android.com/apk/res/android"
android:layout_width="match_parent"
android:layout_height="match_parent"
android:orientation="vertical" >
<LinearLayout
android:id="@+id/sort_key_layout"
android:layout_width="fill_parent"
android:layout_height="18dip"
android:background="#303030" >
<TextView
android:id="@+id/sort_key"
android:layout_width="wrap_content"
android:layout_height="wrap_content"
android:layout_gravity="center_horizontal"
android:layout_marginLeft="10dip"
android:textColor="#ffffff"
android:textSize="13sp" />
</LinearLayout>
<LinearLayout
android:id="@+id/name_layout"
android:layout_width="fill_parent"
android:layout_height="50dip" >
<ImageView
android:layout_width="wrap_content"
android:layout_height="wrap_content"
android:layout_gravity="center_vertical"
android:layout_marginLeft="10dip"
android:layout_marginRight="10dip"
android:src="@drawable/icon" />
<TextView
android:id="@+id/name"
android:layout_width="wrap_content"
android:layout_height="wrap_content"
android:layout_gravity="center_vertical"
android:textColor="#ffffff"
android:textSize="22sp" />
</LinearLayout>
</LinearLayout>
在这个布局文件中,首先是放入了一个和前面完成一样的分组布局,因为不仅界面头部需要展示分组,在每个分组内的第一个无素之前都需要展示分组布局。然后是加入一个简单的LinearLayout,里面包含了一个ImageView用于显示联系人头像,还包含一个TextView用于显示联系人姓名。
这样我们的布局文件就全部写完了,下面开始来真正地实现功能。
先从简单的开始,新建一个Contact实体类:
复制代码 代码如下:
public class Contact {
/**
* 联系人姓名
*/
private String name;
/**
* 排序字母
*/
private String sortKey;
public String getName() {
return name;
}
public void setName(String name) {
this.name = name;
}
public String getSortKey() {
return sortKey;
}
public void setSortKey(String sortKey) {
this.sortKey = sortKey;
}
}
这个实体类很简单,只包含了联系人姓名和排序键。
接下来完成联系人列表适配器的编写,新建一个ContactAdapter类继承自ArrayAdapter,加入如下代码:
复制代码 代码如下:
public class ContactAdapter extends ArrayAdapter<Contact> {
/**
* 需要渲染的item布局文件
*/
private int resource;
/**
* 字母表分组工具
*/
private SectionIndexer mIndexer;
public ContactAdapter(Context context, int textViewResourceId, List<Contact> objects) {
super(context, textViewResourceId, objects);
resource = textViewResourceId;
}
@Override
public View getView(int position, View convertView, ViewGroup parent) {
Contact contact = getItem(position);
LinearLayout layout = null;
if (convertView == null) {
layout = (LinearLayout) LayoutInflater.from(getContext()).inflate(resource, null);
} else {
layout = (LinearLayout) convertView;
}
TextView name = (TextView) layout.findViewById(R.id.name);
LinearLayout sortKeyLayout = (LinearLayout) layout.findViewById(R.id.sort_key_layout);
TextView sortKey = (TextView) layout.findViewById(R.id.sort_key);
name.setText(contact.getName());
int section = mIndexer.getSectionForPosition(position);
if (position == mIndexer.getPositionForSection(section)) {
sortKey.setText(contact.getSortKey());
sortKeyLayout.setVisibility(View.VISIBLE);
} else {
sortKeyLayout.setVisibility(View.GONE);
}
return layout;
}
/**
* 给当前适配器传入一个分组工具。
*
* @param indexer
*/
public void setIndexer(SectionIndexer indexer) {
mIndexer = indexer;
}
}
上面的代码中,最重要的就是getView方法,在这个方法中,我们使用SectionIndexer的getSectionForPosition方法,通过当前的position值拿到了对应的section值,然后再反向通过刚刚拿到的section值,调用getPositionForSection方法,取回新的position值。如果当前的position值和新的position值是相等的,那么我们就可以认为当前position的项是某个分组下的第一个元素,我们应该将分组布局显示出来,而其它的情况就应该将分组布局隐藏。
最后我们来编写程序的主界面,打开或新建MainActivity作为程序的主界面,代码如下所示:
复制代码 代码如下:
public class MainActivity extends Activity {
/**
* 分组的布局
*/
private LinearLayout titleLayout;
/**
* 分组上显示的字母
*/
private TextView title;
/**
* 联系人ListView
*/
private ListView contactsListView;
/**
* 联系人列表适配器
*/
private ContactAdapter adapter;
/**
* 用于进行字母表分组
*/
private AlphabetIndexer indexer;
/**
* 存储所有手机中的联系人
*/
private List<Contact> contacts = new ArrayList<Contact>();
/**
* 定义字母表的排序规则
*/
private String alphabet = "#ABCDEFGHIJKLMNOPQRSTUVWXYZ";
/**
* 上次第一个可见元素,用于滚动时记录标识。
*/
private int lastFirstVisibleItem = -1;
@Override
protected void onCreate(Bundle savedInstanceState) {
super.onCreate(savedInstanceState);
setContentView(R.layout.activity_main);
adapter = new ContactAdapter(this, R.layout.contact_item, contacts);
titleLayout = (LinearLayout) findViewById(R.id.title_layout);
title = (TextView) findViewById(R.id.title);
contactsListView = (ListView) findViewById(R.id.contacts_list_view);
Uri uri = ContactsContract.CommonDataKinds.Phone.CONTENT_URI;
Cursor cursor = getContentResolver().query(uri,
new String[] { "display_name", "sort_key" }, null, null, "sort_key");
if (cursor.moveToFirst()) {
do {
String name = cursor.getString(0);
String sortKey = getSortKey(cursor.getString(1));
Contact contact = new Contact();
contact.setName(name);
contact.setSortKey(sortKey);
contacts.add(contact);
} while (cursor.moveToNext());
}
startManagingCursor(cursor);
indexer = new AlphabetIndexer(cursor, 1, alphabet);
adapter.setIndexer(indexer);
if (contacts.size() > 0) {
setupContactsListView();
}
}
/**
* 为联系人ListView设置监听事件,根据当前的滑动状态来改变分组的显示位置,从而实现挤压动画的效果。
*/
private void setupContactsListView() {
contactsListView.setAdapter(adapter);
contactsListView.setOnScrollListener(new OnScrollListener() {
@Override
public void onScrollStateChanged(AbsListView view, int scrollState) {
}
@Override
public void onScroll(AbsListView view, int firstVisibleItem, int visibleItemCount,
int totalItemCount) {
int section = indexer.getSectionForPosition(firstVisibleItem);
int nextSecPosition = indexer.getPositionForSection(section + 1);
if (firstVisibleItem != lastFirstVisibleItem) {
MarginLayoutParams params = (MarginLayoutParams) titleLayout.getLayoutParams();
params.topMargin = 0;
titleLayout.setLayoutParams(params);
title.setText(String.valueOf(alphabet.charAt(section)));
}
if (nextSecPosition == firstVisibleItem + 1) {
View childView = view.getChildAt(0);
if (childView != null) {
int titleHeight = titleLayout.getHeight();
int bottom = childView.getBottom();
MarginLayoutParams params = (MarginLayoutParams) titleLayout
.getLayoutParams();
if (bottom < titleHeight) {
float pushedDistance = bottom - titleHeight;
params.topMargin = (int) pushedDistance;
titleLayout.setLayoutParams(params);
} else {
if (params.topMargin != 0) {
params.topMargin = 0;
titleLayout.setLayoutParams(params);
}
}
}
}
lastFirstVisibleItem = firstVisibleItem;
}
});
}
/**
* 获取sort key的首个字符,如果是英文字母就直接返回,否则返回#。
*
* @param sortKeyString
* 数据库中读取出的sort key
* @return 英文字母或者#
*/
private String getSortKey(String sortKeyString) {
String key = sortKeyString.substring(0, 1).toUpperCase();
if (key.matches("[A-Z]")) {
return key;
}
return "#";
}
}
可以看到,在onCreate方法中,我们从系统联系人数据库中去查询联系人的姓名和排序键,之后将查询返回的cursor直接传入AlphabetIndexer作为第一个参数。由于我们一共就查了两列,排序键在第二列,所以我们第二个sortedColumnIndex参数传入1。第三个alphabet参数这里传入了"#ABCDEFGHIJKLMNOPQRSTUVWXYZ"字符串,因为可能有些联系人的姓名不在字母表范围内,我们统一用#来表示这部分联系人。
然后我们在setupContactsListView方法中监听了ListView的滚动,在onScroll方法中通过getSectionForPosition方法获取第一个可见元素的分组值,然后给该分组值加1,再通过getPositionForSection方法或者到下一个分组中的第一个元素,如果下个分组的第一个元素值等于第一个可见元素的值加1,那就说明下个分组的布局要和界面顶部分组布局相碰了。之后再通过ListView的getChildAt(0)方法,获取到界面上显示的第一个子View,再用view.getBottom获取底部距离父窗口的位置,对比分组布局的高度来对顶部分组布局进行纵向偏移,就可以实现挤压动画的效果了。
最后给出AndroidManifest.xml的代码,由于要读取手机联系人,因此需要加上android.permission.READ_CONTACTS的声明:
复制代码 代码如下:
<manifest xmlns:android="http://schemas.android.com/apk/res/android"
package="com.example.contactsdemo"
android:versionCode="1"
android:versionName="1.0" >
<uses-sdk
android:minSdkVersion="8"
android:targetSdkVersion="8" />
<uses-permission android:name="android.permission.READ_CONTACTS"></uses-permission>
<application
android:allowBackup="true"
android:icon="@drawable/ic_launcher"
android:label="@string/app_name"
android:theme="@android:style/Theme.NoTitleBar"
>
<activity
android:name="com.example.contactsdemo.MainActivity"
android:label="@string/app_name" >
<intent-filter>
<action android:name="android.intent.action.MAIN" />
<category android:name="android.intent.category.LAUNCHER" />
</intent-filter>
</activity>
</application>
</manifest>
现在我们来运行一下程序,效果如下图所示:
目前的话,分组导航和挤压动画效果都已经完成了,看起来感觉还是挺不错的,下一篇文章我会带领大家继续完善这个程序,加入字母表快速滚动功能。
好了,今天的讲解到此结束,有疑问的朋友请在下面留言。
源码下载,请点击这里
- 上一篇文章: android开机自启动原理与实现案例(附源码)
- 下一篇文章: Android模拟器对应的电脑快捷键说明
- Android系统中的蓝牙连接程序编写实例教程
- Android getSystemService用法实例总结
- [Android开发视频教程]02_05_appwidget的使
- Android 关于“NetworkOnMainThreadExcepti
- Android webview与js交换JSON对象数据示例
- Android中实现为TextView添加多个可点击的文
- Android开发中编写蓝牙相关功能的核心代码讲