
- iOS基础控件(下)
- iOS中的物理引擎
- property参数
- iOS菜鸟之苹果开发者账号的注册
- EffectiveObjective-C2.0之Note.04
- iOS开发--libxml/HTMLparser.hfilenotfound解决方法(libxml.dylib错误处理)
- IOS获取各种文件目录路径的方法
- IOS之网络数据下载和JSON解析
- 一步步教你上架iOSAPP
- Coredata第三课数据查询
- iOS阶段学习第二天笔记(数据类型与进制)
- 给iOS开发新手送点福利,简述UIDatePicker的用法
- .xcodeproj目录中各文件
- 关于swift的可选值(optional)
- IOSUi控件修改位置和尺寸,代码添加控件
- 代理协议消息单方传递机制
- 【Objective-C】OC中KVO的基本概念和使用方法
- 截取2个指定字符串中的字符串
- IOS预处理语句
- swift-通知的基本使用
- Web开发者和设计师必须要知道的iOS8十个变化
- IOS客户端接入微信支付
- 博主教你制作类似9patch效果的iOS图片拉伸
- Objective-C中NSNumber与NSDictionary的用法简介
- iosxmppFramework框架的导入步骤和介绍
- 仿面包旅行个人中心下拉顶部背景放大高斯模糊效果
- IOS开发之数据sqlite使用
- iOS开发系列--C语言之指针
- 黑苹果安装教程(一)
- 下拉框选择效果的实现原理
IOS实现选择城市后跳转Tabbar效果
作者:佚名 IOS开发编辑:admin 更新时间:2022-07-23
本文实例为大家分享了IOS选择城市后跳转Tabbar的具体实现代码,供大家参考,具体内容如下
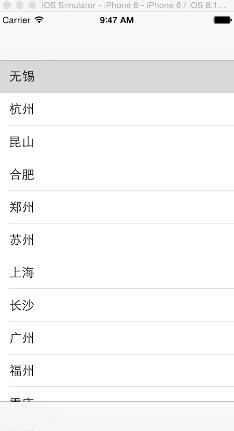
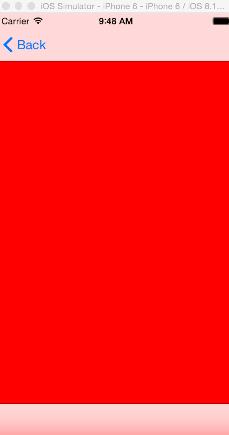
一、效果图
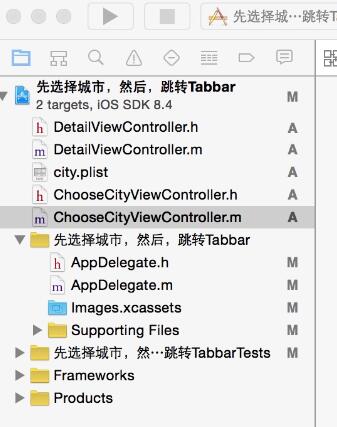
二、工程图
三、代码
ChooseCityViewController.h
#import <UIKit/UIKit.h>

@interface ChooseCityViewController : UIViewController
<UITableViewDelegate,UITableViewDataSource>
{
 NSMutableArray * dataArray;
 UITableView * mTableView;
}

@end
ChooseCityViewController.m
#import "ChooseCityViewController.h"
#import "DetailViewController.h"


@interface ChooseCityViewController ()

@end

@implementation ChooseCityViewController

- (id)initWithNibName:(NSString *)nibNameOrNil bundle:(NSBundle *)nibBundleOrNil
{
 self = [super initWithNibName:nibNameOrNil bundle:nibBundleOrNil];
 if (self) {
  // Custom initialization
 }
 return self;
}

- (void)viewDidLoad
{
 [super viewDidLoad];
 // Do any additional setup after loading the view.

 //读取plist文件
 [self readPlistFile];
 //初始化tableView
 [self initTableView];

}
#pragma -mark -functions

-(void)readPlistFile
{
 dataArray = [[NSMutableArray alloc] initWithCapacity:0];
 NSString * path = [[NSBundle mainBundle] pathForResource:@"city" ofType:@"plist"];

 NSDictionary * dict = [[NSDictionary alloc] initWithContentsOfFile:path];
 NSEnumerator * enumerator = [dict keyEnumerator];
 NSString * key;
 while (key = [enumerator nextObject]) {
  NSDictionary * t = [dict objectForKey:key];

  [dataArray addObject:t];
 }
 NSLog(@"%@",dataArray);
}

-(void)initTableView
{
 mTableView = [[UITableView alloc] initWithFrame:self.view.bounds style:UITableViewStylePlain];
 mTableView.delegate = self;
 mTableView.dataSource = self;
 mTableView.autoresizingMask = UIViewAutoresizingFlexibleHeight;
 [self.view addSubview:mTableView];

}
#pragma -UITableViewDelegate
-(NSInteger)tableView:(UITableView *)tableView numberOfRowsInSection:(NSInteger)section
{
 return [dataArray count];
}

-(UITableViewCell *)tableView:(UITableView *)tableView cellForRowAtIndexPath:(NSIndexPath *)indexPath
{
 static NSString * ID = @"cellID";
 UITableViewCell * cell = [tableView dequeueReusableCellWithIdentifier:ID];
 if (cell == nil)
 {
  cell = [[UITableViewCell alloc] initWithStyle:UITableViewCellStyleSubtitle reuseIdentifier:ID];
 }
 NSDictionary *dict = [dataArray objectAtIndex:indexPath.row];
 cell.textLabel.text = [dict objectForKey:@"city_name"];
 return cell;
}

-(void)tableView:(UITableView *)tableView didSelectRowAtIndexPath:(NSIndexPath *)indexPath
{
 NSDictionary * dict = [dataArray objectAtIndex:indexPath.row];
 //把所选择的城市保存到本地
 [[NSUserDefaults standardUserDefaults] setObject:[dict objectForKey:@"city_id"] forKey:@"city_id"];
 [[NSUserDefaults standardUserDefaults] setObject:[dict objectForKey:@"city_name"] forKey:@"city_name"];

 //跳转到另一个有tabbar的页面
 DetailViewController *detail=[[DetailViewController alloc]init];
 [self.navigationController pushViewController:detail animated:NO];
}

- (void)didReceiveMemoryWarning
{
 [super didReceiveMemoryWarning];
 // Dispose of any resources that can be recreated.
}
以上就是本文的全部内容,希望对大家的学习有所帮助,也希望大家多多支持脚本之家。
- 上一篇文章: iOS的CoreAnimation开发框架中的Layer层动画制作解析
- 下一篇文章: IOS代码笔记之下拉菜单效果
- IOS UI学习教程之使用UIImageView控件制作动
- ARC机制
- OpenGLES3.0之Shaderandprogram(七)
- iOS反射:把对象直接转化成NSDictionary
- CoreAnimation动画的使用:关键帧动画、基础
- iOSUITextField垂直居中
- 从零开始学ios开发(二十):ApplicationSe