
- 编译VLCforIOS
- iOSUI基础05
- newsstand杂志阅读应用源码ipad版
- iOS 解决UICollectionView 计算 Cell 大小的问题
- avalidprovisioningprofileforthisexecutablewasnotfound.
- IOS沙盒与清除缓存
- iOS菜鸟之苹果开发者账号的注册
- NSFileManager沙盒文件管理
- IOS开发文件路径
- Xcode6免证书真机调试
- IOS中WebView的使用
- iOSCocoaPods安装与使用好东西保存
- iOS-无处不在,详解iOS集成第三方登录(SSO授权登录<无需密码>)
- [技术翻译]构建现代化的Objective-C(上)
- IOSinfo.plist配置文件
- 多线程之NSOpertionQueue操作队列
- 利用CALayer动画实现渐变进度条
- 无比迅速敏捷地开发iOS超精美控件
- iOS整理笔记获取手机信息(UIDevice、NSBundle、NSLocale)
- 讯飞语音接口使用
- AFNetworking简单应用
- iOS开发日记15-强制弹出系统键盘(禁用搜狗键盘)
- strongvscopy
- iOS-iOS7的后台多任务(Multitasking)对比之前的异同、具体机制、变化
- Objective-C基础知识
- iOS开发之XML解析代码
- GPUImageAPI文档之GPUImageOutput类
- NSFileHandle&NSFileManager
- (高小德用车)高仿滴滴/快的应用源码
- iOS-Swift:如何使用iOS8中的UIAlertController
iOS中UIAlertView警告框组件的使用教程
1. 最简单的用法
初始化方法:
复制代码 代码如下:
- (instancetype)initWithTitle:(NSString *)title message:(NSString *)message delegate:(id /*<UIAlertViewDelegate>*/)delegate cancelButtonTitle:(NSString *)cancelButtonTitle otherButtonTitles:(NSString *)otherButtonTitles, ...;
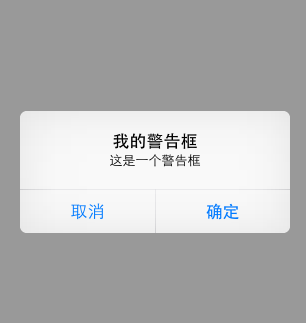
这个方法通过设置一个标题,内容,代理和一些按钮的标题创建警告框,代码示例如下:
UIAlertView * alert = [[UIAlertView alloc]initWithTitle:@"我的警告框" message:@"这是一个警告框" delegate:self cancelButtonTitle:@"取消" otherButtonTitles:@"确定", nil];
[alert show];
效果如下:
注意:如果按钮数超过两个,将会创建成如下样子:
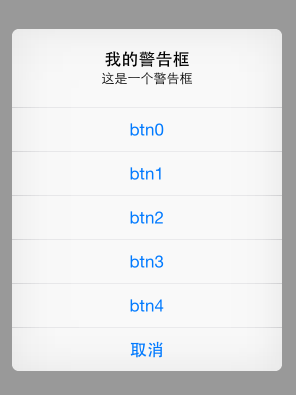
如果按钮数量超出屏幕显示范围,则会创建类似tableView的效果。
2. 为UIAlertView添加多个按钮
复制代码 代码如下:
UIAlertView*alert = [[UIAlertView alloc]initWithTitle:@"提示"
message:@"请选择一个按钮:"
delegate:nil
cancelButtonTitle:@"取消"
otherButtonTitles:@"按钮一", @"按钮二", @"按钮三",nil];
[alert show];
[alert release];
3. 如何判断用户点击的按钮
UIAlertView有一个委托(代理)UIAlertViewDelegate ,继承该委托来实现点击事件
头文件:
复制代码 代码如下:
@interface MyAlertViewViewController : UIViewController {
}
(void)alertView:(UIAlertView *)alertView clickedButtonAtIndex:(NSInteger)buttonIndex;
-(IBAction) buttonPressed;
@end
源文件:
复制代码 代码如下:
-(IBAction) buttonPressed
{
UIAlertView*alert = [[UIAlertView alloc]initWithTitle:@"提示"
message:@"请选择一个按钮:"
delegate:self
cancelButtonTitle:@"取消"
otherButtonTitles:@"按钮一", @"按钮二", @"按钮三",nil];
[alert show];
[alert release];
}
(void)alertView:(UIAlertView *)alertView clickedButtonAtIndex:(NSInteger)buttonIndex
{
NSString* msg = [[NSString alloc] initWithFormat:@"您按下的第%d个按钮!",buttonIndex];
UIAlertView* alert = [[UIAlertView alloc]initWithTitle:@"提示"
message:msg
delegate:nil
cancelButtonTitle:@"确定"
otherButtonTitles:nil];
[alert show];
[alert release];
[msg release];
}
点击“取消”,“按钮一”,“按钮二”,“按钮三”的索引buttonIndex分别是0,1,2,3
4. 手动的取消对话框
复制代码 代码如下:
[alertdismissWithClickedButtonIndex:0 animated:YES];
5. 为UIAlertView添加子视图
在为UIAlertView对象太添加子视图的过程中,有点是需要注意的地方,如果删除按钮,也就是取消UIAlerView视图中所有的按钮的时候,可能会导致整个显示结构失衡。按钮占用的空间不会消失,我们也可以理解为这些按钮没有真正的删除,仅仅是他不可见了而已。如果在UIAlertview对象中仅仅用来显示文本,那么,可以在消息的开头添加换行符(@"\n)有助于平衡按钮底部和顶部的空间。
下面的代码用来演示如何为UIAlertview对象添加子视图的方法。
复制代码 代码如下:
UIAlertView*alert = [[UIAlertView alloc]initWithTitle:@"请等待"
message:nil
delegate:nil
cancelButtonTitle:nil
otherButtonTitles:nil];
[alert show];
UIActivityIndicatorView*activeView = [[UIActivityIndicatorView alloc]initWithActivityIndicatorStyle:UIActivityIndicatorViewStyleWhiteLarge];
activeView.center = CGPointMake(alert.bounds.size.width/2.0f, alert.bounds.size.height-40.0f);
[activeView startAnimating];
[alert addSubview:activeView];
[activeView release];
[alert release];
6. 其他
UIAlertView默认情况下所有的text是居中对齐的。 那如果需要将文本向左对齐或者添加其他控件比如输入框时该怎么办呢? 不用担心, iPhone SDK还是很灵活的, 有很多delegate消息供调用程序使用。 所要做的就是在
复制代码 代码如下:
(void)willPresentAlertView:(UIAlertView *)alertView
中按照自己的需要修改或添加即可, 比如需要将消息文本左对齐,下面的代码即可实现:
复制代码 代码如下:
-(void) willPresentAlertView:(UIAlertView *)alertView
{
for( UIView * view in alertView.subviews )
{
if( [view isKindOfClass:[UILabel class]] )
{
UILabel* label = (UILabel*) view;
label.textAlignment=UITextAlignmentLeft;
}
}
}
这段代码很简单, 就是在消息框即将弹出时,遍历所有消息框对象,将其文本对齐属性修改为 UITextAlignmentLeft即可。
添加其他部件也如出一辙, 如下代码添加两个UITextField:
复制代码 代码如下:
-(void) willPresentAlertView:(UIAlertView *)alertView
{
CGRect frame = alertView.frame;
frame.origin.y -= 120;
frame.size.height += 80;
alertView.frame = frame;
for( UIView * viewin alertView.subviews )
{
if( ![viewisKindOfClass:[UILabelclass]] )
{
CGRect btnFrame = view.frame;
btnFrame.origin.y += 70;
view.frame = btnFrame;
}
}
UITextField* accoutName = [[UITextFieldalloc] init];
UITextField* accoutPassword = [[UITextFieldalloc] init];
accoutName.frame = CGRectMake( 10, frame.origin.y + 40,frame.size.width - 20, 30 );
accoutPassword.frame = CGRectMake( 10, frame.origin.y + 80,frame.size.width -20, 30 );
accoutName.placeholder = @"请输入账号";
accoutPassword.placeholder = @"请输入密码";
accoutPassword.secureTextEntry = YES;
[alertView addSubview:accoutPassword];
[alertView addSubview:accoutName];
[accoutName release];
[accoutPassword release];
}
显示将消息框固有的button和label移位, 不然添加的text field会将其遮盖住。 然后添加需要的部件到相应的位置即可。
对于UIActionSheet其实也是一样的, 在
复制代码 代码如下:
(void)willPresentActionSheet:(UIActionSheet *)actionSheet
中做同样的处理一样可以得到自己想要的界面。
- Objective-CObjectinitialization对象初始化
- iOS开发日记13-原生二维码的扫描和生成
- [iOSUI进阶-0]Quiartz2D
- iOS中使用UItableviewcell实现团购和微博界
- 详解iOS中UIButton的三大UIEdgeInsets属性用
- IOS中Json解析的四种方法
- [iOS]圆形进度条及计时功能