
�������ڵ�λ�ã� �������� >> �������� >> ��վ���� >> app�������� >> IOS���� >> ʵ������iOSӦ�ÿ�����ʹ��UITableView�����Զ������
- IOS���߳̿���֮�̵߳�״̬
- IOSUITableView�϶�������
- iOS-Apple����������Э��Bonjour��ʹ��?
- iOSBlock��ʹ��
- ������ͼ���
- iOSѧϰ֮UILable����ʾ��ͬ���������ɫ
- iOS App���ģʽ����֮������ģʽʹ�õ�ʵս����
- iOSXcode:linkercommandfailedwithexitcode1(use-vtoseeinvocation)��������
- XMPP-����չ����Ϣ�ͳ�ϯ��ϢЭ�飨������
- IOS�����
- iOS����ϵ��--��ͼ�붨λ
- ��OneNoteд���͵ķ���
- CoreAnimation-08-CATransition
- UIMenuController��Cell�ڲ�����ʾ�Ľ���취��iOS9.2��
- ios��������ƪ��������Objective-C�ļ������
- ɽկQQ���ֵIJ��֣��������ڰ�IOS6��UITableView�ı���
- IOS����--�ڶ���--�йص�Ԫ��IJ�����2���Զ��嵥Ԫ��
- iOS������������������
- ��ѧϰ�ʼǡ���C���ԡ�����
- �������ҵ�С���ա���ϷԴ��v1.0
- ��¼����Խ�����жϷ���
- runtimeʹ�ü���һ
- SwiftѧϰDay004
- iOS�����ռ�29-UIAlertController
- [iOS�����ؼ�-6.10.5]UIApplication
- C�Լ�Objective-C�����⽲�⣨�ϣ�
- IOSѧϰ�ʼ�----15/09/06
- ��ѧϰ�ʼǡ���C���ԡ�����ָ��ĺ���
- �ٲ���-01-�Զ��岼��ʵ��Ѥ�����ٲ���
- OpenGLES3.0֮Uniform���
ʵ������iOSӦ�ÿ�����ʹ��UITableView�����Զ������
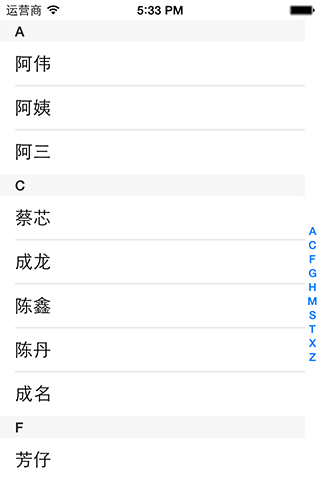
һ��������Ŀ¼�ı���ͼ
1.Ч��ͼ
2.����Դ
�����ȡͨѶ¼�е����֣���Ϊ����ģ�������Է��㣬��д�������ݣ�����Ҳֻд�˲�����ĸ����֮����ô����˼�ͳ�
���ƴ��� ��������:
@interface ViewController ()<UITableViewDataSource,UITableViewDelegate>
{
NSArray *sectionTitles; // ÿ�������ı���
NSArray *contentsArray; // ÿ�е�����
}
/** @brief ������Դ ��viewDidLoad�����е���*/
- (void)readySource
{
sectionTitles = [[NSArray alloc] initWithObjects:
@"A",@"C",@"F",@"G",@"H",@"M",@"S",@"T",@"X",@"Z", nil];
contentsArray = [[NSArray alloc] initWithObjects:
@[@"��ΰ",@"����",@"����"],
@[@"��о",@"����",@"����",@"�µ�",@"����"],
@[@"����",@"������",@"����ͬ",@"����",@"��ΰ"],
@[@"����",@"������",@"����",@"��ɽ��"],
@[@"���ɹ�",@"�ͫ|",@"�¸�",@"����"],
@[@"����",@"ë��ϯ"],
@[@"����ɽ",@"���",@"����"],
@[@"����",@"�Ա�",@"����"],
@[@"С��",@"����ޱ",@"��Ρ",@"����"],
@[@"�ܶ���",@"�ܽ���",@"�Ű�֥",@"�Ŵ���"],nil];
}
3.��ʾ����
���ƴ��� ��������:
// ÿ��������ҳü
-(NSString *)tableView:(UITableView *)tableView titleForHeaderInSection:(NSInteger)section
{
return [sectionTitles objectAtIndex:section];
}
// ����Ŀ¼
-(NSArray *)sectionIndexTitlesForTableView:(UITableView *)tableView
{
return sectionTitles;
}
�ܵ����������ת������ķ���
// ���Ŀ¼
-(NSInteger)tableView:(UITableView *)tableView sectionForSectionIndexTitle:(NSString *)title atIndex:(NSInteger)index
{
// ��ȡ����Ŀ¼��Ӧ��indexPathֵ
NSIndexPath *selectIndexPath = [NSIndexPath indexPathForRow:0 inSection:index];
// ��table��������Ӧ��indexPathλ��
[tableView scrollToRowAtIndexPath:selectIndexPath atScrollPosition:UITableViewScrollPositionBottom animated:YES];
return index;
}
�������Խ����б�ǵı���ͼ
1.Ч��ͼ

2.��cellForRow�����У���Cell��accessoryType����ΪNone
���ƴ��� ��������:
// �����丨����ʽ
cell.accessoryType = UITableViewCellAccessoryNone;
3.��didSelectRow������
���ƴ��� ��������:
// ������¼�
-(void)tableView:(UITableView *)tableView didSelectRowAtIndexPath:(NSIndexPath *)indexPath
{
// ��ȡ����е�cell
UITableViewCell *cell = [tableView cellForRowAtIndexPath:indexPath];
// ���cell�Ѿ������
if (cell.accessoryType == UITableViewCellAccessoryCheckmark) {
// ȡ�����
cell.accessoryType = UITableViewCellAccessoryNone;
}
// ���cell��
else{
// ���cell
cell.accessoryType = UITableViewCellAccessoryCheckmark;
}
// ȡ��ѡ��Ч��
[tableView deselectRowAtIndexPath:indexPath animated:YES];
}
��ʱ������м���ѡ�У�ȡ��ѡ�У����ǹ���һ����ͼ�ɣ���ᷢ������ijЩδ���������Ҳ�Ѿ�������ˣ�������Ϊcell�����û�����ɵģ��ڵ�һƪ�����о�����������ᵽ��
4.���cell�������⣬��cellForRow�����У�����cellIdetifierʱ������ÿһ�ж�����Ϊ��ͬ��ֵ���Ͳ�����ָ��ǣ��ظ��������ˣ������������̫���ֱ�����������õĽ���취���鼱֮�¿������ã�Ȼ������������Table�ϵ�����
���ƴ��� ��������:
NSString *cellIdentifier = [NSString stringWithFormat:@"cellIdentifier%d%d",indexPath.row,indexPath.section];
�������Ʊ���ͼ��ÿһ������
1.������һ�������������ſͻ��˵������б���table������ͼ����Ч��ͼ������ͼ��


2.����Դ����interface������
���ƴ��� ��������:
NSMutableArray *news_MArray;// ������������Դ
�½�һ��model�࣬����Ϊ"newsModel"�����ÿһ������
newsModel.h���£�.m��û�������������룬�����Ҫ��������������copyWithZone������
#import <Foundation/Foundation.h>
typedef NS_ENUM(NSInteger, NEWSReportType){
NEWSReportOrdinary, // ��ͨ����
NEWSReportExclusive,// ��������
NEWSReportSpecial, // ר������
};
@interface newsModel : NSObject
@property (nonatomic, copy)NSString * news_image; //ͼƬ
@property (nonatomic, copy)NSString * news_title; //����
@property (nonatomic, copy)NSString * news_summary; //ժҪ
@property (nonatomic, assign)NSInteger news_replyNo; //��������
@property (nonatomic, assign)NEWSReportType reportType; //��������
@end
��viewDidLoad������
���ƴ��� ��������:
news_MArray = [[NSMutableArray alloc] init];
for(NSInteger index =0; index<10; index++){
newsModel *model = [[newsModel alloc] init];
model.news_image = [NSString stringWithFormat:@"%d.jpg",index+1];
model.news_title = @"�����¹�֮�����̻�";
model.news_summary = @"������Ϧ�������� ����ô���ȥ���� Ҫ��ô���ȥ����";
model.news_replyNo = index+196;
model.reportType = index%3;
[news_MArray addObject:model];
}
3.����
���ƴ��� ��������:
// ÿ����������
-(NSInteger)tableView:(UITableView *)tableView numberOfRowsInSection:(NSInteger)section
{
return [news_MArray count];
}
4.�Զ���cell�Ͽؼ�
��cellForRow������if(cell==nil)ǰ
���ƴ��� ��������:
/*****�Զ���cell******/
newsModel *model = [news_MArray objectAtIndex:indexPath.row];
UIImageView * image_view; //1.����imageView
UILabel * title_label; //2.���ӱ���Label
UILabel * summary_label; //3.����ժҪLabel
UILabel * replyNo_label; //4.���Ӹ�������Label
UIButton * extra_view; //5.����ר����߶��ұ��������б��
/********************/
��if(cell==nil)��
���ƴ��� ��������:
/*****�Զ���cell******/
//1.����imageView
CGRect imageViewF = CGRectMake(5, 5, 85, 65);
image_view = [[UIImageView alloc] initWithFrame:imageViewF];
[cell addSubview:image_view];
//2.���ӱ���Label
CGRect titleLabelF = CGRectMake(95, 5, 230, 24);
title_label = [[UILabel alloc] initWithFrame:titleLabelF];
title_label.font = [UIFont systemFontOfSize:16];//�����С
[cell addSubview:title_label];
//3.����ժҪLabel
CGRect summaryLabelF = CGRectMake(97, 27, 210, 40);
summary_label = [[UILabel alloc] initWithFrame:summaryLabelF];
summary_label.font = [UIFont systemFontOfSize:12]; // �����С
summary_label.textColor = [UIColor darkGrayColor]; // ������ɫ
summary_label.numberOfLines = 2;
[cell addSubview:summary_label];
//4.��������Label
CGRect replyNoLabelF = CGRectMake(210, 45, 95, 24);
replyNo_label = [[UILabel alloc] initWithFrame:replyNoLabelF];
replyNo_label.font = [UIFont systemFontOfSize:12]; // �����С
replyNo_label.textColor = [UIColor darkGrayColor]; // ������ɫ
replyNo_label.textAlignment = NSTextAlignmentRight; // �����Ҷ���
//5.ר��extraView
CGRect extraViewF = CGRectMake(270, 50, 28, 14);
extra_view = [[UIButton alloc] initWithFrame:extraViewF];
extra_view.titleLabel.font = [UIFont boldSystemFontOfSize:10];
[extra_view setTitleColor:[UIColor whiteColor] forState:UIControlStateNormal];
// ��ͨ���ţ�ֻ���Ӹ�������
if (model.reportType==NEWSReportOrdinary) {
[cell addSubview:replyNo_label];
}
// ר�����ţ�����ר���־�������Ӹ�������
else if(model.reportType == NEWSReportSpecial){
// ���ñ���ɫ
extra_view.backgroundColor = [UIColor colorWithRed:120.0/255.0 green:170.0/255.0 blue:245.0/255.0 alpha:1.0];
[extra_view setTitle:@"����" forState:UIControlStateNormal];// ����
[cell addSubview:extra_view]; // ����
replyNo_label.frame = CGRectMake(170, 45, 95, 24); // �ı��������Label������
[cell addSubview:replyNo_label]; // ���Ӹ�������Label
}
// �������ţ�ֻ���Ӷ��ұ�־
else if(model.reportType == NEWSReportExclusive){
extra_view.backgroundColor = [UIColor redColor]; // ���ñ�����ɫ
[extra_view setTitle:@"ר��" forState:UIControlStateNormal]; // ���ñ���
[cell addSubview:extra_view]; // ���ӵ�cell
}
/********************/
��if(cell==nil)��
���ƴ��� ��������:
/*****�Զ���cell******/
[image_view setImage:[UIImage imageNamed:model.news_image]];// ����ͼƬ
title_label.text = model.news_title; // ����
summary_label.text = model.news_summary; // ��������
replyNo_label.text = [NSString stringWithFormat:@"%d ����",model.news_replyNo];// ���ø�������
/********************/
5.�����и�
���ƴ��� ��������:
-(CGFloat) tableView:(UITableView *)tableView heightForRowAtIndexPath:(NSIndexPath *)indexPath
{
return 75;
}
- ��һƪ���£� ʵ������iOS app��������Ƶ�ļ����Ź�����ķ�װ
- ��һƪ���£� iOS�ŵ�������¼ʵ��
- �ٲ���-03-ͨ����װ���Զ��岼�ֿ���ʵ����
- ����XMPPЭ��ļ�ʱͨ��
- Xcode6��Xcode5��ȡapp���ּ����ʻ��IJ�ͬ
- [iOS�����ؼ�-6.10]Notification֪ͨ����
- ��ҵ��֤����APP��������װ������������
- ���UIScrollView�ĵ���¼�
- [iOS���߳�&����-2.5]-С�ļ��ϴ�