
・您现在的位置: 云翼网络 >> 文章中心 >> 网站建设 >> 网站建设开发 >> ASP.NET网站开发 >> 1.创建一个EF实体数据模型
- ASP.NET截取网页注释行之间的内容
- 一般应用场景
- ASP.NET -自定义 TreeView Web 服务器控件的外观
- asp.net中用sqlclient访问数据库出错解决办法
- C#中的文件操作
- 禁止Asp.NetWebService的Test页面功能
- 选择列表控件的使用(PickList)
- Fluent Validation For .NET
- 开源Launcher-Wox出炉了
- 使用ASP.NET Web Api构建基于REST风格的服务实战系列教程【二】――使用Repository模式构建数据库访问层
- Easyui登陆页面制作
- ASP.NETHTTP模拟提交通用类GETPOST
- 【ASP.NET 进阶】PDF文件在线预览(类似百度文库)
- 基于WebForm+EasyUI的业务管理系统形成之旅 -- 系统设置(Ⅰ)
- 在Ubuntu下搭建ASP.NET5开发环境
- .NET条形码
- ASP.NET实现在线人员实时显示
- 如何在ASP.NET环境中建立基于WML的站点
- ASP.NET 2.0 中实现跨页提交
- exchange邮箱系统增加验证码机制
- ASP.NET模拟指定帐号权限, 删除非本机图片文件
- ASP.NET Session的七点认识
- C#图片按比例缩放
- ASP.NET - FileUpload Web 服务器控件概述(下)
- 如何在.NET中访问MySQL数据库
- 巧用枚举类型,实现项目的多语言切换
- 在ASP.NET中创建安全的web站点(配置)
- asp.net三种页面跳转方法
- ASP.NET追捕休整版
- 调试.NET程序OutOfMemoryException(转载)
1.创建一个EF实体数据模型
1.创建一个EF实体数据模型
1.The Contoso University sample web application demonstrates how to create asp.net MVC 5 applications using the Entity Framework 6 and Visual Studio 2013. This tutorial uses the Code First workflow. For information about how to choose between Code First, Database First, and Model First, seeEntity Framework Development Workflows.(这个网站的例子,向我们展示了,怎样使用EF6和VS2013来创建ASP.NET MVC5应用程序。这个系列的课程使用了Code First工作流。要了解怎么在Code First,Database First 和Model First之间进行选择,请看链接这篇文章。)
2.The sample application is a web site for a fictional Contoso University. It includes functionality such as student admission, course creation, and instructor assignments. This tutorial series explains how to build the Contoso University sample application. You candownload the completed application.
(这个示例程序是为Contoso University虚构的一个网站。网站的功能包含:招生模块,课程的创建模块,布置作业模块,这个系列的课程将带你创建这个网站,你可以通过这个链接下载完整的网站源代码。)
3.课程中用到的软件环境:
- Visual Studio 2013
- .NET 4.5
- Entity Framework 6 (EntityFramework 6.1.0 NuGet package)
- Windows Azure SDK 2.2(可选)
The Contoso University Web Application
The application you'll be building in these tutorials is a simple university web site.(在这个系列课程中,你将要创建的是一个大学的简单web网站)
Users can view and update student, course, and instructor information. Here are a few of the screens you'll create.(你可以浏览,更新学生、课程信息,和老师信息,这里的一些页面,将是你将来要创建的。)


The UI style of this site has been kept close to what's generated by the built-in templates, so that the tutorial can focus mainly on how to use the Entity Framework.(这个网站的界面样式,使用的是默认提供的模板样式,所以这个课程将会把主要的精力放在,怎样去使用EF上面。PS:后面我会自己使用EasyUI和Bootstrap自己把界面美化一下。)
Create an MVC Web Application
Open Visual Studio and create a new C# Web PRoject named "ContosoUniversity".(打开VS,创建一个新的web项目,取名为ContosoUniversity)
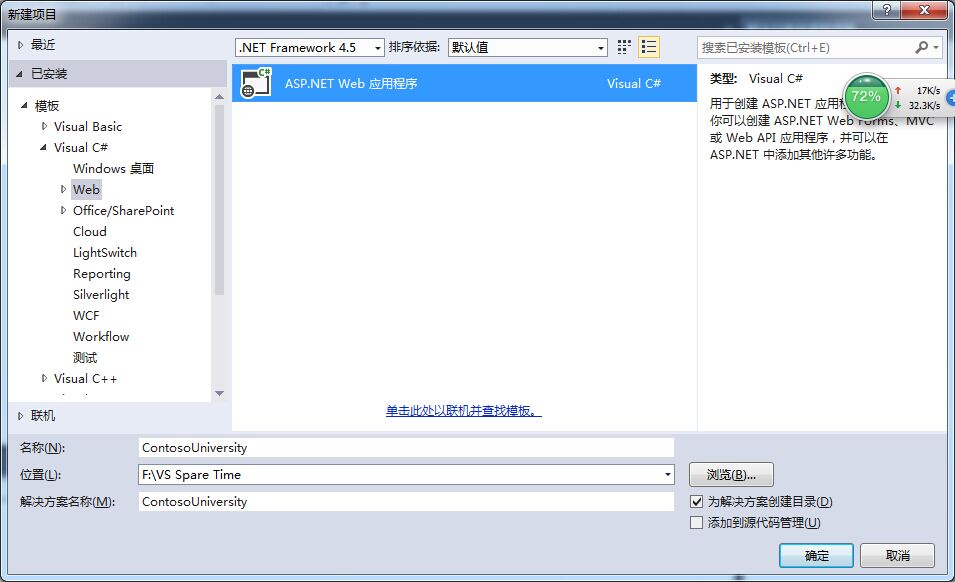
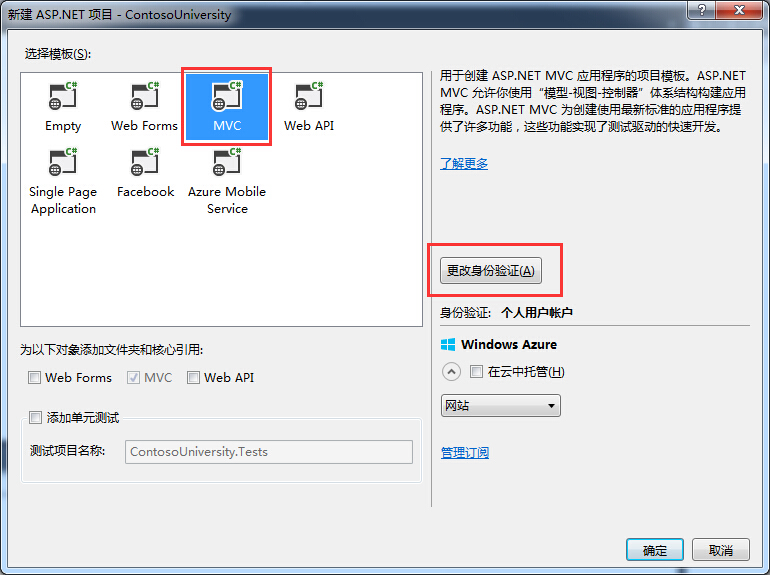
In theNew ASP.NET Projectdialog box select theMVCtemplate. (在新的ASP.NET项目中,选择MVC模板)
If theHost in the cloudcheck box in theMicrosoft Azuresection is selected, clear it.(如果在云中托管被选中了,请取消勾选)
ClickChange Authentication.(点击更改身份验证)
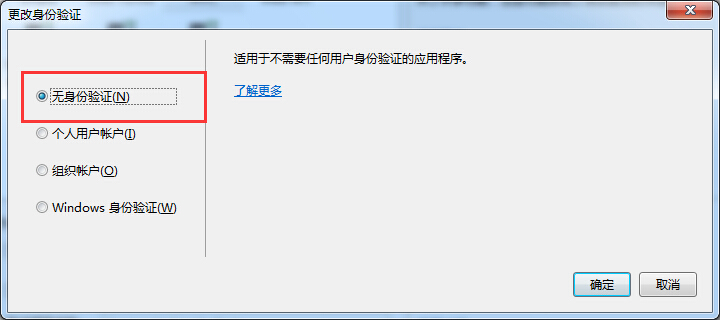
In theChange Authenticationdialog box, selectNo Authentication, and then clickOK. For this tutorial you won't be requiring users to log on or restricting access based on who's logged on.(在更改身份验证的对话框中,选择无身份验证,然后点击确定。这个系列的课程,你不会被要求,需要让用户来登录,或者限制用户登录)
Back in the New ASP.NET Project dialog box, clickOKto create the project. (返回到新建ASP.NET项目的界面,点击确定,创建新项目)
Set Up the Site Style(设置站点的样式)
A few simple changes will set up the site menu, layout, and home page.(我们会对菜单,样式,和主页做一些细微的改变)
OpenViews\Shared\_Layout.cshtml, and make the following changes:(打开Views\Shared\_Layout.cshtml文件,做如下改变)
- Change each occurrence of "My ASP.NET Application" and "Application name" to "Contoso University".(把每个”My ASP.NET Application“和“Application name”改成“Contoso University”)PS:这里可以随便改,你想取什么名字都行,我取武汉大学。
- Add menu entries for Students, Courses, Instructors, and Departments, and delete the Contact entry.(为学生,课程,老师,部门添加菜单选项链接,并且删除联系方式链接)
The changes are highlighted.(这些改变都做了高亮显示:)
1 <!DOCTYPE html> 2 <html> 3 <head> 4 <meta http-equiv="Content-Type" content="text/html; charset=utf-8"/> 5 <meta charset="utf-8" /> 6 <meta name="viewport" content="width=device-width, initial-scale=1.0"> 7 <title>@ViewBag.Title - WuHan University</title> 8 @Styles.Render("~/Content/CSS") 9 @Scripts.Render("~/bundles/modernizr")10 </head>11 <body>12 <div class="navbar navbar-inverse navbar-fixed-top">13 <div class="container">14 <div class="navbar-header">15 <button type="button" class="navbar-toggle" data-toggle="collapse" data-target=".navbar-collapse">16 <span class="icon-bar"></span>17 <span class="icon-bar"></span>18 <span class="icon-bar"></span>19 </button>20 @Html.ActionLink("Wuhan University", "Index", "Home", new { area = "" }, new { @class = "navbar-brand" })21 </div>22 <div class="navbar-collapse collapse">23 <ul class="nav navbar-nav">24 <li>@Html.ActionLink("主页", "Index", "Home")</li>25 <li>@Html.ActionLink("关于", "About", "Home")</li>26 <li>@Html.ActionLink("学生", "Index", "Student")</li>27 <li>@Html.ActionLink("课程", "Index", "Course")</li>28 <li>@Html.ActionLink("教师", "Index", "Instructor")</li>29 <li>@Html.ActionLink("部门", "Index", "Department")</li>30 </ul>31 </div>32 </div>33 </div>34 <div class="container body-content">35 @RenderBody()36 <hr />37 <footer>38 <p>© @DateTime.Now.Year - Wuhan University</p>39 </footer>40 </div>41 42 @Scripts.Render("~/bundles/jquery")43 @Scripts.Render("~/bundles/bootstrap")44 @RenderSection("scripts", required: false)45 </body>46 </html>InViews\Home\Index.cshtml, replace the contents of the file with the following code to replace the text about ASP.NET and MVC with text about this application:(在Views\Home\Index.cshtml中,用下面的代码,来代替它)
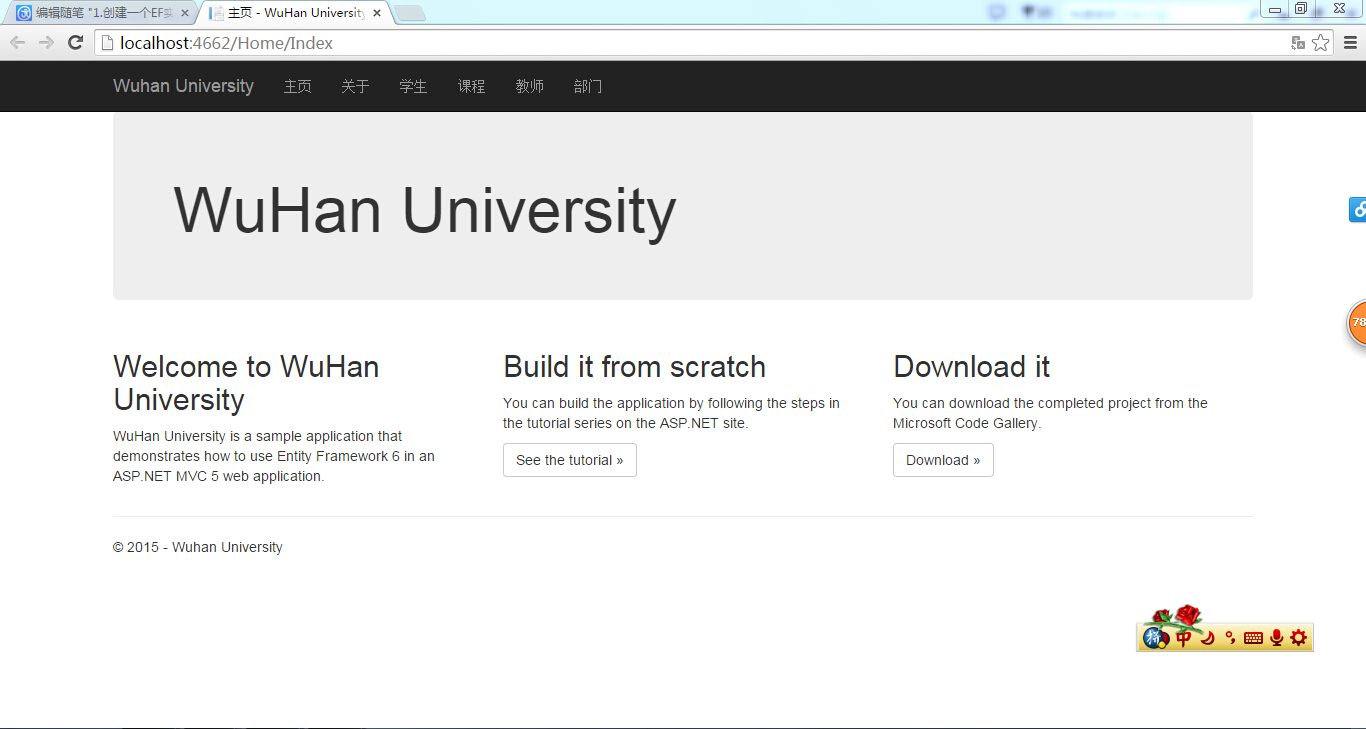
1 @{ 2 ViewBag.Title = "主页"; 3 } 4 5 <div class="jumbotron"> 6 <h1>WuHan University</h1> 7 </div> 8 <div class="row"> 9 <div class="col-md-4">10 <h2>Welcome to WuHan University</h2>11 <p>12 WuHan University is a sample application that13 demonstrates how to use Entity Framework 6 in an14 ASP.NET MVC 5 web application.15 </p>16 </div>17 <div class="col-md-4">18 <h2>Build it from scratch</h2>19 <p>You can build the application by following the steps in the tutorial series on the ASP.NET site.</p>20 <p><a class="btn btn-default" href="http://www.asp.net/mvc/tutorials/getting-started-with-ef-using-mvc/">See the tutorial »</a></p>21 </div>22 <div class="col-md-4">23 <h2>Download it</h2>24 <p>You can download the completed project from the Microsoft Code Gallery.</p>25 <p><a class="btn btn-default" href="http://code.msdn.microsoft.com/ASPNET-MVC-Application-b01a9fe8">Download »</a></p>26 </div>27 </div>Press CTRL+F5 to run the site. You see the home page with the main menu.(按一下CTRL+F5,来运行项目,你可以看到:)
Install Entity Framework 6(安装EF6)
From theToolsmenu clickNuGet Package Managerand then clickPackage Manager Console.(点击工具-->NuGet程序包管理器--->程序包管理器控制台)
In thePackage Manager Consolewindow enter the following command:(在程序包管理器控制台窗口里,输入下面的指令:)
Install-Package EntityFramework
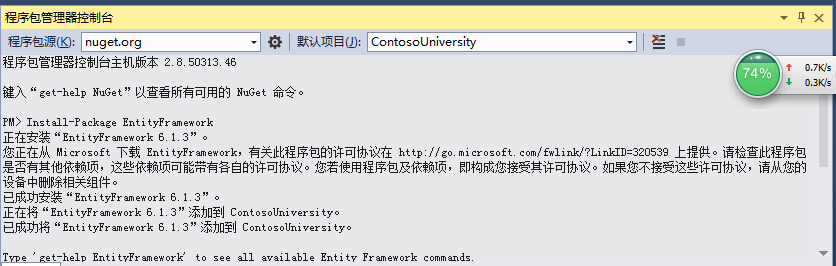
The image shows 6.0.0 being installed, but NuGet will install the latest version of Enti
- 上一篇文章: ASP.NET常见命名空间及其功能描述
- 下一篇文章: fullcalendar .net版本
- 文件上传~Uploadify上传控件
- 那些可以在数据库里做的事:分页与过滤
- cache应用(asp.net2.0SQL数据缓存依赖[Sql
- 数据采集类
- 解读ASP.NET 5 & MVC6系列(17):MVC中
- 基于WebForm+EasyUI的业务管理系统形成之旅
- ASP.NET中文乱码解决方案四则