
- Android仿今日头条滑动页面导航效果
- android从资源文件中读取文件流并显示的方法
- 怎样删除android的gallery中的图片实例说明
- Android AsyncTask完全解析 带你从源码的角度彻底理解
- Android实现退出时关闭所有Activity的方法
- Android内容提供者ContentProvider用法实例分析
- Android 判断是否有外网连接
- Android编程之SharedPreferences文件存储操作实例分析
- Android拍照上传功能示例代码
- Android模拟器实现手机添加文件到sd卡的方法
- Android实现从网络获取图片显示并保存到SD卡的方法
- android网络编程之android连接网络的简单示例代码
- android中intent传递list或者对象的方法
- Android 底部导航控件实例代码
- android教程viewpager自动循环和手动循环
- Android使用Handler和Message更新UI
- 深入Android开发FAQ的详解
- Android开发小技巧篇之集合
- Andriod arcgis保存Mapview为图片的实例代码
- Android利用ViewPager实现滑动广告板实例源码
- Android调用堆栈跟踪实例分析
- 小心!Listview结合EditText使用实例中遇到的那些坑
- Android实现TextView两端对齐的方法
- Android编程之TextView的字符过滤功能分析
- Android拦截外拨电话程序示例
- android 浏览器之多窗口方案详解
- Android自定义dialog简单实现方法
- Android 5.0彩蛋:机器人版Flappy Bird
- Android SharedPreferences的使用分析
- Android编程四大组件之BroadcastReceiver(广播接收者)用法实例
Android自定义View实现随机验证码
作者:佚名 Android开发编辑:admin 更新时间:2022-07-23
对于android开发来说自定义View还是一个比较重要的技能,所以在这里写一篇自定义View入门的文章,也是实现一个相对简单的随机产生验证码的功能:
自定义View主要也就分为几步
1.自定义View的属性
2.在我们的自定义的布局中获取自定义属性
3.重写onMesure方法
4.重写onDraw方法
好现在我们就一步一步的来,首先创建我们的View属性
在valuse目录下创建一个attrs.xml的文件,然后:
<?xml version="1.0" encoding="utf-8"?>
<resources>
 <attr name="textColor" format="color"/>
 <attr name="textContent" format="string"/>
 <attr name="textSize" format="dimension"/>

 <declare-styleable name="VerificationCodeView">
 <attr name="textContent" />
 <attr name="textColor" />
 <attr name="textSize" />
 </declare-styleable>
</resources>
我们总共定义了三个属性,一个是颜色,内容,大小
然后我们去建立我们的自定义类
public class VerificationCodeView extends View {
 /**
 * 文本
 */
 private String mTitleText;
 /**
 * 文本的颜色
 */
 private int mTextColor;
 /**
 * 文本的大小
 */
 private int mTextSize;

 /**
 * 绘制时控制文本绘制的范围
 */
 private Rect mBound;
 /**
 * 初始化画笔
 */
 private Paint mTextPaint;
 private Paint mPointPaint;
 private Paint mPathPaint;
 /**
 * 干扰点坐标的集合
 */
 private ArrayList<PointF> mPoints = new ArrayList<PointF>();
 /**
 * 绘制贝塞尔曲线的路径集合
 */
 private ArrayList<Path> mPaths = new ArrayList<Path>();

 public VerificationCodeView(Context context) {
 this(context, null);
 }

 public VerificationCodeView(Context context, AttributeSet attributeSet) {
 this(context, attributeSet, 0);
 }

 public VerificationCodeView(Context context, AttributeSet attributeSet, int defStyle) {
 super(context, attributeSet, defStyle);
 TypedArray typedArray = context.getTheme().obtainStyledAttributes(attributeSet, R.styleable.VerificationCodeView, defStyle, 0);
 int size = typedArray.getIndexCount();
 for (int i = 0; i < size; i++) {
  int content = typedArray.getIndex(i);
  switch (content) {
  case R.styleable.VerificationCodeView_textContent:
   mTitleText = typedArray.getString(content);
   break;
  case R.styleable.VerificationCodeView_textColor:
   mTextColor = typedArray.getColor(content, Color.BLACK);
   break;
  case R.styleable.VerificationCodeView_textSize:
   // 默认设置为16sp,TypeValue也可以把sp转化为px
   mTextSize = typedArray.getDimensionPixelSize(content, (int) TypedValue.applyDimension(
    TypedValue.COMPLEX_UNIT_SP, 16, getResources().getDisplayMetrics()));
   break;
  }
 }
 typedArray.recycle();
 //设置点击事件变换数字
 this.setOnClickListener(new OnClickListener() {
  @Override
  public void onClick(View v) {
  mTitleText = randomText();
  postInvalidate();
  }
 });
 }

 /**
 * EXACTLY:一般是设置了明确的值或者是MATCH_PARENT
 * AT_MOST:表示子布局限制在一个最大值内,一般为WARP_CONTENT
 * UNSPECIFIED:表示子布局想要多大就多大,很少使用
 *
 * @param widthMeasureSpec
 * @param heightMeasureSpec
 */
 @Override
 protected void onMeasure(int widthMeasureSpec, int heightMeasureSpec) {
 super.onMeasure(widthMeasureSpec, heightMeasureSpec);
 int widthMode = MeasureSpec.getMode(widthMeasureSpec);
 int widthSize = MeasureSpec.getSize(widthMeasureSpec);
 int heightMode = MeasureSpec.getMode(heightMeasureSpec);
 int heightSize = MeasureSpec.getSize(heightMeasureSpec);
 //用来设置要画的布局的大小
 if (widthMode != MeasureSpec.EXACTLY) {
  widthSize = (int) (getPaddingLeft() + mBound.width() + getPaddingRight());
 }

 if (heightMode != MeasureSpec.EXACTLY) {
  heightSize = (int) (getPaddingTop() + mBound.height() + getPaddingBottom());
 }

 setMeasuredDimension(widthSize, heightSize);
 }

 @Override
 protected void onDraw(Canvas canvas) {
 //生成随机的背景颜色
 mTextPaint.setColor(Color.YELLOW);
 canvas.drawRect(0, 0, getMeasuredWidth(), getMeasuredHeight(), mTextPaint);
 //生成随机的文字颜色
 mTextPaint.setColor(mTextColor);
 //将文字画在布局的中间
 canvas.drawText(mTitleText, getWidth() / 2 - mBound.width() / 2, getHeight() / 2 + mBound.height() / 2, mTextPaint);
 }
 /**
 * 生成随机的四位数字验证码
 *
 * @return
 */
 private String randomText() {
 Random random = new Random();
 Set<Integer> set = new HashSet<Integer>();
 while (set.size() < 4) {
  int randomInt = random.nextInt(10);
  set.add(randomInt);
 }
 StringBuffer sb = new StringBuffer();
 for (Integer i : set) {
  sb.append("" + i);
 }

 return sb.toString();
 }
}
以上代码就是自定义的类,继承了View他有三个构造方法,我们要获取它的属性,所以一定要走第三个,但是默认是第二个,所以我们要在每一个里面调用第三个,以确保做了初始化工作 注意调用的时候用的是this的构造方法,而不是super
当我们的这个类出来之后,后面的就很简单了
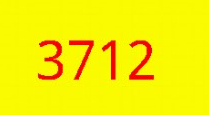
<?xml version="1.0" encoding="utf-8"?>
<RelativeLayout xmlns:android="http://schemas.android.com/apk/res/android"
 xmlns:verification="http://schemas.android.com/apk/res-auto"
 android:layout_width="match_parent"
 android:layout_height="match_parent"
 android:gravity="center"
 >

 <com.example.aotuman.verification.view.VerificationCodeView
 android:layout_width="wrap_content"
 android:layout_height="wrap_content"
 android:paddingTop="10dp"
 android:paddingBottom="10dp"
 android:paddingLeft="10dp"
 android:paddingRight="10dp"
 verification:textContent="3712"
 verification:textColor="#ff0000"
 verification:textSize="40sp" />
</RelativeLayout>
在布局里面应用它就可以了, xmlns:verification=”http://schemas.android.com/apk/res-auto”是必须要的,要不找不到自定义的属性。
好了到这为止就实现了最简单的
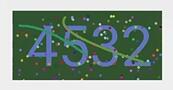
接下来我们就是实现绘制一些散点和曲线,修改我们的自定义类的onDraw()方法
@Override
 protected void onDraw(Canvas canvas) {
 initData();
 Random mRandom = new Random();
 //生成随机的背景颜色
 mTextPaint.setARGB(255, mRandom.nextInt(200) + 20, mRandom.nextInt(200) + 20, mRandom.nextInt(200) + 20);
 canvas.drawRect(0, 0, getMeasuredWidth(), getMeasuredHeight(), mTextPaint);
 //生成随机的文字颜色
 mTextPaint.setARGB(255, mRandom.nextInt(200) + 20, mRandom.nextInt(200) + 20, mRandom.nextInt(200) + 20);
 //将文字画在布局的中间
 canvas.drawText(mTitleText, getWidth() / 2 - mBound.width() / 2, getHeight() / 2 + mBound.height() / 2, mTextPaint);

 // 产生干扰效果1 -- 干扰点
 for (PointF pointF : mPoints) {
  mPointPaint.setARGB(255, mRandom.nextInt(200) + 20, mRandom.nextInt(200) + 20, mRandom.nextInt(200) + 20);
  canvas.drawPoint(pointF.x, pointF.y, mPointPaint);
 }
 // 产生干扰效果2 -- 干扰线
 for (Path path : mPaths) {
  mPathPaint.setARGB(255, mRandom.nextInt(200) + 20, mRandom.nextInt(200) + 20, mRandom.nextInt(200) + 20);
  canvas.drawPath(path, mPathPaint);
 }

 private void initData() {
 Random mRandom = new Random();
 // 获取控件的宽和高,此时已经测量完成
 int mHeight = getHeight();
 int mWidth = getWidth();
 mPoints.clear();
 // 生成干扰点坐标
 for (int i = 0; i < 150; i++) {
  PointF pointF = new PointF(mRandom.nextInt(mWidth) + 10, mRandom.nextInt(mHeight) + 10);
  mPoints.add(pointF);
 }
 mPaths.clear();
 // 生成干扰线坐标
 for (int i = 0; i < 2; i++) {
  Path path = new Path();
  int startX = mRandom.nextInt(mWidth / 3) + 10;
  int startY = mRandom.nextInt(mHeight / 3) + 10;
  int endX = mRandom.nextInt(mWidth / 2) + mWidth / 2 - 10;
  int endY = mRandom.nextInt(mHeight / 2) + mHeight / 2 - 10;
  path.moveTo(startX, startY);
  path.quadTo(Math.abs(endX - startX) / 2, Math.abs(endY - startY) / 2, endX, endY);
  mPaths.add(path);
 }
 }

 private void init() {
 // 初始化文字画笔
 /**
  * 获得绘制文本的宽和高
  */
 mTextPaint = new Paint();
 mTextPaint.setTextSize(mTextSize);

 mBound = new Rect();
 //获取到的存在mBound里面
 mTextPaint.getTextBounds(mTitleText, 0, mTitleText.length(), mBound);
 // 初始化干扰点画笔
 mPointPaint = new Paint();
 mPointPaint.setStrokeWidth(6);
 mPointPaint.setStrokeCap(Paint.Cap.ROUND); // 设置断点处为圆形
 // 初始化干扰线画笔
 mPathPaint = new Paint();
 mPathPaint.setStrokeWidth(5);
 mPathPaint.setColor(Color.GRAY);
 mPathPaint.setStyle(Paint.Style.STROKE); // 设置画笔为空心
 mPathPaint.setStrokeCap(Paint.Cap.ROUND); // 设置断点处为圆形
 }
init()方法请自行加在构造方法里面
OK到这为止就完成了,以后我们用到只要移植就可以了,怎么样,也很简单吧
以上就是本文的全部内容,希望对大家的学习有所帮助,也希望大家多多支持脚本之家。
- Android清除工程中无用资源文件的两种方法
- Unity3D游戏引擎实现在Android中打开WebVie
- Android中删除文件以及文件夹的命令记录
- Android中常用的XML生成方法实例分析
- Android编程之自定义AlertDialog(退出提示框
- Android控件之TabHost用法实例分析
- Android中Property Animation属性动画编写的