
- IOSID生成器
- 沙盒目录常用获取方式
- 关情纸尾-----Quartz2D-基本线条绘制
- 在Swift中使用JSONModel 实例代码
- Cheatsheet:201508.01~08.31
- vvDocumenterXcode注释工具使用
- 「OC」基本语法
- 如何控制iOS的导航栏和状态栏的样式
- BeginningiOS8ProgrammingwithSwift-TableView
- 关于ios中得路径详细讲解
- iOS模仿电子书首页实现书架布局样式
- 获取documents、tmp、app、Library的路径的方法
- [iOSUI进阶-2.2]彩票Demov1.2UICollectionView基本
- 使用Swift操作NSDate类型基础
- IOS优秀博客
- AppleWatch应用开发经验谈:我遇到的那些坑
- 苹果商店应用审核指南(2014年翻译版)
- 预处理命令
- iOS开发之窥探UICollectionViewController(四)--一款功能强大的自定义瀑布流
- IOS实现简单的进度条功能
- 详细对比IB开发与纯手码开发的优劣。
- IOS学习笔记----15/09/07
- 加载带有手势识别器的XIB文件需注意哪些问题
- IOS开发使用KeychainItemWrapper 持久存储用户名和密码
- XMPP-IOS即时通讯开发环境搭建
- 从C#到Objective-C,循序渐进学习苹果开发(6)--视图控制器的使用
- (8/18)重学Standford_iOS7开发_协议、block、动画_课程笔记
- iOS开发系列--通讯录、蓝牙、内购、GameCenter、iCloud、Passbook系统服务开发汇总
- 在Swift中应用GrandCentralDispatch(下)
- iOS中判断Emoji表情问题
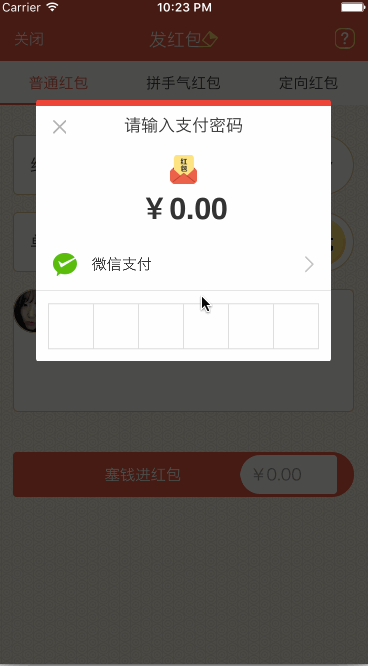
iOS实现类似微信和支付宝的密码输入框(UIKeyInput协议)
作者:佚名 IOS开发编辑:admin 更新时间:2022-07-23
目前在项目中需要实现发红包的功能,自己就写了一个密码输入框的控件,主要用到了UIKeyInput协议和CoreGraphics框架,效果类似微信支付,感觉还行就把我的思路和制作过程写下来给大家分享一下。
让你的自定义View具备输入的功能(UIKeyInput协议)
通过UIKeyInput协议可以为响应者提供简单的键盘输入的功能,让需要键盘的responder成为第一响应者就行了。UIKeyInput协议必须实现的有三个方法,分别是以下方法:
#pragma mark - UIKeyInput
/**
 * 用于显示的文本对象是否有任何文本
 */
- (BOOL)hasText {
  return self.textStore.length > 0;
}

/**
 * 插入文本
 */
- (void)insertText:(NSString *)text {
  if (self.textStore.length < self.passWordNum) {
    //判断是否是数字
    NSCharacterSet *cs = [[NSCharacterSet characterSetWithCharactersInString:MONEYNUMBERS] invertedSet];
    NSString*filtered = [[text componentsSeparatedByCharactersInSet:cs] componentsJoinedByString:@""];
    BOOL basicTest = [text isEqualToString:filtered];
    if(basicTest) {
     if ([self.delegate respondsToSelector:@selector(passWordDidChange:)]) {
        [self.delegate passWordDidChange:self];
      }
      if (self.textStore.length == self.passWordNum) {
        if ([self.delegate respondsToSelector:@selector(passWordCompleteInput:)]) {
          [self.delegate passWordCompleteInput:self];
        }
      }
      [self.textStore appendString:text];
      [self setNeedsDisplay];
    }
  }
}

/**
 * 删除文本
 */
- (void)deleteBackward {
  if (self.textStore.length > 0) {
    [self.textStore deleteCharactersInRange:NSMakeRange(self.textStore.length - 1, 1)];
   if ([self.delegate respondsToSelector:@selector(passWordDidChange:)]) {
      [self.delegate passWordDidChange:self];
    }
  }
  [self setNeedsDisplay];
}

/**
 * 是否能成为第一响应者
 */
- (BOOL)canBecomeFirstResponder {
  return YES;
}

/**
 * 点击成为第一相应者
 */
- (void)touchesBegan:(NSSet<UITouch *> *)touches withEvent:(UIEvent *)event {
  if (![self isFirstResponder]) {
    [self becomeFirstResponder];
  }
}
通过CoreGraphics绘制出密码输入框
实现的思路是通过CoreGraphics框架绘制出密码输入框的外框和里面的小黑点,然后通过从键盘上获取到的字符串判断输入的位数,具体实现如下:
/**
 * 设置正方形的边长
 */
- (void)setSquareWidth:(CGFloat)squareWidth {
  _squareWidth = squareWidth;
  [self setNeedsDisplay];
}

/**
 * 设置键盘的类型
 */
- (UIKeyboardType)keyboardType {
  return UIKeyboardTypeNumberPad;
}

/**
 * 设置密码的位数
 */
- (void)setPassWordNum:(NSUInteger)passWordNum {
  _passWordNum = passWordNum;
  [self setNeedsDisplay];
}

/**
 * 绘制
 */
- (void)drawRect:(CGRect)rect {
  CGFloat height = rect.size.height;
  CGFloat width = rect.size.width;
  CGFloat x = (width - self.squareWidth*self.passWordNum)/2.0;
  CGFloat y = (height - self.squareWidth)/2.0;
  CGContextRef context = UIGraphicsGetCurrentContext();
  //画外框
  CGContextAddRect(context, CGRectMake( x, y, self.squareWidth*self.passWordNum, self.squareWidth));
  CGContextSetLineWidth(context, 1);
  CGContextSetStrokeColorWithColor(context, self.rectColor.CGColor);
  CGContextSetFillColorWithColor(context, [UIColor whiteColor].CGColor);
  //画竖条
  for (int i = 1; i <= self.passWordNum; i++) {
    CGContextMoveToPoint(context, x+i*self.squareWidth, y);
    CGContextAddLineToPoint(context, x+i*self.squareWidth, y+self.squareWidth);
     CGContextClosePath(context);
  }
  CGContextDrawPath(context, kCGPathFillStroke);
  CGContextSetFillColorWithColor(context, self.pointColor.CGColor);
  //画黑点
  for (int i = 1; i <= self.textStore.length; i++) {
    CGContextAddArc(context, x+i*self.squareWidth - self.squareWidth/2.0, y+self.squareWidth/2, self.pointRadius, 0, M_PI*2, YES);
    CGContextDrawPath(context, kCGPathFill);
  }
}
源码下载:https://github.com/631106979/WCLPassWordView
以上就是本文的全部内容,希望对大家的学习有所帮助,也希望大家多多支持脚本之家。
- 上一篇文章: IOS关于大型网站抢购、距活动结束,剩余时间倒计时的实现代码
- 下一篇文章: 总结IOS界面间跳转的几种方法
- IOS学习笔记-UINavgationController
- 【iOS】Objective-C简约而不简单的单例模式
- 一个layer可以跟着画完的线移动ios程序好玩
- iOS分析UI利器――Reveal及简单破解方法
- 蓝懿iOSAFNetwoking原理及常用操作
- IOS开发模式――单例
- 环信SDK与AppleWatch的结合(1)