
- Android自定义桌面功能代码实现
- android+json+php+mysql实现用户反馈功能方法解析
- Android简单创建一个Activity的方法
- Android中使用Canvas绘制南丁格尔玫瑰图(Nightingale rose diagram)
- Android中执行java命令的方法及java代码执行并解析shell命令
- 深入理解Android组件间通信机制对面向对象特性的影响详解
- Android编程之数据库Sql编程实例分析
- Android应用中加入微信分享简单方法
- Android中Service(后台服务)详解
- Android中3种全屏方法及3种去掉标题栏的方法
- Android在JNI中使用ByteBuffer的方法
- android中UI主线程与子线程深入分析
- Android获取屏幕尺寸大小代码实例
- Android有效获取状态栏(StatusBar)高度的方法
- Android中的广播(BroadCast)详细介绍
- Android 使用Shell脚本截屏并自动传到电脑上
- Android中使用Service实现后台发送邮件功能实例
- 详解Android中Notification的使用方法
- Android程序开发之给背景图加上移动的手势
- 比较完整的android MP3 LRC歌词滚动高亮显示(附源码)
- Android常用命令集锦(图文并茂适应于初学者)
- Android非XML形式动态生成、调用页面的方法
- Android控件之RatingBar自定义星级评分样式
- Android调用堆栈跟踪实例分析
- [Android开发视频教程]02_07_AppWidget的使用(三)
- Android布局实现圆角边框效果
- Android实现短信发送功能
- Java操作FreeMarker模板引擎的基本用法示例小结
- Android 编程下的计时器代码
- 模仿美团点评的Android应用中价格和购买栏悬浮固定的效果
Android EditText自定义样式的方法
本文实例讲述了Android EditText自定义样式的方法。分享给大家供大家参考,具体如下:
1.去掉边框
EditText的background属性设置为@null就搞定了:android:background="@null"
style属性倒是可加可不加
附原文:
@SlumberMachine, that's a great observation! But, it seems that there is more to making a TextView editable than just setting android:editable="true". It has to do with the "input method" - what ever that is - and that is where the real difference between TextView and EditText lies. TextView was designed with an EditText in mind, that's for sure. One would have to look at the EditText source code and probably EditText style to see what's really going on there. Documentation is simply not enough.
I have asked the same question back at android-developers group, and got a satisfactory answer. This is what you have to do:
XML:
<EditText android:id="@+id/title" android:layout_width="fill_parent"
   style="?android:attr/textViewStyle"
   android:background="@null" android:textColor="@null"/>
Instead of style="?android:attr/textViewStyle" you can also write style="@android:style/Widget.TextView", don't ask me why and what it means.
2.Android EditText 改变边框颜色
第一步:为了更好的比较,准备两个一模一样的EditText(当Activity启动时,焦点会在第一个EditText上,如果你不希望这样只需要写一个高度和宽带为0的EditText即可避免,这里就不这么做了),代码如下:
<EditText
  android:layout_width="fill_parent"
    android:layout_height="36dip"
    android:background="@drawable/bg_edittext"
    android:padding="5dip"
  android:layout_margin="36dip"
  android:textColorHint="#AAAAAA"
  android:textSize="15dip"
  android:singleLine="true"
  android:hint="请输入..."
/>
接下来建立三个xml文件,分别为输入框未获得焦点时的背景,输入框获得焦点时的背景,selector背景选择器(这里能获得输入框什么时候获得和失去焦点),代码如下:
bg_edittext_normal.xml(未获得焦点时)
<?xml version="1.0" encoding="UTF-8"?>
<shape xmlns:android="http://schemas.android.com/apk/res/android">
  <solid android:color="#FFFFFF" />
  <corners android:radius="3dip"/>
  <stroke
    android:width="1dip"
    android:color="#BDC7D8" />
</shape>
bg_edittext_focused.xml(获得焦点时)
<?xml version="1.0" encoding="UTF-8"?>
<shape xmlns:android="http://schemas.android.com/apk/res/android">
  <solid android:color="#FFFFFF" />
  <corners android:radius="3dip"/>
  <stroke
    android:width="1dip"
    android:color="#728ea3" />
</shape>
bg_edittext.xml(selector选择器,这方面资料网上很多)
<?xml version="1.0" encoding="UTF-8"?>
<selector xmlns:android="http://schemas.android.com/apk/res/android">
    <item android:state_window_focused="false" android:drawable="@drawable/contact_edit_edittext_normal" />
    <item android:state_focused="true" android:drawable="@drawable/contact_edit_edittext_focused" />
</selector>
这样就OK了,效果图如下:
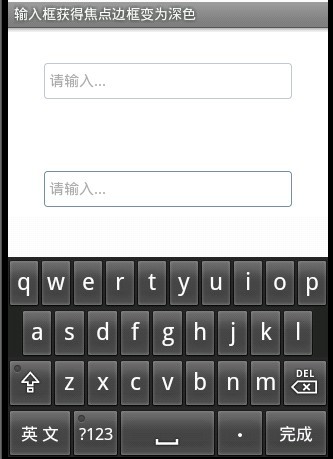
第二个输入框边框变为深色,是不是这样更友好点。
更多关于Android相关内容感兴趣的读者可查看本站专题:《Android开发入门与进阶教程》、《Android通信方式总结》、《Android基本组件用法总结》、《Android视图View技巧总结》、《Android布局layout技巧总结》及《Android控件用法总结》
希望本文所述对大家Android程序设计有所帮助。
- 上一篇文章: Android 使用Shell脚本截屏并自动传到电脑上
- 下一篇文章: Android TextView字体颜色设置方法小结
- android开发教程之listview显示sqlite数据
- 获取android4.0版本sdcard路径示例
- Android布局优化之ViewStub控件
- Android动画之3D翻转效果实现函数分析
- 基于Android中实现定时器的3种解决方法
- Android WebView上实现JavaScript与Java交互
- 3种Android隐藏顶部状态栏及标题栏的方法