
- Android手势密码的实现
- android4.0混淆XmlPullParser报错原因分析解决
- Android动画效果之自定义ViewGroup添加布局动画(五)
- Android开发技巧之ViewStub控件惰性装载
- Android中实现自动生成布局View的初始化代码方法
- 总结Android中多线程更新应用的页面信息的方式
- 让Android应用不被杀死(killer)的方法
- Android应用中仿今日头条App制作ViewPager指示器
- Android 开发实例简单涂鸦板
- 使用OkHttp包在Android中进行HTTP头处理的教程
- EditText属性深入解析
- Android采取BroadcastReceiver方式自动获取验证码
- Android编程实现从字符串中查找电话号码的方法
- Android单选按钮对话框用法实例分析
- 深入理解Activity之间的数据传递
- Android应用程序模型之应用程序,任务,进程,线程分析
- Android编程之菜单实现方法
- Android实现2048小游戏
- 基于Android实现百度地图定位过程详解
- Android开发中CheckBox的简单用法示例
- Android判断设备网络连接状态及判断连接方式的方法
- Android 完全退出应用程序的解决方法
- Android Activity生命周期详解
- Android 操作系统获取Root权限 原理详细解析
- 详解Android中Handler的实现原理
- Android App开发中ViewPager组件的入门使用教程
- Android应用中实现手势控制图片缩放的完全攻略
- Android编程简单实现雷达扫描效果
- Android开发中比较耗时的一些操作小结
- C#之Android手机App开发
Android实现热门标签的流式布局
一、概述:
在日常的app使用中,我们会在android 的app中看见 热门标签等自动换行的流式布局,今天,我们就来看看如何
自定义一个类似热门标签那样的流式布局吧(源码下载在下面最后给出)
类似的自定义布局。下面我们就来详细介绍流式布局的应用特点以及用的的技术点:
1.流式布局的特点以及应用场景
特点:当上面一行的空间不够容纳新的TextView时候,
才开辟下一行的空间
原理图:
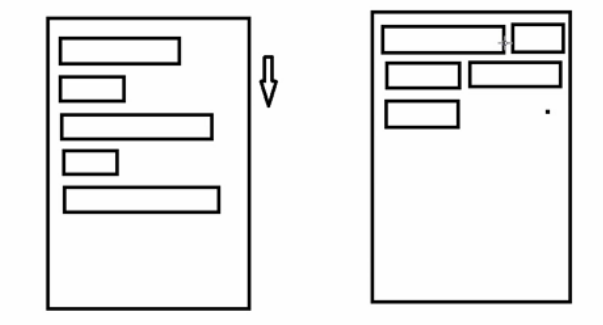
场景:主要用于关键词搜索或者热门标签等场景
2.自定义ViewGroup,重点重写下面两个方法
1)、onMeasure:测量子view的宽高,设置自己的宽和高
2)、onLayout:设置子view的位置
onMeasure:根据子view的布局文件中属性,来为子view设置测量模式和测量值
测量=测量模式+测量值;
测量模式有3种:
EXACTLY:表示设置了精确的值,一般当childView设置其宽、高为精确值、match_parent时,ViewGroup会将其设置为EXACTLY;
AT_MOST:表示子布局被限制在一个最大值内,一般当childView设置其宽、高为wrap_content时,ViewGroup会将其设置为AT_MOST;
UNSPECIFIED:表示子布局想要多大就多大,一般出现在AadapterView的item的heightMode中、ScrollView的childView的heightMode中;此种模式比较少见。
3.LayoutParams
ViewGroup LayoutParams :每个 ViewGroup 对应一个 LayoutParams; 即 ViewGroup -> LayoutParams
getLayoutParams 不知道转为哪个对应的LayoutParams ,其实很简单,就是如下:
子View.getLayoutParams 得到的LayoutParams对应的就是 子View所在的父控件的LayoutParams;
例如,LinearLayout 里面的子view.getLayoutParams ->LinearLayout.LayoutParams
所以 咱们的FlowLayout 也需要一个LayoutParams,由于上面的效果图是子View的 margin,
所以应该使用MarginLayoutParams。即FlowLayout->MarginLayoutParams
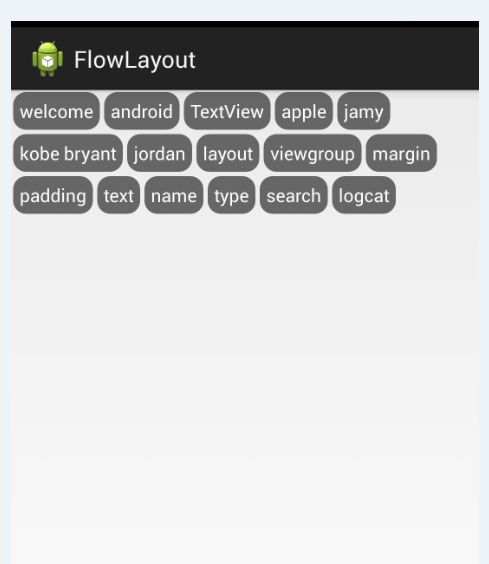
4.最后来看看实现的最终效果图:
二、热门标签的流式布局的实现:
1. 自定义热门标签的ViewGroup实现
根据上面的技术分析,自定义类继承于ViewGroup,并重写 onMeasure和onLayout等方法。具体实现代码如下:
<font color="#362e2b"><font style="background-color:rgb(255, 255, 255)"><font face="Arial"><font style="font-size:14px">package com.czm.flowlayout;

import java.util.ArrayList;
import java.util.List;

import android.content.Context;
import android.util.AttributeSet;
import android.view.View;
import android.view.ViewGroup;
/**
 *
 * @author caizhiming
 * @created on 2015-4-13
 */
public class XCFlowLayout extends ViewGroup{

  //存储所有子View
  private List<List<View>> mAllChildViews = new ArrayList<>();
  //每一行的高度
  private List<Integer> mLineHeight = new ArrayList<>();

  public XCFlowLayout(Context context) {
    this(context, null);
    // TODO Auto-generated constructor stub
  }
  public XCFlowLayout(Context context, AttributeSet attrs) {
    this(context, attrs, 0);
    // TODO Auto-generated constructor stub
  }
  public XCFlowLayout(Context context, AttributeSet attrs, int defStyle) {
    super(context, attrs, defStyle);
    // TODO Auto-generated constructor stub
  }
  @Override
  protected void onMeasure(int widthMeasureSpec, int heightMeasureSpec) {
    // TODO Auto-generated method stub

    //父控件传进来的宽度和高度以及对应的测量模式
    int sizeWidth = MeasureSpec.getSize(widthMeasureSpec);
    int modeWidth = MeasureSpec.getMode(widthMeasureSpec);
    int sizeHeight = MeasureSpec.getSize(heightMeasureSpec);
    int modeHeight = MeasureSpec.getMode(heightMeasureSpec);

    //如果当前ViewGroup的宽高为wrap_content的情况
    int width = 0;//自己测量的 宽度
    int height = 0;//自己测量的高度
    //记录每一行的宽度和高度
    int lineWidth = 0;
    int lineHeight = 0;

    //获取子view的个数
    int childCount = getChildCount();
    for(int i = 0;i < childCount; i ++){
      View child = getChildAt(i);
      //测量子View的宽和高
      measureChild(child, widthMeasureSpec, heightMeasureSpec);
      //得到LayoutParams
      MarginLayoutParams lp = (MarginLayoutParams) getLayoutParams();
      //子View占据的宽度
      int childWidth = child.getMeasuredWidth() + lp.leftMargin + lp.rightMargin;
      //子View占据的高度
      int childHeight = child.getMeasuredHeight() + lp.topMargin + lp.bottomMargin;
      //换行时候
      if(lineWidth + childWidth > sizeWidth){
        //对比得到最大的宽度
        width = Math.max(width, lineWidth);
        //重置lineWidth
        lineWidth = childWidth;
        //记录行高
        height += lineHeight;
        lineHeight = childHeight;
      }else{//不换行情况
        //叠加行宽
        lineWidth += childWidth;
        //得到最大行高
        lineHeight = Math.max(lineHeight, childHeight);
      }
      //处理最后一个子View的情况
      if(i == childCount -1){
        width = Math.max(width, lineWidth);
        height += lineHeight;
      }
    }
    //wrap_content
    setMeasuredDimension(modeWidth == MeasureSpec.EXACTLY ? sizeWidth : width,
        modeHeight == MeasureSpec.EXACTLY ? sizeHeight : height);
    super.onMeasure(widthMeasureSpec, heightMeasureSpec);
  }

  @Override
  protected void onLayout(boolean changed, int l, int t, int r, int b) {
    // TODO Auto-generated method stub
    mAllChildViews.clear();
    mLineHeight.clear();
    //获取当前ViewGroup的宽度
    int width = getWidth();

    int lineWidth = 0;
    int lineHeight = 0;
    //记录当前行的view
    List<View> lineViews = new ArrayList<View>();
    int childCount = getChildCount();
    for(int i = 0;i < childCount; i ++){
      View child = getChildAt(i);
      MarginLayoutParams lp = (MarginLayoutParams) child.getLayoutParams();
      int childWidth = child.getMeasuredWidth();
      int childHeight = child.getMeasuredHeight();

      //如果需要换行
      if(childWidth + lineWidth + lp.leftMargin + lp.rightMargin > width){
        //记录LineHeight
        mLineHeight.add(lineHeight);
        //记录当前行的Views
        mAllChildViews.add(lineViews);
        //重置行的宽高
        lineWidth = 0;
        lineHeight = childHeight + lp.topMargin + lp.bottomMargin;
        //重置view的集合
        lineViews = new ArrayList();
      }
      lineWidth += childWidth + lp.leftMargin + lp.rightMargin;
      lineHeight = Math.max(lineHeight, childHeight + lp.topMargin + lp.bottomMargin);
      lineViews.add(child);
    }
    //处理最后一行
    mLineHeight.add(lineHeight);
    mAllChildViews.add(lineViews);

    //设置子View的位置
    int left = 0;
    int top = 0;
    //获取行数
    int lineCount = mAllChildViews.size();
    for(int i = 0; i < lineCount; i ++){
      //当前行的views和高度
      lineViews = mAllChildViews.get(i);
      lineHeight = mLineHeight.get(i);
      for(int j = 0; j < lineViews.size(); j ++){
        View child = lineViews.get(j);
        //判断是否显示
        if(child.getVisibility() == View.GONE){
          continue;
        }
        MarginLayoutParams lp = (MarginLayoutParams) child.getLayoutParams();
        int cLeft = left + lp.leftMargin;
        int cTop = top + lp.topMargin;
        int cRight = cLeft + child.getMeasuredWidth();
        int cBottom = cTop + child.getMeasuredHeight();
        //进行子View进行布局
        child.layout(cLeft, cTop, cRight, cBottom);
        left += child.getMeasuredWidth() + lp.leftMargin + lp.rightMargin;
      }
      left = 0;
      top += lineHeight;
    }

  }
  /**
   * 与当前ViewGroup对应的LayoutParams
   */
  @Override
  public LayoutParams generateLayoutParams(AttributeSet attrs) {
    // TODO Auto-generated method stub

    return new MarginLayoutParams(getContext(), attrs);
  }
}</font></font></font></font>
2.相关的布局文件:
引用自定义控件:
<font color="#362e2b"><font style="background-color:rgb(255, 255, 255)"><font face="Arial"><font style="font-size:14px"><RelativeLayout xmlns:android="http://schemas.android.com/apk/res/android"
  xmlns:tools="http://schemas.android.com/tools"
  android:id="@+id/container"
  android:layout_width="match_parent"
  android:layout_height="match_parent" >

  <com.czm.flowlayout.XCFlowLayout
    android:id="@+id/flowlayout"
    android:layout_width="match_parent"
    android:layout_height="match_parent" >

  </com.czm.flowlayout.XCFlowLayout>

</RelativeLayout></font></font></font></font>
TextView的样式文件:
<font color="#362e2b"><font style="background-color:rgb(255, 255, 255)"><font face="Arial"><font style="font-size:14px"><?xml version="1.0" encoding="utf-8"?>
<shape xmlns:android="http://schemas.android.com/apk/res/android" >
  <solid android:color="#666666" />
  <corners android:radius="10dp" />
  <padding
    android:left="5dp"
    android:right="5dp"
    android:top="5dp"
    android:bottom="5dp"
    />

</shape></font></font></font></font>
三、使用该自定义布局控件类
最后,如何使用该自定义的热门标签控件类呢?很简单,请看下面实例代码:
<font color="#362e2b"><font style="background-color:rgb(255, 255, 255)"><font face="Arial"><font style="font-size:14px">package com.czm.flowlayout;

import android.app.Activity;
import android.graphics.Color;
import android.os.Bundle;
import android.view.ViewGroup.LayoutParams;
import android.view.ViewGroup.MarginLayoutParams;
import android.widget.TextView;
/**
 *
 * @author caizhiming
 * @created on 2015-4-13
 */
public class MainActivity extends Activity {

  private String mNames[] = {
      "welcome","android","TextView",
      "apple","jamy","kobe bryant",
      "jordan","layout","viewgroup",
      "margin","padding","text",
      "name","type","search","logcat"
  };
  private XCFlowLayout mFlowLayout;
  @Override
  protected void onCreate(Bundle savedInstanceState) {
    super.onCreate(savedInstanceState);
    setContentView(R.layout.activity_main);

    initChildViews();

  }
  private void initChildViews() {
    // TODO Auto-generated method stub
    mFlowLayout = (XCFlowLayout) findViewById(R.id.flowlayout);
    MarginLayoutParams lp = new MarginLayoutParams(
        LayoutParams.WRAP_CONTENT,LayoutParams.WRAP_CONTENT);
    lp.leftMargin = 5;
    lp.rightMargin = 5;
    lp.topMargin = 5;
    lp.bottomMargin = 5;
    for(int i = 0; i < mNames.length; i ++){
      TextView view = new TextView(this);
      view.setText(mNames[i]);
      view.setTextColor(Color.WHITE);
      view.setBackgroundDrawable(getResources().getDrawable(R.drawable.textview_bg));
      mFlowLayout.addView(view,lp);
    }
  }

}</font></font></font></font>
以上就是本文的全部内容,下面在给大家一个小福利:
// 流式布局 话不多说,比较简单,注释都写的很清楚


import java.util.ArrayList;
import java.util.List;

import android.content.Context;
import android.util.AttributeSet;
import android.view.View;
import android.view.ViewGroup;

/**
 *
 * @author Mr.Himan
 * @version 1.0<br>
 *     2015年11月4日 11:12:06 <br>
 *     流式布局 设置MarginTop 和MarginLeft有效 MarginRight 暂未实现
 */
public class FlowLayout extends ViewGroup {

 /**
 * 存储所有的子View
 */
 private List<List<View>> mAllChildViews = new ArrayList<List<View>>();

 /**
 * 存储每一行的高度
 */
 private List<Integer> mLineHeight = new ArrayList<Integer>();

 public FlowLayout(Context context) {
 this(context, null);
 }

 public FlowLayout(Context context, AttributeSet attrs) {
 this(context, attrs, 0);
 }

 public FlowLayout(Context context, AttributeSet attrs, int defStyle) {
 super(context, attrs, defStyle);
 }

 @Override
 protected void onLayout(boolean changed, int l, int t, int r, int b) {
 mAllChildViews.clear();
 mLineHeight.clear();
 // 获取当前ViewGroup的宽度
 int width = getWidth();

 int lineWidth = 0;
 int lineHeight = 0;
 // 记录当前行的view
 List<View> lineViews = new ArrayList<View>();
 int childCount = getChildCount();
 for (int i = 0; i < childCount; i++) {
  View child = getChildAt(i);
  MarginLayoutParams lp = (MarginLayoutParams) child
   .getLayoutParams();
  int childWidth = child.getMeasuredWidth();
  int childHeight = child.getMeasuredHeight();

  // 如果需要换行
  if (childWidth + lineWidth + lp.leftMargin + lp.rightMargin > width) {
  // 记录LineHeight
  mLineHeight.add(lineHeight);
  // 记录当前行的Views
  mAllChildViews.add(lineViews);
  // 重置行的宽高
  lineWidth = 0;
  lineHeight = childHeight + lp.topMargin + lp.bottomMargin;
  // 重置view的集合
  lineViews = new ArrayList();
  }
  lineWidth += childWidth + lp.leftMargin + lp.rightMargin;
  lineHeight = Math.max(lineHeight, childHeight + lp.topMargin
   + lp.bottomMargin);
  lineViews.add(child);
 }
 // 处理最后一行
 mLineHeight.add(lineHeight);
 mAllChildViews.add(lineViews);

 MarginLayoutParams params = (MarginLayoutParams) this.getLayoutParams();

 // 设置子View的位置
 int left = 0;
 // 添加marginTop
 int top = 0 + params.topMargin;
 // 获取行数
 int lineCount = mAllChildViews.size();
 for (int i = 0; i < lineCount; i++) {
  // 当前行的views和高度
  lineViews = mAllChildViews.get(i);
  lineHeight = mLineHeight.get(i);
  for (int j = 0; j < lineViews.size(); j++) {
  // 为每一列设置marginLeft
  if (j == 0) {
   left = 0 + params.leftMargin;
  }
  View child = lineViews.get(j);
  // 判断是否显示
  if (child.getVisibility() == View.GONE) {
   continue;
  }
  MarginLayoutParams lp = (MarginLayoutParams) child
   .getLayoutParams();
  int cLeft = left + lp.leftMargin;
  int cTop = top + lp.topMargin;
  int cRight = cLeft + child.getMeasuredWidth();
  int cBottom = cTop + child.getMeasuredHeight();
  // 进行子View进行布局
  child.layout(cLeft, cTop, cRight, cBottom);
  left += child.getMeasuredWidth() + lp.leftMargin
   + lp.rightMargin;
  }
  left = 0;
  top += lineHeight;
 }
 }

 @Override
 protected void onMeasure(int widthMeasureSpec, int heightMeasureSpec) {

 // 父控件传进来的宽度和高度以及对应的测量模式
 int sizeWidth = MeasureSpec.getSize(widthMeasureSpec);
 int modeWidth = MeasureSpec.getMode(widthMeasureSpec);
 int sizeHeight = MeasureSpec.getSize(heightMeasureSpec);
 int modeHeight = MeasureSpec.getMode(heightMeasureSpec);

 // 如果当前ViewGroup的宽高为wrap_content的情况
 int width = 0;// 自己测量的 宽度
 int height = 0;// 自己测量的高度
 // 记录每一行的宽度和高度
 int lineWidth = 0;
 int lineHeight = 0;

 // 获取子view的个数
 int childCount = getChildCount();

 for (int i = 0; i < childCount; i++) {
  View child = getChildAt(i);
  // 测量子View的宽和高
  measureChild(child, widthMeasureSpec, heightMeasureSpec);
  // 得到LayoutParams

  MarginLayoutParams params = (MarginLayoutParams) child
   .getLayoutParams();
  // 子View占据的宽度
  int childWidth = child.getMeasuredWidth() + params.leftMargin
   + params.rightMargin;
  // 子View占据的高度
  int childHeight = child.getMeasuredHeight() + params.bottomMargin
   + params.topMargin;
  // 换行时候
  if (lineWidth + childWidth > sizeWidth) {
  // 对比得到最大的宽度
  width = Math.max(width, lineWidth);
  // 重置lineWidth
  lineWidth = childWidth;
  // 记录行高
  height += lineHeight;
  lineHeight = childHeight;
  } else {
  // 不换行情况
  // 叠加行宽
  lineWidth += childWidth;
  // 得到最大行高
  lineHeight = Math.max(lineHeight, childHeight);
  }
  // 处理最后一个子View的情况
  if (i == childCount - 1) {
  width = Math.max(width, lineWidth);
  height += lineHeight;
  }
 }
 setMeasuredDimension(modeWidth == MeasureSpec.EXACTLY ? sizeWidth
  : width, modeHeight == MeasureSpec.EXACTLY ? sizeHeight
  : height);

 }

 /**
 * 与当前ViewGroup对应的LayoutParams
 */
 @Override
 public LayoutParams generateLayoutParams(AttributeSet attrs) {
 return new MarginLayoutParams(getContext(), attrs);
 }
}
希望本文所述对大家学习Android实现热门标签的流式布局有所帮助。
- Android中基于XMPP协议实现IM聊天程序与多人
- [Android开发视频教学]01_07_Activity生命周
- Android仿QQ空间底部菜单示例代码
- Android自定义View过程解析
- Android通过SOCKET下载文件的方法
- 浅析Android 模拟键盘鼠标事件
- Android Intent启动别的应用实现方法