
- Android中判断网络连接状态的方法
- Android编程中Activity的四种启动模式
- Android中显示GIF动画的实现代码
- Android 软件自动更新功能实现的方法
- Android开发时尽管已root但是ddms还是没有data路径怎么办
- Android组合控件实现功能强大的自定义控件
- 深入浅析Android JSON解析
- Android应用中使用SharedPreferences类存储数据的方法
- 基于android中读取assets目录下a.txt文件并进行解析的深入分析
- Android开发之实现GridView支付宝九宫格
- Android判断Activity是否在最上层的方法
- Android实现字母雨的效果
- Android App开发的自动化测试框架UI Automator使用教程
- Adapter实现ListView带多选框等状态的自定义控件的注意事项
- android 线性布局LinearLayout实例代码
- android短信拦截的实现代码
- Android提高之SurfaceView与多线程的混搭实例
- Android实现带列表的地图POI周边搜索功能
- android编程实现局部界面动态切换的方法
- Android实现语音识别代码
- 利用smsmanager实现后台发送短信示例
- Android中程序的停止状态详细介绍
- 简单实现Android学生管理系统(附源码)
- Android通过手势实现答题器翻页效果
- Android Mms之:深入MMS支持
- 全面解析Android的开源图片框架Universal-Image-Loader
- Android巧用ViewPager实现左右循环滑动图片
- 详解Android中的Menu菜单键
- Android中如何利用AIDL机制调用远程服务
- android防止提交事件时触发多个表单中的按钮
Android控件之ProgressBar用法实例分析
作者:佚名 Android开发编辑:admin 更新时间:2022-07-23
本文实例讲述了Android控件之ProgressBar用法。分享给大家供大家参考。具体如下:
ProgressBar位于android.widget包下,其继承于View,主要用于显示一些操作的进度。应用程序可以修改其长度表示当前后台操作的完成情况。因为进度条会移动,所以长时间加载某些资源或者执行某些耗时的操作时,不会使用户界面失去响应。ProgressBar类的使用非常简单,只需将其显示到前台,然后启动一个后台线程定时更改表示进度的数值即可。
以下ProgressBar跟Handle结合,模拟进度条的使用,当进度条完成时会跳转到TestActivity
main.xml布局文件
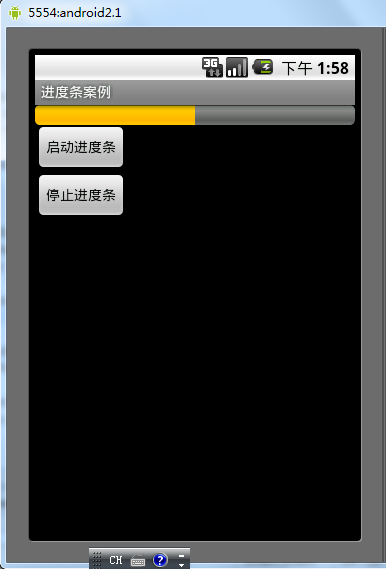
<?xml version="1.0" encoding="utf-8"?>
<LinearLayout xmlns:android="http://schemas.android.com/apk/res/android"
 android:orientation="vertical"
 android:layout_width="fill_parent"
 android:layout_height="fill_parent">
 <!-- 长方形进度条,一开始不可见,直到点击按钮时才出现进度条 -->
 <ProgressBar android:id="@+id/progressBar"
  style="?android:attr/progressBarStyleHorizontal"
  mce_style="?android:attr/progressBarStyleHorizontal"
  android:layout_width="fill_parent"
  android:layout_height="wrap_content"
  android:visibility="gone"
  android:max="100" />
 <!-- 圆形进度条 -->
 <!--<ProgressBar android:id="@+id/progressBar"
  style="?android:attr/progressBarStyleLarge"
  mce_style="?android:attr/progressBarStyleLarge"
  android:layout_width="wrap_content"
  android:layout_height="wrap_content" />-->
 <Button android:id="@+id/start"
  android:text="启动进度条"
  android:layout_width="wrap_content"
  android:layout_height="wrap_content" />
 <Button android:id="@+id/stop"
  android:text="停止进度条"
  android:layout_width="wrap_content"
  android:layout_height="wrap_content" />
</LinearLayout>
PbActivity类
package com.ljq.pb;
import android.app.Activity;
import android.content.Intent;
import android.os.Bundle;
import android.os.Handler;
import android.view.View;
import android.widget.Button;
import android.widget.ProgressBar;
public class PbActivity extends Activity {
 private ProgressBar progressBar = null;
 private Button start = null, stop = null;
 // 定义Handler对象
 private Handler handler = new Handler();
 @Override
 public void onCreate(Bundle savedInstanceState) {
  super.onCreate(savedInstanceState);
  setContentView(R.layout.main);
  progressBar = (ProgressBar) findViewById(R.id.progressBar);
  progressBar.setProgress(0);
  start = (Button) findViewById(R.id.start);
  start.setOnClickListener(new View.OnClickListener() {
   public void onClick(View v) {
    handler.post(runnable); //开始执行
   }
  });
  stop=(Button)findViewById(R.id.stop);
  stop.setOnClickListener(new View.OnClickListener() {
   public void onClick(View v) {
    handler.removeCallbacks(runnable);//停止执行
    progressBar.setProgress(0);
   }
  });
 }
 int pro=0;
 Runnable runnable=new Runnable(){
  public void run() {
   progressBar.setVisibility(View.VISIBLE);
   pro=progressBar.getProgress()+10;
   progressBar.setProgress(pro);
   //如果进度小于100,,则延迟1000毫秒后重复执行runnable
   if(pro<100){
    handler.postDelayed(runnable, 1000);
   }else{
    progressBar.setVisibility(View.GONE);
    startActivity(new Intent(PbActivity.this, TestActivity.class));
    handler.removeCallbacks(runnable);
    progressBar.setProgress(0);
   }
  }
 };
}
运行结果
希望本文所述对大家的Android程序设计有所帮助。
- 上一篇文章: Android控件之GridView用法实例分析
- 下一篇文章: Android模拟美团客户端进度提示框
- 使用科大讯飞语音SDK实现文字在线合成语音
- 简单掌握Android开发中彩信的发送接收及其附
- Android Fragment 基本了解(图文介绍)
- Android自定义view制作绚丽的验证码
- Android AnalogClock简单使用方法实例
- 基于Android AppWidgetProvider的使用介绍
- Android 加密解密字符串详解