
- android指定DatePickerDialog样式并不显示年的实现代码
- Android发送xml数据给服务器的方法
- Android 实现旋转木马的音乐效果
- Andriod开发中引入jar包的正确方式介绍
- Android SDK在线更新镜像服务器大全
- Android实现创意LoadingView动画效果
- Android 将 android view 的位置设为右下角的解决方法
- Android开发之完成登陆界面的数据保存回显操作实例
- [Android开发从零开始].21.广播事件处理(2)
- Android控件系列之CheckBox使用介绍
- Android中Textview超链接实现方式
- Android五子棋游戏程序完整实例分析
- Android 创建/验证/删除桌面快捷方式(已测试可用)
- android操作XML的几种方法总结
- Android中asset和raw的区别详解
- Android搜索框组件SearchView的基本使用方法
- 详解Android MVP开发模式
- Android实现多次闪退清除数据
- 深入学习Android中的Intent
- 根据USER-AGENT判断手机类型并跳转到相应的app下载页面
- Android实现EditText控件禁止输入内容的方法(附测试demo)
- Android中Notification用法实例总结
- Android 图片特效处理的方法实例
- android LinearLayout 布局实例代码
- Android开发学习之WallPaper设置壁纸详细介绍与实例
- Android带进度的圆形进度条
- Android 中动态加载.jar的实现步骤
- Android控制闪光灯的方法(打开与关闭)
- 谷歌被屏蔽后如何搭建安卓环境
- android 退出程序解决内存释放的问题
android TabHost(选项卡)的使用方法
首先,定义TabHost的布局文件:
复制代码 代码如下:
<?xml version="1.0" encoding="utf-8"?>
<TabHost xmlns:android="http://schemas.android.com/apk/res/android"
android:id="@android:id/tabhost" android:layout_width="fill_parent"
android:layout_height="fill_parent">
<LinearLayout android:orientation="vertical"
android:layout_width="fill_parent" android:layout_height="fill_parent">
<TabWidget android:id="@android:id/tabs"
android:layout_alignParentBottom="true"
android:layout_width="fill_parent"
android:layout_height="wrap_content"/>
<FrameLayout
android:id="@android:id/tabcontent"
android:layout_width="fill_parent"
android:layout_height="fill_parent" />
</LinearLayout>
</TabHost>
其中,TabWidget即是选项卡上面的标签,FrameLayout是选项卡的内容。
在Java类文件中定义如下:
复制代码 代码如下:
public class MainActivity extends TabActivity {
private TabHost my_tabhost;
private TabWidget my_tabwidget;
private int i,k;
private TextView tv;
private String[] tabMenu = { "系统", "硬件", "操作"};
private Intent intent0, intent1, intent2;
private Intent[] intents = { intent0, intent1, intent2};
private TabHost.TabSpec tabSpec0, tabSpec1, tabSpec2, tabSpec3;
private TabHost.TabSpec[] tabSpecs = { tabSpec0, tabSpec1, tabSpec2, tabSpec3};
public static Context mContext;
@Override
protected void onCreate(Bundle savedInstanceState) {
super.onCreate(savedInstanceState);
// 不要窗体标题
requestWindowFeature(Window.FEATURE_NO_TITLE);
setContentView(R.layout.activity_main);
setContentView(R.layout.activity_main);
my_tabhost = getTabHost();
intent0 = new Intent(this, system.class);
intent1 = new Intent(this, hardware.class);
intent2 = new Intent(this, operation.class);
tabSpec0 = my_tabhost.newTabSpec("system").setIndicator(tabMenu[0],null).
setContent(intent0);
tabSpec1 = my_tabhost.newTabSpec("hardware").setIndicator(tabMenu[1],null).
setContent(intent1);
tabSpec2 = my_tabhost.newTabSpec("operation").setIndicator(tabMenu[2],null).
setContent(intent2);
my_tabhost.addTab(tabSpec1);
my_tabhost.addTab(tabSpec0);
my_tabhost.addTab(tabSpec2);
<br> // 设置默认选中的选项卡为第2个
my_tabhost.setCurrentTab(1);
}
}
每一个选项卡对应一个Intent,每一个Intent又对应一个类,选中这个选项卡时,就显示对应的类。
运行结果如下: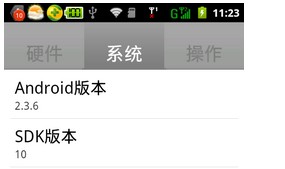
- 上一篇文章: Android加载大分辨率图片到手机内存中的实例方法
- 下一篇文章: Android获取ROOT权限的实例代码
- Android编程四大组件分别是什么
- 安卓(Android)ListView 显示图片文字
- Android编程实现将压缩数据库文件拷贝到安装
- 获取Android手机中所有短信的实现代码
- Android编程开发之Spinner组件用法
- Android笔记之:onConfigurationChanged详解
- 详解Android的OkHttp包编写异步HTTP请求调用