
- Android中在GridView网格视图上实现item拖拽交换的方法
- 分享40条Android开发的优化建议
- Android编程实现根据不同日期计算天数差的方法
- 根据USER-AGENT判断手机类型并跳转到相应的app下载页面
- Android开发中的数据库事务用法分析
- Android实现波浪线效果(xml bitmap)
- Android开发中避免应用无响应的方法(Application Not Responding、ANR)
- android实现蓝牙文件发送的实例代码,支持多种机型
- Android编程之高效开发App的10个建议
- Android中删除文件以及文件夹的命令记录
- 刷新Activity中的scrollview示例(局部ui刷新)
- Android图片处理实例介绍(图)
- Android中XUtils3框架使用方法详解(一)
- Android中Dialog去黑边的方法
- Android中实现开机自动启动服务(service)实例
- Android手机号码归属地的查询
- Android实现手势控制ImageView图片大小
- Android获取屏幕方向及键盘状态的小例子
- Android常用命令集锦(图文并茂适应于初学者)
- android ListView和ProgressBar(进度条控件)的使用方法
- android 版本检测 Android程序的版本检测与更新实现介绍
- android开发中ListView与Adapter使用要点介绍
- android操作XML的几种方法总结
- Android RichText 让Textview轻松的支持富文本(图像ImageSpan、点击效果等等类似QQ微信聊天)
- android 权限大全 分享
- Android中加入名片扫描功能实例代码
- android RadioGroup的使用方法
- 深入Understanding Android ContentProvider详解
- 浅析Android文件管理器(项目一)
- 属于自己的常见Android选项菜单样式集合
android notification 的总结分析
分类
notification有以下几种:
1>普通notification
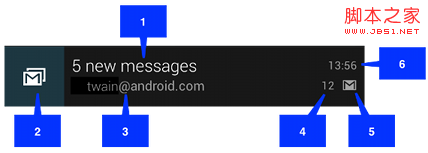
1.内容标题
2.大图标
3.内容
4.内容附加信息
5.小图标
6.时间
2>大布局Notification
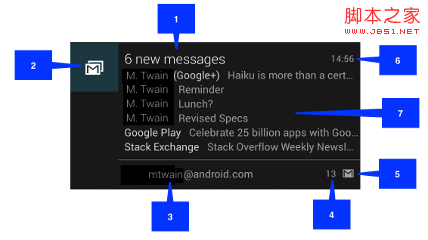 图1
图1
大布局notification是在android4.1以后才增加的,大布局notification与小布局notification只在‘7'部分有区别,其它部分都一致。大布局notification只有在所有notification的最上 面时才会显示大布局,其它情况下显示小布局。你也可以用手指将其扩展为大布局(前提是它是大布局)。如下图:
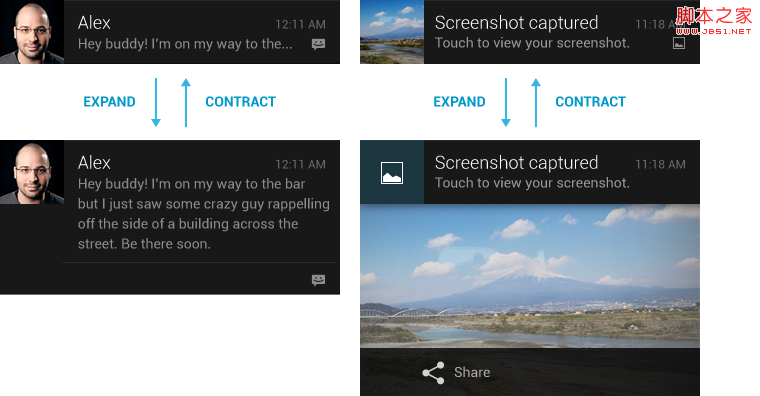 图2
图2
大布局notification有三种类型:如图1为NotificationCompat.InboxStyle 类型。图2左部为NotificationCompat.BigTextStyle。图2右部 为:NotificationCompat.BigPictureStyle
3>自定义布局notification
除了系统提供的notification,我们也可以自定义notification。如下图所示的一个音乐播放器控制notification:
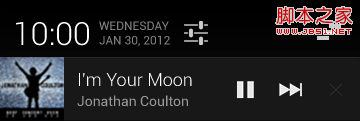 图3
图3
如何创建notification
1>实例化一个NotificationCompat.Builder对象;如builder
2>调用builder的相关方法对notification进行上面提到的各种设置
3>调用builder.build()方法此方法返回一个notification对象。
4>实例化一个NotificationManager对象;如:manager
5>调用manager的notify方法。
注:
一个notification不必对上面所有的选项都进行设置,但有3项是必须的:
小图标, set by setSmallIcon()
内容标题, set by setContentTitle()
内容, set by setContentText()
示例代码
示例程序截图:
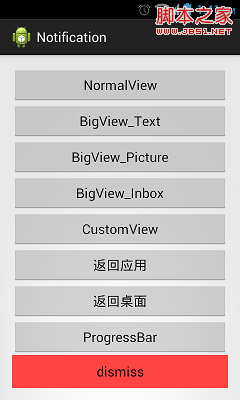
0>初始化部分代码
复制代码 代码如下:
View Code
public class MainActivity extends Activity implements OnClickListener {
private static final int NOTIFICATION_ID_1 = 0;
private static final int NOTIFICATION_ID_2 = 1;
private static final int NOTIFICATION_ID_3 = 2;
private static final int NOTIFICATION_ID_4 = 3;
private static final int NOTIFICATION_ID_5 = 4;
private static final int NOTIFICATION_ID_6 = 5;
private static final int NOTIFICATION_ID_7 = 6;
private static final int NOTIFICATION_ID_8 = 7;
private static int messageNum = 0;
private Context context = this;
private NotificationManager manager;
private Bitmap icon;
private static final int[] btns = new int[] { R.id.btn1, R.id.btn2,
R.id.btn3, R.id.btn4, R.id.btn5, R.id.btn6, R.id.btn7, R.id.btn8,
R.id.btn9 };
@Override
protected void onCreate(Bundle savedInstanceState) {
super.onCreate(savedInstanceState);
setContentView(R.layout.activity_main);
init();
}
private void init() {
// 获取通知服务
manager = (NotificationManager) getSystemService(Context.NOTIFICATION_SERVICE);
// 注册监听器
for (int btn : btns) {
findViewById(btn).setOnClickListener(this);
}
icon = BitmapFactory.decodeResource(getResources(),
R.drawable.ic_launcher);
}
@Override
public void onClick(View v) {
switch (v.getId()) {
case R.id.btn1:
showNormal();
break;
case R.id.btn2:
showBigView_Text();
break;
case R.id.btn3:
showBigView_Pic();
break;
case R.id.btn4:
showBigView_Inbox();
break;
case R.id.btn5:
showCustomView();
break;
case R.id.btn6:
backApp();
break;
case R.id.btn7:
backScreen();
break;
case R.id.btn8:
showProgressBar();
break;
case R.id.btn9:
dismiss();
break;
default:
Toast.makeText(context, "error", Toast.LENGTH_SHORT).show();
break;
}
}
private void dismiss() {
manager.cancelAll();
}
1>普通notification
复制代码 代码如下:
View Code
private void showNormal() {
Notification notification = new NotificationCompat.Builder(context)
.setLargeIcon(icon).setSmallIcon(R.drawable.ic_launcher)
.setTicker("showNormal").setContentInfo("contentInfo")
.setContentTitle("ContentTitle").setContentText("ContentText")
.setNumber(++messageNum)
.setAutoCancel(true).setDefaults(Notification.DEFAULT_ALL)
.build();
manager.notify(NOTIFICATION_ID_1, notification);
}
2>大布局Text类型notification
复制代码 代码如下:
View Code
private void showBigView_Text() {
NotificationCompat.BigTextStyle textStyle = new BigTextStyle();
textStyle
.setBigContentTitle("BigContentTitle")
.setSummaryText("SummaryText")
.bigText(
"I am Big Texttttttttttttttttttttttttttttttttttttttttttt!!!!!!!!!!!!!!!!!!!......");
Notification notification = new NotificationCompat.Builder(context)
.setLargeIcon(icon).setSmallIcon(R.drawable.ic_launcher)
.setTicker("showBigView_Text").setContentInfo("contentInfo")
.setContentTitle("ContentTitle").setContentText("ContentText")
.setStyle(textStyle)
.setAutoCancel(true).setDefaults(Notification.DEFAULT_ALL)
.build();
manager.notify(NOTIFICATION_ID_2, notification);
}
3> 大布局Picture类型notificatio
复制代码 代码如下:
View Code
private void showBigView_Pic() {
NotificationCompat.BigPictureStyle pictureStyle = new BigPictureStyle();
pictureStyle.setBigContentTitle("BigContentTitle")
.setSummaryText("SummaryText").bigPicture(icon);
Notification notification = new NotificationCompat.Builder(context)
.setLargeIcon(icon).setSmallIcon(R.drawable.ic_launcher)
.setTicker("showBigView_Pic").setContentInfo("contentInfo")
.setContentTitle("ContentTitle").setContentText("ContentText")
.setStyle(pictureStyle)
.setAutoCancel(true).setDefaults(Notification.DEFAULT_ALL)
.build();
manager.notify(NOTIFICATION_ID_3, notification);
}
4>大布局Inbox类型notification
复制代码 代码如下:
View Code
private void showBigView_Inbox() {
NotificationCompat.InboxStyle inboxStyle = new NotificationCompat.InboxStyle();
inboxStyle.setBigContentTitle("BigContentTitle").setSummaryText(
"SummaryText");
for (int i = 0; i < 5; i++)
inboxStyle.addLine("news:" + i);
Notification notification = new NotificationCompat.Builder(context)
.setLargeIcon(icon).setSmallIcon(R.drawable.ic_launcher)
.setTicker("showBigView_Inbox").setContentInfo("contentInfo")
.setContentTitle("ContentTitle").setContentText("ContentText")
.setStyle(inboxStyle)
.setAutoCancel(true).setDefaults(Notification.DEFAULT_ALL)
.build();
manager.notify(NOTIFICATION_ID_4, notification);
}
5>自定义notification
效果图:
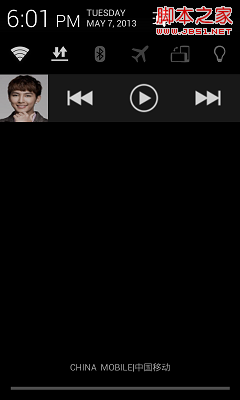
并对中间的播放按钮做了一个简单的点击处理事件(点击播放后,请关闭幕帘否则可能会看不到toast提示)
复制代码 代码如下:
View Code
private void showCustomView() {
RemoteViews remoteViews = new RemoteViews(getPackageName(),
R.layout.custom_notification);
Intent intent = new Intent(this, TestMusicControl.class);
PendingIntent pendingIntent = PendingIntent.getBroadcast(context, 0,
intent, 0);
remoteViews.setOnClickPendingIntent(R.id.paly_pause_music,
pendingIntent);
NotificationCompat.Builder builder = new Builder(context);
builder.setContent(remoteViews).setSmallIcon(R.drawable.music_icon)
.setLargeIcon(icon).setOngoing(true)
.setTicker("music is playing");
manager.notify(NOTIFICATION_ID_8, builder.build());
}
布局文件:
复制代码 代码如下:
View Code
<?xml version="1.0" encoding="utf-8"?>
<LinearLayout xmlns:android="http://schemas.android.com/apk/res/android"
android:layout_width="match_parent"
android:layout_height="match_parent"
android:gravity="center_vertical"
android:orientation="horizontal" >
<ImageView
android:id="@+id/songer_pic"
android:layout_width="64dp"
android:layout_height="64dp"
android:src="@drawable/yan" />
<LinearLayout
android:layout_width="fill_parent"
android:layout_height="fill_parent"
android:gravity="center_vertical"
android:orientation="horizontal" >
<ImageView
android:id="@+id/last_music"
android:layout_width="0dp"
android:layout_height="48dp"
android:layout_weight="1"
android:src="@drawable/music_previous" />
<ImageView
android:id="@+id/paly_pause_music"
android:layout_width="0dp"
android:layout_height="48dp"
android:layout_weight="1"
android:src="@drawable/music_play" />
<ImageView
android:id="@+id/next_music"
android:layout_width="0dp"
android:layout_height="48dp"
android:layout_weight="1"
android:src="@drawable/music_next" />
</LinearLayout>
</LinearLayout>
带进度条的notification
复制代码 代码如下:
View Code
private void showProgressBar() {
final NotificationCompat.Builder builder = new NotificationCompat.Builder(
context);
builder.setLargeIcon(icon).setSmallIcon(R.drawable.ic_launcher)
.setTicker("showProgressBar").setContentInfo("contentInfo")
.setOngoing(true).setContentTitle("ContentTitle")
.setContentText("ContentText");
new Thread(new Runnable() {
@Override
public void run() {
int progress = 0;
for (progress = 0; progress < 100; progress += 5) {
//将setProgress的第三个参数设为true即可显示为无明确进度的进度条样式
builder.setProgress(100, progress, false);
manager.notify(NOTIFICATION_ID_7, builder.build());
try {
// Sleep for 5 seconds
Thread.sleep(2 * 1000);
} catch (InterruptedException e) {
System.out.println("sleep failure");
}
}
builder.setContentTitle("Download complete")
.setProgress(0, 0, false).setOngoing(false);
manager.notify(NOTIFICATION_ID_7, builder.build());
}
}).start();
}
点击事件处理
--------------------------------------------------------------------------------
有时候我们可能需要实现这样的功能:当新notification出现时,我们希望点击它后可直接进入应用相应的界面中去完整查看或处理此消息的功能。然后,当我们点击back按钮时返回到应用主界面而不是桌面。比如:当我们有新的短信来时,我们在任务栏中点击它后进入读信息页面,当我们读完短信后,按“返回”键回到短信的主界面,而不是手机桌面。要实现这样的功能要我们做相应的处理:
1>返回应用主界面
复制代码 代码如下:
View Code
private void backApp() {
TaskStackBuilder stackBuilder = TaskStackBuilder.create(this);
// Adds the back stack
stackBuilder.addParentStack(OtherActivity.class);
// Adds the Intent to the top of the stack
Intent resultIntent = new Intent(this, OtherActivity.class);
stackBuilder.addNextIntent(resultIntent);
// Gets a PendingIntent containing the entire back stack
PendingIntent resultPendingIntent = stackBuilder.getPendingIntent(0,
PendingIntent.FLAG_UPDATE_CURRENT);
Notification notification = new NotificationCompat.Builder(context)
.setLargeIcon(icon).setSmallIcon(R.drawable.ic_launcher)
.setTicker("backApp").setContentInfo("contentInfo")
.setContentTitle("ContentTitle").setContentText("ContentText")
.setContentIntent(resultPendingIntent).setAutoCancel(true)
.setDefaults(Notification.DEFAULT_ALL).build();
manager.notify(NOTIFICATION_ID_5, notification);
this.finish();
}
并需要我们在配置文件中对我们用来显示详细信息的OtherActivity进行相应的配置如下:
复制代码 代码如下:
<activity
android:name="com.example.notification.OtherActivity"
android:label="@string/title_activity_other"
android:parentActivityName=".MainActivity" >
<meta-data
android:name="android.support.PARENT_ACTIVITY"
android:value=".MainActivity" />
</activity>
2>直接返回桌面
有些时候我们可能需要实现这样的功能:当我们点击notification时弹出一个稍大点的窗口来显示整个消息,这窗口的作用就是用来显示整个消息内容的,和此应用内的其它Activity都没有关系,然后当我们点击"back"后直接返回到手机桌面。要实现这样的功能我们只需要调用builder的.setContentIntent方法,然后对所要跳转到的activity在配置文件中进行一些配置:
复制代码 代码如下:
View Code
private void backScreen() {
Intent notifyIntent = new Intent(this, SpecialActivity.class);
// Sets the Activity to start in a new, empty task
notifyIntent.setFlags(Intent.FLAG_ACTIVITY_NEW_TASK
| Intent.FLAG_ACTIVITY_CLEAR_TASK);
// Creates the PendingIntent
PendingIntent notify_Intent = PendingIntent.getActivity(this, 0,
notifyIntent, PendingIntent.FLAG_UPDATE_CURRENT);
Notification notification = new NotificationCompat.Builder(context)
.setLargeIcon(icon).setSmallIcon(R.drawable.ic_launcher)
.setTicker("backScreen").setContentInfo("contentInfo")
.setContentTitle("ContentTitle").setContentText("ContentText")
.setContentIntent(notify_Intent).setAutoCancel(true)
.setDefaults(Notification.DEFAULT_ALL).build();
manager.notify(NOTIFICATION_ID_6, notification);
this.finish();
}
配置文件:
复制代码 代码如下:
<activity
android:name="com.example.notification.SpecialActivity"
android:excludeFromRecents="true"
android:label="@string/title_activity_special"
android:launchMode="singleTask"
android:taskAffinity="" >
源码下载
- 深入解析Android App开发中Context的用法
- Android动态布局小结
- Android开发中Eclipse报错及对应处理方法总
- Android ContentResolver使用说明
- Android手机开发 使用线性布局和相对布局实
- 完美解决Android三星手机从图库选择照片旋转
- Android实现文字和图片混排(文字环绕图片)效