
- Android中RecyclerView点击Item设置事件
- Android学习项目之简易版微信为例(二)
- android 弹出提示框的使用(图文实例)
- 使用Android的OkHttp包实现基于HTTP协议的文件上传下载
- Android仿美团分类下拉菜单实例代码
- android 默认时间格式修改方法
- Android事件传递机制
- Android实现信号强度监听的方法
- 微信公众平台开发入门教程(图文详解)
- Android异步加载数据和图片的保存思路详解
- Android XUtils3框架的基本使用方法(二)
- 深入Android线程的相关问题解惑
- android通过jxl读excel存入sqlite3数据库
- android控件之WebView控件缩小
- [Android开发从零开始].13.Table.Layout学习
- Android 实现不依赖焦点和选中的TextView跑马灯
- Android中实现Runnable接口简单例子
- 实例解析Android ImageView的scaleType属性
- Android编程之界面实现全屏显示的方法(2种方法)
- Android应用开发中Fragment的静态加载与动态加载实例
- Android动画之渐变动画(Tween Animation)详解 (渐变、缩放、位移、旋转)
- Android 实现沉浸式状态栏的方法
- android TextView多行文本(超过3行)使用ellipsize属性无效问题的解决方法
- 浅谈Android app开发中Fragment的Transaction操作
- 基于Android实现3D翻页效果
- Android测量每秒帧数Frames Per Second (FPS)的方法
- Android中使用定时器的三种方法
- Android监听Home键和Back键的区别介绍
- android图像绘制(一)多种方法做图像镜像
- android中可以通过两种方式调用接口发送短信
深入Android 五大布局对象的应用
FrameLayout(帧布局),LinearLayout (线性布局),AbsoluteLayout(绝对布局),RelativeLayout(相对布局),TableLayout(表格布局)
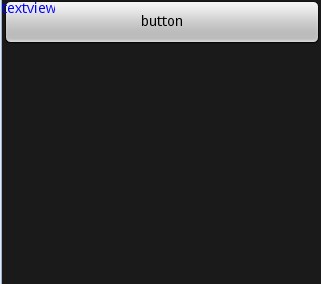
FrameLayout:
FrameLayout是最简单的一个布局对象。它被定制为你屏幕上的一个空白备用区域,之后你可以在其中填充一个单一对象 ,比如,一张你要发布的图片。所有的子元素将会固定在屏幕的左上角;你不能为FrameLayout中的一个子元素指定一个位置。后一个子元素将会直接在前 一个子元素之上进行覆盖填充,把它们部份或全部挡住(除非后一个子元素是透明的)。

复制代码 代码如下:
<?xml version="1.0" encoding="utf-8"?>
<FrameLayout xmlns:android="http://schemas.android.com/apk/res/android"
android:layout_width="fill_parent"
android:layout_height="fill_parent" >
<!-- 我们在这里加了一个Button按钮 -->
<Button
android:text="button"
android:layout_width="fill_parent"
android:layout_height="wrap_content" />
<TextView
android:text="textview"
android:textColor="#0000ff"
android:layout_width="wrap_content"
android:layout_height="wrap_content" />
</FrameLayout>
右边图片常见为视频点播,两张图片叠放在一起,后一张覆盖前一张,添加链接到播放地址;
LinearLayout:
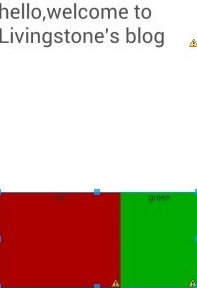
LinearLayout以你为它设置的垂直或水平的属性值,来排列所有的子元素。所有的子元素都被堆放在其它元素之后,因此一个垂直列表的每一行只会有 一个元素,而不管他们有多宽,而一个水平列表将会只有一个行高(高度为最高子元素的高度加上边框高度)。LinearLayout保持子元素之间的间隔以 及互相对齐(相对一个元素的右对齐、中间对齐或者左对齐)。
LinearLayout还支持为单独的子元素指定weight 。好处就是允许子元素可以填充屏幕上的剩余空间。这也避免了在一个大屏幕中,一串小对象挤成一堆的情况,而是允许他们放大填充空白。子元素指定一个weight 值,剩余的空间就会按这些子元素指定的weight 比例分配给这些子元素。默认的 weight 值为0。例如,如果有三个文本框,其中两个指定了weight 值为1,那么,这两个文本框将等比例地放大,并填满剩余的空间,而第三个文本框不会放大。
复制代码 代码如下:
<LinearLayout xmlns:android="http://schemas.android.com/apk/res/android"
android:layout_width="match_parent"
android:layout_height="match_parent"
android:orientation="vertical" >
<LinearLayout
android:layout_width="fill_parent"
android:layout_height="fill_parent"
android:orientation="vertical"
android:layout_weight="1" >
<TextView
android:layout_width="fill_parent"
android:layout_height="wrap_content"
android:text="hello,welcome to Livingstone's blog"
android:textSize="15pt" /> </LinearLayout>
<LinearLayout
android:layout_width="fill_parent"
android:layout_height="fill_parent"
android:orientation="horizontal"
android:layout_weight="2" >
<TextView
android:layout_width="wrap_content"
android:layout_height="fill_parent"
android:layout_weight="2"
android:background="#aa0000"
android:gravity="center_horizontal"
android:text="red" />
<TextView
android:layout_width="wrap_content"
android:layout_height="fill_parent"
android:layout_weight="1"
android:background="#00aa00"
android:gravity="center_horizontal"
android:text="green" /> </LinearLayout>
</LinearLayout>
AbsoluteLayout:
AbsoluteLayout 可以让子元素指定准确的x/y坐标值,并显示在屏幕上。(0, 0)为左上角,当向下或向右移动时,坐标值将变大。AbsoluteLayout 没有页边框,允许元素之间互相重叠(尽管不推荐)。我们通常不推荐使用 AbsoluteLayout ,除非你有正当理由要使用它,因为它使界面代码太过刚性,以至于在不同的设备上可能不能很好地工作。
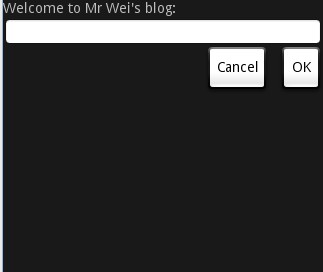
RelativeLayout:
RelativeLayout 允许子元素指定他们相对于其它元素或父元素的位置(通过ID 指定)。因此,你可以以右对齐,或上下,或置于屏幕中央的形式来 排列两个元素。元素按顺序排列,因此如果第一个元素在屏幕的中央,那么相对于这个元素的其它元素将以屏幕中央的相对位置来排列。如果使用XML 来指定这个 layout ,在你定义它之前,被关联的元素必须定义。
 复制代码 代码如下:
<LinearLayout xmlns:android="http://schemas.android.com/apk/res/android"
android:layout_width="match_parent"
android:layout_height="match_parent"
android:orientation="vertical" >
<LinearLayout
android:layout_width="fill_parent"
android:layout_height="fill_parent"
android:orientation="vertical"
android:layout_weight="1" >
<TextView
android:layout_width="fill_parent"
android:layout_height="wrap_content"
android:text="hello,welcome to Livingstone's blog"
android:textSize="15pt" /> </LinearLayout>
<LinearLayout
android:layout_width="fill_parent"
android:layout_height="fill_parent"
android:orientation="horizontal"
android:layout_weight="2" >
<TextView
android:layout_width="wrap_content"
android:layout_height="fill_parent"
android:layout_weight="2"
android:background="#aa0000"
android:gravity="center_horizontal"
android:text="red" />
<TextView
android:layout_width="wrap_content"
android:layout_height="fill_parent"
android:layout_weight="1"
android:background="#00aa00"
android:gravity="center_horizontal"
android:text="green" /> </LinearLayout>
</LinearLayout>
TableLayout:
TableLayout 将子元素的位置分配到行或列中。一个TableLayout 由许多的TableRow 组成,每个TableRow都会定义一个 row (事实上,你可以定义其它的子对象,这在下面会解释到)。TableLayout 容器不会显示row、cloumns 或cell 的边框线。每个 row 拥有0个或多个的cell ;每个cell 拥有一个View 对象。表格由列和行组成许多的单元格。表格允许单元格为空。单元格不能跨列,这与HTML 中的不一样。

复制代码 代码如下:
<TableLayout xmlns:android="http://schemas.android.com/apk/res/android"
android:layout_width="fill_parent" android:layout_height="fill_parent"
android:stretchColumns="1">
<TableRow>
<TextView android:layout_column="1" android:text="Open..." />
<TextView android:text="Ctrl-O" android:gravity="right" />
</TableRow>
<TableRow>
<TextView android:layout_column="1" android:text="Save..." />
<TextView android:text="Ctrl-S" android:gravity="right" />
</TableRow>
<View android:layout_height="2dip" android:background="#FF909090" /> //这里是上图中的分隔线
<TableRow>
<TextView android:text="X" />
<TextView android:text="Export..." />
<TextView android:text="Ctrl-E" android:gravity="right " /> //让TextView显示在右面
</TableRow>
<View android:layout_height="2dip" android:background="#FF909090" />
<TableRow>
<TextView android:layout_column="1" android:text="Quit"
android:padding="3dip" />
</TableRow>
</TableLayout>
- 上一篇文章: Android 程序应用的生命周期
- 下一篇文章: 在Android中创建菜单项Menu以及获取手机分辨率的解决方法
- 深入浅析Android手机卫士保存密码时进行md5
- Android布局实现圆角边框效果
- Android中SwipeBack实现右滑返回效果
- Android开发之自定义控件用法详解
- Android 使用 ViewPager循环广告位的实现
- Android开发apk反编译和二次打包教程
- Android 数据库SQLite 写入SD卡的方法