- iOS非ARC基本内存管理系列总结6-设计微博模型
- UITextField输入中文限制
- iOS App开发中通过UIDevice类获取设备信息的方法
- iOS获取文件和文件夹大小
- 触摸事件-拖动view
- 第一个OC类
- Swift基础语法之变量函数
- Note_Master-DetailApplication(iOStemplate)_03_main.m
- 《ARC以及非ARC的讨论》
- Coredata第一课认识coredata
- OC基础--self关键字
- OC-26.CAAnimationGroup
- IOSAndWCF上传文件
- 从一个子视图或者一个View中刷新其他UITableView
- 表格选中效果展示
- 非常难得的iPad版房地产售楼助手应用
- 实例解析iOS app开发中音频文件播放工具类的封装
- IOS开发UI基础UIView
- GPUImageAPI文档之GPUImageOutput类
- 【IOS学习】之四、协议,委托,分类粗解
- IOS开发之──应用之间调用(1)
- OC-1.面向过程和面向对象的思想对比
- UIImageView自带动画+N张图片实现很炫的动画
- 如何解决IOS动画中Autolayout与ViewTransforms的冲突
- 苹果_公司开发者账号申请_公司账号申请
- UIWebView的HTML5扩展
- MAC下将libpomelo连接到cocos2d-x
- iOS定位问题解决方案
- 【读书笔记】iOS-安全地传输用户密码的方法
- iOS、Mac OS X系统中编程实现汉字转拼音的方法(超级简单)
iOS应用中存储用户设置的plist文件的创建与读写教程
在做iOS开发时,经常用到到plist文件, 那plist文件是什么呢? 它全名是:Property List,属性列表文件,它是一种用来存储串行化后的对象的文件。属性列表文件的扩展名为.plist ,因此通常被称为 plist文件。文件是xml格式的。
Plist文件通常用于储存用户设置,也可以用于存储捆绑的信息
我们创建一个项目来学习plist文件的读写。
1、创建项目Plistdemo
项目创建之后可以找到项目对应的plist文件,打开如下图所示:
在编辑器中显示类似与表格的形式,可以在plist上右键,用源码方式打开,就能看到plist文件的xml格式了。
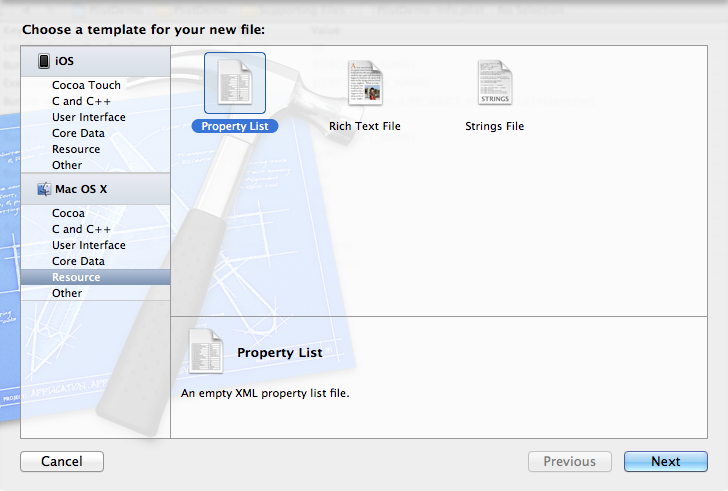
2、创建plist文件。
按command +N快捷键创建,或者File ―> New ―> New File,选择Mac OS X下的Property List
文件名为 customInfo,Group选择Supporting Files。
3、单击新建的customInfo.plist,我们添加数据,如下图:
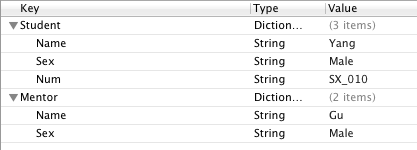
注意,Type一项的类型,选择的是Dictionary,以Source Code打开,显示如下:
<?xml version="1.0" encoding="UTF-8"?>
<!DOCTYPE plist PUBLIC "-//Apple//DTD PLIST 1.0//EN" "http://www.apple.com/DTDs/PropertyList-1.0.dtd">
<plist version="1.0">
<dict>
 <key>Student</key>
 <dict>
 <key>Name</key>
 <string>Yang</string>
 <key>Sex</key>
 <string>Male</string>
 <key>Num</key>
 <string>SX_010</string>
 </dict>
 <key>Mentor</key>
 <dict>
 <key>Name</key>
 <string>Gu</string>
 <key>Sex</key>
 <string>Male</string>
 </dict>
</dict>
</plist>
4、为视图添加控件:
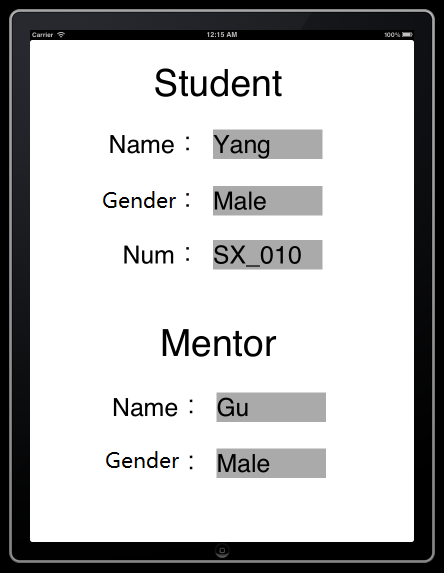
单击BIDViewController.xib,打开IB,拖几个控件上去,并设置好布局,如下图:

上图中所有的控件都是Label,并设置了字体大小。
5、接下来就是映射呗,把五个灰色的Label都映射到BIDViewController.h文件中,类型都是OutLet,名称依次是stuName,stuSex,stuNum,mtName,mtSex。
6、单击BIDViewController.m,在viewDidLoad方法中的[super viewDidLoad]之后添加如下代码:
复制代码 代码如下:
//首先读取studentInfo.plist中的数据
NSString *plistPath = [[NSBundle mainBundle] pathForResource:@"customInfo" ofType:@"plist"];
NSDictionary *dictionary = [[NSDictionary alloc] initWithContentsOfFile:plistPath];
//将学生信息填入视图
NSDictionary *tmpInfo = [dictionary objectForKey: @"Student"];
self.stuName.text = [NSString stringWithFormat:@"%@", [tmpInfo objectForKey: @"Name"]];
self.stuSex.text = [NSString stringWithFormat:@"%@", [tmpInfo objectForKey: @"Sex"]];
self.stuNum.text = [NSString stringWithFormat:@"%@", [tmpInfo objectForKey: @"Num"]];
//将导师信息写入视图
tmpInfo = [dictionary objectForKey: @"Mentor"];
self.mtName.text = [NSString stringWithFormat:@"%@", [tmpInfo objectForKey: @"Name"]];
self.mtSex.text = [NSString stringWithFormat:@"%@", [tmpInfo objectForKey: @"Sex"]];
7、运行,查看效果: