
- [Android开发视频教学]01_28_项目详细设计
- Android编程绘制圆形图片的方法
- Android编程之非调用系统界面实现发送彩信的方法(MMS)
- Android中ImageView使用网络图片资源的方法
- Android笔记之:App应用之启动界面SplashActivity的使用
- Android开发:TextView加入滚动条示例
- Android Studio使用教程(四):Gradle基础
- Android开发中Intent传递对象的方法分析
- Android实现无标题栏全屏的方法
- Android动画之渐变动画(Tween Animation)详解 (渐变、缩放、位移、旋转)
- 探讨:android项目开发 统筹兼顾 需要考虑的因素
- Android中Parcel用法详解
- 轻松实现Android语音识别功能
- android IntentService实现原理及内部代码分享
- Android基础开发之手势识别
- Android中Intent机制详解及示例总结(总结篇)
- Android布局(RelativeLayout、TableLayout等)使用方法
- Android UI效果之绘图篇(三)
- Android UI设计系列之自定义Dialog实现各种风格的对话框效果(7)
- Android系统更改状态栏字体颜色
- 深入Android MediaPlayer的使用方法详解
- 20行Android代码写一个CircleImageView
- 解析android创建快捷方式会启动两个应用的问题
- Android 往Framework中添加新资源的方法详解
- Android图片缓存之Bitmap详解(一)
- Android编程之动态壁纸实例分析
- Android实现手势控制ImageView图片大小
- Android clipChildren属性实例详解
- Android编程获取控件宽和高的方法总结分析
- Android编程之内存溢出解决方案(OOM)实例总结
Android ScrollView滑动实现仿QQ空间标题栏渐变
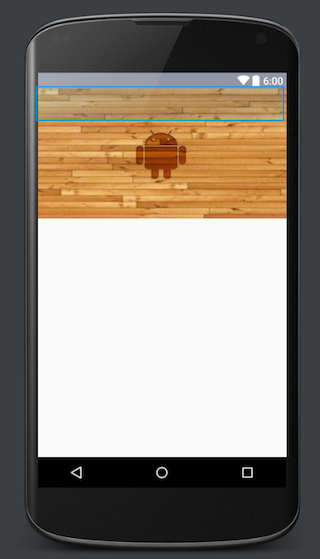
今天来研究的是ScrollView-滚动视图,滚动视图又分横向滚动视图(HorizontalScrollView)和纵向滚动视图(ScrollView),今天主要研究纵向的。相信大家在开发中经常用到,ScrollView的功能已经很强大了,但是仍然满足不了我们脑洞大开的UI设计师们,所以我们要自定义…本篇文章主要讲监听ScrollView的滑动实现仿QQ空间标题栏渐变,先看一下效果图:
好了我们切入主题。
有可能你不知道的那些ScrollView属性
•android:scrollbars
设置滚动条显示。none(隐藏),horizontal(水平),vertical(垂直)
•android:scrollbarStyle
设置滚动条的风格和位置。设置值:insideOverlay、insideInset、outsideOverlay、outsideInset
•android:scrollbarThumbHorizontal
设置水平滚动条的drawable。
•android:soundEffectsEnabled
设置点击或触摸时是否有声音效果
•android:fadingEdge
设置拉滚动条时,边框渐变的放向。none(边框颜色不变),horizontal(水平方向颜色变淡),vertical(垂直方向颜色变淡)。参照fadingEdgeLength的效果图 android:fadingEdgeLength 设置边框渐变的长度
•android:scrollX
以像素为单位设置水平方向滚动的的偏移值,在GridView中可看的这个效果
•android:scrollY
以像素为单位设置垂直方向滚动的的偏移值
•android:scrollbarAlwaysDrawHorizontalTrack
设置是否始终显示垂直滚动条
•android:scrollbarDefaultDelayBeforeFade
设置N毫秒后开始淡化,以毫秒为单位。
以上这些属性有兴趣的可以去研究一下,这里就不详细讲了。很多属性并不常用,下面说说我们经常用的,怎样监听ScrollView的滑动并实现标题栏的渐变?
ScrollView滑动监听:
Google并没有给我们提供ScrollView的滑动距离、是否滑动到布局底部、顶部的方法,但是提供了一个onScrollChanged方法:
@Override
  protected void onScrollChanged(int x, int y, int oldx, int oldy) {
    super.onScrollChanged(x, y, oldx, oldy);
    //todo:
    }
  }
通过查看源码注释,
/**
* This is called in response to an internal scroll in this view (i.e., the
* view scrolled its own contents). This is typically as a result of
* {@link #scrollBy(int, int)} or {@link #scrollTo(int, int)} having been
* called.
*
* @param l Current horizontal scroll origin.
* @param t Current vertical scroll origin.
* @param oldl Previous horizontal scroll origin.
* @param oldt Previous vertical scroll origin.
*/
我们可以知道这个方法的参数分别为:
l:当前横向滑动距离
t:当前纵向滑动距离
oldl:之前横向滑动距离
oldt:之前纵向滑动距离
但是这个方法我们不可以调用,我们可以重写接口或者重写ScrollView暴露该方法:
package com.hankkin.gradationscroll;

import android.content.Context;
import android.util.AttributeSet;
import android.widget.ScrollView;
/**
 * 带滚动监听的scrollview
 *
 */
public class GradationScrollView extends ScrollView {

  public interface ScrollViewListener {

    void onScrollChanged(GradationScrollView scrollView, int x, int y,
               int oldx, int oldy);

  }

  private ScrollViewListener scrollViewListener = null;

  public GradationScrollView(Context context) {
    super(context);
  }

  public GradationScrollView(Context context, AttributeSet attrs,
                int defStyle) {
    super(context, attrs, defStyle);
  }

  public GradationScrollView(Context context, AttributeSet attrs) {
    super(context, attrs);
  }

  public void setScrollViewListener(ScrollViewListener scrollViewListener) {
    this.scrollViewListener = scrollViewListener;
  }

  @Override
  protected void onScrollChanged(int x, int y, int oldx, int oldy) {
    super.onScrollChanged(x, y, oldx, oldy);
    if (scrollViewListener != null) {
      scrollViewListener.onScrollChanged(this, x, y, oldx, oldy);
    }
  }

}
设置标题渐变
滚动监听暴露出来我们就该去设置标题栏随着ScrollView的滑动来改变标题栏的透明度实现渐变:
我们先看一下布局:
<?xml version="1.0" encoding="utf-8"?>
<RelativeLayout xmlns:android="http://schemas.android.com/apk/res/android"
  xmlns:tools="http://schemas.android.com/tools"
  android:layout_width="match_parent"
  android:layout_height="match_parent"
  tools:context="com.hankkin.gradationtitlebar.QQSpeakActivity">

  <com.hankkin.gradationscroll.GradationScrollView
    android:id="@+id/scrollview"
    android:layout_width="match_parent"
    android:layout_height="match_parent"
    android:scrollbars="none">
    <LinearLayout
      android:layout_width="match_parent"
      android:layout_height="wrap_content"
      android:orientation="vertical" >
      <ImageView
        android:id="@+id/iv_banner"
        android:scaleType="fitXY"
        android:src="@drawable/banner3"
        android:layout_width="match_parent"
        android:layout_height="200dp" />
      <com.hankkin.gradationscroll.NoScrollListview
        android:id="@+id/listview"
        android:layout_width="match_parent"
        android:layout_height="wrap_content" >
      </com.hankkin.gradationscroll.NoScrollListview>
    </LinearLayout>
  </com.hankkin.gradationscroll.GradationScrollView>
  <TextView
    android:paddingBottom="10dp"
    android:id="@+id/textview"
    android:layout_width="match_parent"
    android:layout_height="55dp"
    android:gravity="center|bottom"
    android:text="我是标题"
    android:textSize="18sp"
    android:textColor="@color/transparent"
    android:background="#00000000" />
</RelativeLayout>
最外层是我们自定义的ScrollView,包裹着一张背景图片和一个ListView(ListView重写为不可以滑动),然后布局的上面有一个TextView当做标题栏,你也可以用布局。
然后我们需要获取图片的高度,并且设置滚动监听,随着滚动的距离来设置标题栏的颜色透明度和字体颜色的透明度
/**
   * 获取顶部图片高度后,设置滚动监听
   */
  private void initListeners() {

    ViewTreeObserver vto = ivBanner.getViewTreeObserver();
    vto.addOnGlobalLayoutListener(new ViewTreeObserver.OnGlobalLayoutListener() {
      @Override
      public void onGlobalLayout() {
        textView.getViewTreeObserver().removeGlobalOnLayoutListener(
            this);
        height = ivBanner.getHeight();

        scrollView.setScrollViewListener(QQSpeakActivity.this);
      }
    });
  }
/**
   * 滑动监听
   * @param scrollView
   * @param x
   * @param y
   * @param oldx
   * @param oldy
   */
  @Override
  public void onScrollChanged(GradationScrollView scrollView, int x, int y,
                int oldx, int oldy) {
    // TODO Auto-generated method stub
    if (y <= 0) {  //设置标题的背景颜色
      textView.setBackgroundColor(Color.argb((int) 0, 144,151,166));
    } else if (y > 0 && y <= height) { //滑动距离小于banner图的高度时,设置背景和字体颜色颜色透明度渐变
      float scale = (float) y / height;
      float alpha = (255 * scale);
      textView.setTextColor(Color.argb((int) alpha, 255,255,255));
      textView.setBackgroundColor(Color.argb((int) alpha, 144,151,166));
    } else {  //滑动到banner下面设置普通颜色
      textView.setBackgroundColor(Color.argb((int) 255, 144,151,166));
    }
  }
OK,这就实现了你在最上方看到的效果了。
其实并不难,只是我们没有亲自动手去实现,相信多动手自己亲自去实现一下,UI想要的我们都可以实现。
源码地址:https://github.com/Hankkin/GradationTitleBar
项目里面我还添加了一个带banner的,原理是一样的。
以上就是本文的全部内容,希望对大家的学习有所帮助,也希望大家多多支持脚本之家。
- Android开发之TimePicker控件用法实例详解
- Android Map新用法:MapFragment应用介绍
- camera录制视频的缩略图获取原理心得分享
- 使用WEB工具快速提高Android开发效率
- Android日期显示和日期选择库
- Android中使用ContentProvider管理系统资源
- Android工程:引用另一个Android工程的方法详