
- Android入门之RelativeLayout、FrameLayout用法分析
- [Android开发视频教程]02_11_Animations的使用(四)
- Android 使用Gallery实现3D相册(附效果图+Demo源码)
- Android提高之多方向抽屉实现方法
- Android实现带磁性的悬浮窗体效果
- 详细讲解Android中使用LoaderManager加载数据的方法
- 详解Android中提示对话框(ProgressDialog和DatePickerDialog和TimePickerDialog&PopupWindow)
- 如何判断软件程序是否联网 联网状态提示信息Android实现
- Android线程的优先级设置方法技巧
- 解析Java的迭代器中的fast-fail错误检测机制
- Android实现手势控制ImageView图片大小
- Android编程之控件可拖动的实现方法
- Android RecyclerView实现下拉刷新和上拉加载
- Android XML数据解析简单示例
- Android SQLite详解及示例代码
- Android页面之间进行数据回传的方法分析
- Android shell命令行中过滤adb logcat输出的方法
- Android中基于XMPP协议实现IM聊天程序与多人聊天室
- Android修改源码解决Alertdialog触摸对话框边缘消失的问题
- Android字体设置及Roboto字体使用方法
- Android中的Button自定义点击效果实例代码
- android private libraries 中的包源代码添加方法
- Android 如何收集已发布程序的崩溃信息
- Android开发之时间日期操作实例
- android Textview文字监控(Textview使用方法)
- 举例讲解Android应用中SimpleAdapter简单适配器的使用
- Android TextView字体颜色设置方法小结
- Android 有道词典的简单实现方法介绍
- Android控件系列之EditText使用方法
- Android Service生命周期详解
Android编程重写ViewGroup实现卡片布局的方法
作者:佚名 Android开发编辑:admin 更新时间:2022-07-23
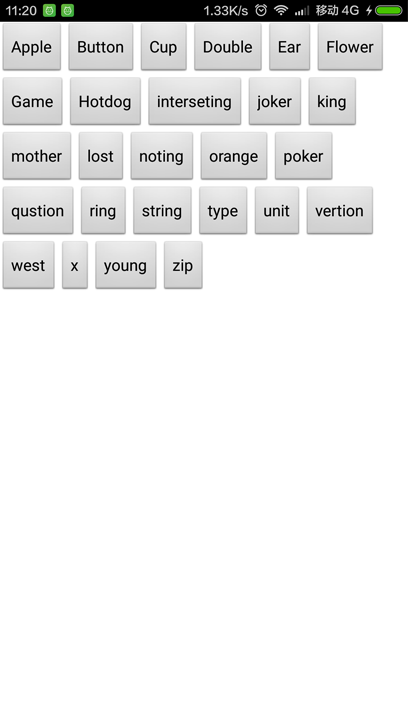
本文实例讲述了Android编程重写ViewGroup实现卡片布局的方法。分享给大家供大家参考,具体如下:
实现效果如图:
实现思路
1. 重写onMeasure(int widthMeasureSpec, int heightMeasureSpec)设置每个子View的大小
2. 重写onLayout(boolean changed, int l, int t, int r, int b) 设置每个子View的位置
第一步:新建FlowLayout继承ViewGroup
package com.rong.activity;
import android.content.Context;
import android.util.AttributeSet;
import android.view.View;
import android.view.ViewGroup;
/**
 * 卡片布局
 *
 * @author 徐荣
 *
 */
public class FlowLayout extends ViewGroup {
  public FlowLayout(Context context, AttributeSet attrs) {
    super(context, attrs);
  }
  @Override
  protected void onLayout(boolean changed, int l, int t, int r, int b) {
    // 当前子View的数量
    int childSize = getChildCount();
    // 获取行宽
    int lineWidth = getMeasuredWidth();
    // 当前是第几行
    int lines = 1;
    // 当前累加的行宽
    int nowLineWidth = 0;
    for (int i = 0; i < childSize; i++) {
      View view = getChildAt(i);
      // 子View的宽度
      int childWidth = view.getMeasuredWidth();
      // 子View的高度
      int childHeight = view.getMeasuredHeight();
      // 如果当前的nowLineWidth+childWidth>= lineWidth 则换行
      if (nowLineWidth + childWidth >= lineWidth) {
        nowLineWidth = 0;
        lines = lines + 1;
      }
      // 设置子View的位置
      view.layout(nowLineWidth, childHeight * (lines - 1), nowLineWidth + childWidth, childHeight * lines);
      nowLineWidth = nowLineWidth + childWidth;
      // 如果nowLineWidth >= lineWidth 则换行
      if (nowLineWidth >= lineWidth) {
        nowLineWidth = 0;
        lines = lines + 1;
      }
    }
  }
  @Override
  protected void onMeasure(int widthMeasureSpec, int heightMeasureSpec) {
    super.onMeasure(widthMeasureSpec, heightMeasureSpec);
    // 设置自己View的大小
    setMeasuredDimension(widthMeasureSpec, heightMeasureSpec);
    for (int i = 0; i < getChildCount(); i++) {
      View view = getChildAt(i);
      // 设置每个子View的大小
      view.measure(view.getMeasuredWidth(), view.getMeasuredHeight());
    }
  }
}
第二步:新建布局文件
<?xml version="1.0" encoding="utf-8"?>
<RelativeLayout xmlns:android="http://schemas.android.com/apk/res/android"
  android:layout_width="match_parent"
  android:layout_height="match_parent"
  android:background="@android:color/black"
  android:orientation="vertical" >
  <com.rong.activity.FlowLayout
    android:layout_width="match_parent"
    android:layout_height="match_parent"
    android:background="#ffffff" >
    <Button
      android:layout_width="wrap_content"
      android:layout_height="wrap_content"
      android:text="Apple" />
    <Button
      android:layout_width="wrap_content"
      android:layout_height="wrap_content"
      android:text="Button" />
    <Button
      android:layout_width="wrap_content"
      android:layout_height="wrap_content"
      android:text="Cup" />
    <Button
      android:layout_width="wrap_content"
      android:layout_height="wrap_content"
      android:text="Double" />
    <Button
      android:layout_width="wrap_content"
      android:layout_height="wrap_content"
      android:text="Ear" />
    <Button
      android:layout_width="wrap_content"
      android:layout_height="wrap_content"
      android:text="Flower" />
    <Button
      android:layout_width="wrap_content"
      android:layout_height="wrap_content"
      android:text="Game" />
    <Button
      android:layout_width="wrap_content"
      android:layout_height="wrap_content"
      android:text="Hotdog" />
    <Button
      android:layout_width="wrap_content"
      android:layout_height="wrap_content"
      android:text="interseting" />
    <Button
      android:layout_width="wrap_content"
      android:layout_height="wrap_content"
      android:text="joker" />
    <Button
      android:layout_width="wrap_content"
      android:layout_height="wrap_content"
      android:text="king" />
    <Button
      android:layout_width="wrap_content"
      android:layout_height="wrap_content"
      android:text="mother" />
    <Button
      android:layout_width="wrap_content"
      android:layout_height="wrap_content"
      android:text="lost" />
    <Button
      android:layout_width="wrap_content"
      android:layout_height="wrap_content"
      android:text="noting" />
    <Button
      android:layout_width="wrap_content"
      android:layout_height="wrap_content"
      android:text="orange" />
    <Button
      android:layout_width="wrap_content"
      android:layout_height="wrap_content"
      android:text="poker" />
    <Button
      android:layout_width="wrap_content"
      android:layout_height="wrap_content"
      android:text="qustion" />
    <Button
      android:layout_width="wrap_content"
      android:layout_height="wrap_content"
      android:text="ring" />
    <Button
      android:layout_width="wrap_content"
      android:layout_height="wrap_content"
      android:text="string" />
    <Button
      android:layout_width="wrap_content"
      android:layout_height="wrap_content"
      android:text="type" />
    <Button
      android:layout_width="wrap_content"
      android:layout_height="wrap_content"
      android:text="unit" />
    <Button
      android:layout_width="wrap_content"
      android:layout_height="wrap_content"
      android:text="vertion" />
    <Button
      android:layout_width="wrap_content"
      android:layout_height="wrap_content"
      android:text="west" />
    <Button
      android:layout_width="wrap_content"
      android:layout_height="wrap_content"
      android:text="x" />
    <Button
      android:layout_width="wrap_content"
      android:layout_height="wrap_content"
      android:text="young" />
    <Button
      android:layout_width="wrap_content"
      android:layout_height="wrap_content"
      android:text="zip" />
  </com.rong.activity.FlowLayout>
</RelativeLayout>
运行!
更多关于Android相关内容感兴趣的读者可查看本站专题:《Android开发入门与进阶教程》、《Android基本组件用法总结》、《Android视图View技巧总结》、《Android布局layout技巧总结》及《Android控件用法总结》
希望本文所述对大家Android程序设计有所帮助。
- 上一篇文章: Android重写View并自定义属性实例分析
- 下一篇文章: Android编程绘制圆形图片的方法
- Android巧用ActionBar实现下拉式导航
- Android在启动adb时失败解决方案
- Android自定义控件实现边缘凹凸的卡劵效果
- Android资源命名规范 分享
- Android中通过反射实现圆角ImageView代码实
- Android编程下拉菜单spinner用法小结(附2则
- Android SQLite详解及示例代码