
- UIButton根据不同的状态设置layer
- IOS开发笔记-百度地图(第三方库)
- Objective-C排序算法实现
- 有关UIView、subview的几个基础知识点-IOS开发(实例)
- 在UILabel内计算内容的大小
- iOS各种控件默认高度
- iOS简单画板开发案例分享
- iOS传值之代理传值
- 【读书笔记】iOS-开发技巧-UILabel内容模糊的原因
- 实例讲解iOS应用开发中UIPickerView滚动选择栏的用法
- 体育资讯新闻应用客户端源码
- iOS-关于AVAudioSession的使用――后台播放音乐
- 写给iOS程序员的命令行使用秘籍
- Objective-C知识总结(3)
- [oc学习日记]NSDate
- iOS应用开发中的文字选中操作控件UITextView用法讲解
- 千里之行,始于足下。
- 微信朋友圈评论功能的细节考虑及实现
- [iOSUI进阶-2.4]彩票Demov1.4转盘动画
- iOS开发中对于摄像头的一些基本使用方法分享
- [iOS基础控件-6.9.3]QQ好友列表DemoTableView
- 服务器文件下载
- iOS如何解决并发请求时,只接受最后一个请求返回的结果
- Objective-C【protocol的引用问题】
- Archive&Unarchive
- iPhone图片拉伸的几种方法
- 查看iOSCrashlogs
- (2/18)重学Standford_iOS7开发_Xcode_课程笔记
- IOS页面间得传值方式
- 【学习笔记】【C语言】char类型
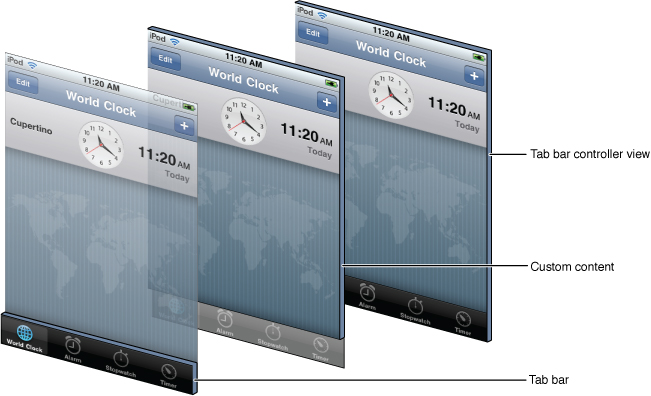
iOS开发中UITabBarController的使用示例
首先我们看一下它的view层级图:
复制代码 代码如下:
- (BOOL)application:(UIApplication *)application didFinishLaunchingWithOptions:(NSDictionary *)launchOptions
{
self.window = [[UIWindow alloc] initWithFrame:[[UIScreen mainScreen] bounds]];
// Override point for customization after application launch.
self.window.backgroundColor = [UIColor whiteColor];
#pragma mark - 设置tabBarItem
#pragma mark 第一个视图ViewController
HMT_AViewController * tabBarViewA = [[HMT_AViewController alloc] init];
// 设置A视图下----标签栏标题文字(可参照微信或者QQ体会)
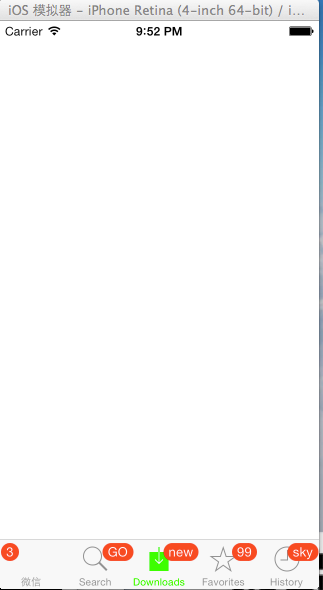
tabBarViewA.tabBarItem.title = @"微信";
// 设置A视图下----标签栏图片(因为自己没有图片,在这里随便设置了个名字)
//tabBarViewA.tabBarItem.image = [UIImage imageNamed:@"1.png"];
// 设置A视图下----标签栏信息提示(住:badgeValue是NSString类型 如下设置了3,就像QQ消息有3条未接受一样,给人一种提醒)
tabBarViewA.tabBarItem.badgeValue = @"3";
// ios7弃用了----标签栏选中的时候显示一张图片,没选中的时候显示另一张图片
//[tabBarViewA.tabBarItem setFinishedSelectedImage:actionMenu.selectedIcon withFinishedUnselectedImage:actionMenu.icon];
// ios7的方法(自己没有图片,所以代码里面的图片都是一个随便取的名字,没有实用意义)
//tabBarViewA.tabBarItem.selectedImage = actionMenu.selectedIcon;
#pragma mark 第二个视图ViewController
// 第二个视图ViewController
HMT_BViewController * tabBarViewB = [[HMT_BViewController alloc] init];
// 设置B视图下----标签栏
// 用系统提供的标识(可以算等价于图标和文字)进行设置(参数:UITabBarSystemItem是个枚举值,想要什么形式,就去系统提供的API中找)
tabBarViewB.tabBarItem = [[UITabBarItem alloc]initWithTabBarSystemItem:UITabBarSystemItemSearch tag:1];
// 设置B视图下----标签栏信息提示
tabBarViewB.tabBarItem.badgeValue = @"GO";
#pragma mark 第三个视图ViewController
HMT_CViewController * tabBarViewC = [[HMT_CViewController alloc] init];
tabBarViewC.tabBarItem = [[UITabBarItem alloc]initWithTabBarSystemItem:UITabBarSystemItemDownloads tag:2];
// 设置B视图下----标签栏信息提示
tabBarViewC.tabBarItem.badgeValue = @"new";
#pragma mark 第四个视图ViewController
HMT_DViewController * tabBarViewD = [[HMT_DViewController alloc] init];
tabBarViewD.tabBarItem = [[UITabBarItem alloc]initWithTabBarSystemItem:UITabBarSystemItemFavorites tag:3];
// 设置B视图下----标签栏信息提示
tabBarViewD.tabBarItem.badgeValue = @"99";
#pragma mark 第五个视图ViewController
HMT_EViewController * tabBarViewE = [[HMT_EViewController alloc] init];
tabBarViewE.tabBarItem = [[UITabBarItem alloc]initWithTabBarSystemItem:UITabBarSystemItemHistory tag:4];
// 设置B视图下----标签栏信息提示
tabBarViewE.tabBarItem.badgeValue = @"sky";
#pragma mark 第六个视图ViewController(系统默认能显示的最大视图个数是5个)
/* 如果你的viewControllers属性添加了多于五个的items,那tab bar controller将会自动插入一个特殊的view controller,
称为 More view controller,该 controller 将会负责管理多于的items,这个More view controller提供一个自定义的界面,
用table的方式呈现多余的view controller,并且view controller的数量是不限制的*/
HMT_FViewController * tabBarViewF = [[HMT_FViewController alloc] init];
tabBarViewF.tabBarItem = [[UITabBarItem alloc]initWithTabBarSystemItem:UITabBarSystemItemContacts tag:5];
// 设置F视图下----标签栏信息提示
tabBarViewF.tabBarItem.badgeValue = @"AG";
#pragma mark - 设置TabBarController
// 创建TabBarController
UITabBarController * tabBarController = [[UITabBarController alloc]init];
// TabBarController默认是放在最底部的,如果你想调整位置,可以进行下面2部操作(44是iPhone中TabBarController和UINavigationController标准高度)
//CGRect frame = CGRectMake(0, 20, 320, 44);
//tabBarController.tabBar.frame = frame;
// 每一个tab都必须有一个content view controller------->viewControllers属性,用来存入一个应用的TabBarController有多少个界面切换
tabBarController.viewControllers = [NSArray arrayWithObjects:tabBarViewA,tabBarViewB,tabBarViewC,tabBarViewD,tabBarViewE,tabBarViewF, nil nil];
// 设置着色
tabBarController.tabBar.tintColor = [UIColor greenColor];
// 设置选中图片时候
tabBarController.tabBar.selectedImageTintColor = [UIColor brownColor];
// 设置背景图片(自己没有图片,不进行设置)
//tabBarController.tabBar.backgroundImage = [UIImage imageNamed:@"@@@@@"];
// 设置程序启动时默认的ViewController视图(设置为3,一共5个ViewController,进来时候显示的视图就是第4个-tabBarViewD,下标从0开始)
tabBarController.selectedIndex = 3;
self.window.rootViewController = tabBarController;
[self.window makeKeyAndVisible];
return YES;
}
最后效果如下图:
UITabBarController的代理方法以及模态显示
首先要实现协议<UITabBarControllerDelegate>
复制代码 代码如下: // 设置代理
tabBarController.delegate =self;
//UINavigationController *nav = tabBarController.moreNavigationController;
//[nav setNavigationBarHidden:YES animated:YES];
// 控制哪些ViewController的标签栏能被点击
- (BOOL)tabBarController:(UITabBarController *)tabBarControllershouldSelectViewController:(UIViewController *)viewController{
// 代表HMT_CViewController这个View无法显示,无法点击到它代表的标签栏
if ([viewControllerisKindOfClass:[HMT_CViewControllerclass]]) {
returnNO;
}
returnYES;
}
// 选中哪个标签栏,一个监控作用吧
- (void)tabBarController:(UITabBarController *)tabBarControllerdidSelectViewController:(UIViewController *)viewController{
}
// More view controller将要开始编辑
- (void)tabBarController:(UITabBarController *)tabBarControllerwillBeginCustomizingViewControllers:(NSArray *)viewControllers{
}
// More view controller将要结束编辑
- (void)tabBarController:(UITabBarController *)tabBarControllerwillEndCustomizingViewControllers:(NSArray *)viewControllers changed:(BOOL)changed{
}
// More view controller编辑
- (void)tabBarController:(UITabBarController *)tabBarControllerdidEndCustomizingViewControllers:(NSArray *)viewControllers changed:(BOOL)changed{
}
#import "HMT-AViewController.h"
#import "HMTModalShowViewController.h"
@interfaceHMT_AViewController ()
@end
@implementation HMT_AViewController
- (void)viewDidLoad
{
[superviewDidLoad];
self.view.backgroundColor = [UIColorredColor];
// 创建一个按钮
UIButton * button = [UIButton buttonWithType:UIButtonTypeDetailDisclosure];
button.frame =CGRectMake(100,100,100, 100);
[button addTarget:self action:@selector(modalShow)forControlEvents:UIControlEventTouchUpInside];
[self.view addSubview:button];
// Do any additional setup after loading the view.
}
- (void)modalShow{
HMTModalShowViewController * modalShowVC = [[HMTModalShowViewController alloc]init];
//模态视图控制器呈现出来时候的视觉效果
modalShowVC.modalTransitionStyle =UIModalTransitionStyleCrossDissolve;
/*
UIModalTransitionStyleCoverVertical = 0, //默认,由下往上
UIModalTransitionStyleFlipHorizontal, //水平转动效果
UIModalTransitionStyleCrossDissolve, //渐变效果
UIModalTransitionStylePartialCurl, //书页往上翻动效果
*/
//模态视图控制器呈现方式,默认全屏
modalShowVC.modalPresentationStyle =UIModalPresentationFullScreen;
/*
UIModalPresentationFullScreen = 0,
UIModalPresentationPageSheet,
UIModalPresentationFormSheet,
UIModalPresentationCurrentContext,
UIModalPresentationCustom,
UIModalPresentationNone = -1,
*/
UINavigationController * modalShowNC = [[UINavigationController alloc] initWithRootViewController:modalShowVC];
//推出模态视图控制器
[self presentViewController:modalShowNC animated:YES completion:^{
NSLog(@"hello world");
}];
}
#import "HMTModalShowViewController.h"
@interfaceHMTModalShowViewController ()
@end
@implementation HMTModalShowViewController
- (void)viewDidLoad
{
[superviewDidLoad];
// Do any additional setup after loading the view.
self.view.backgroundColor = [UIColor yellowColor];
// 利用UINavigationController来实现退出控制器
UIBarButtonItem * barButton = [[UIBarButtonItem alloc] initWithBarButtonSystemItem:UIBarButtonSystemItemAdd target:self action:@selector(modalDismiss)];
self.navigationItem.leftBarButtonItem = barButton;
self.navigationItem.title =@"humingtao";
//创建一个按钮来实现退出控制器
/* UIButton * button = [UIButton buttonWithType:UIButtonTypeDetailDisclosure];
button.frame = CGRectMake(100, 100, 100, 100);
[button addTarget:self action:@selector(modalDismiss) forControlEvents:UIControlEventTouchUpInside];
[self.view addSubview:button];*/
}
- (void)modalDismiss{
//退出模态视图控制器
[self dismissViewControllerAnimated:YES completion:^{
NSLog(@"退出GoodBye");
}];
}
@end