- 基于App自适应draw9patch不失真背景的方法详解
- 用于cocos2d-x引擎(ndk)中为android项目生成编译文件列表
- 谈一谈Android内存泄漏问题
- android编程实现电话录音的方法
- 丢失Android系统库或者Conversion to Dalvik format failed with error 1错误的解决方法
- 详解Android自定义控件属性TypedArray以及attrs
- Android定制自己的EditText轻松改变底线颜色
- Android通过ConnectivityManager检查网络状态
- Android StickListView实现悬停效果
- ubuntu用wifi连接android调试程序的步骤
- Android开发笔记之: 数据存储方式详解
- Android源码学习之组合模式定义及应用
- 基于Android SQLite的使用介绍
- 详解Android中Notification通知提醒
- Android里实现退出主程序的提示代码
- Android 原始资源文件的使用详解
- 封装的android监听手指左右滑动屏幕的事件类分享
- Android实现读取相机(相册)图片并进行剪裁
- 配置android开发环境时出现eclipse获取不到ADT的解决方法
- Android控件系列之XML静态资源使用介绍
- android动态加载布局文件示例
- 六款值得推荐的android(安卓)开源框架简介
- Android游戏开发实践之人物移动地图的平滑滚动处理
- Android中实现监听ScrollView滑动事件
- Android中自定义ScrollView代码实例
- Android获取apk程序签名信息代码示例
- Android Studio与SVN版本控制程序的协作使用指南
- 学习Android开发之RecyclerView使用初探
- Eclipse安装ADT插件速度慢的解决方法
- Android Socket通信详解
从源码解析Android中View的容器ViewGroup
这回我们是深入到ViewGroup内部\,了解ViewGroup的工作,同时会阐述更多有关于View的相关知识。以便为以后能灵活的使用自定义空间打更近一步的基础。希望有志同道合的朋友一起来探讨,深入Android内部,深入理解Android。
一、ViewGroup是什么?
一个ViewGroup是一个可以包含子View的容器,是布局文件和View容器的基类。在这个类里定义了ViewGroup.LayoutParams类,这个类是布局参数的子类。
其实ViewGroup也就是View的容器。通过ViewGroup.LayoutParams来指定子View的参数。
ViewGroup作为一个容器,为了制定这个容器应有的标准所以为其指定了接口
public abstract class ViewGroup extends View implements ViewParent, ViewManager
这两个接口这里不研究,如果涉及到的话会带一下。ViewGroup有小4000行代码,下面我们一个模块一个模块分析。
二、ViewGroup这个容器
ViewGroup是一个容器,其采用一个数组来存储这些子View:
// Child views of this ViewGroup
private View[] mChildren;
由于是通过一个数组来存储View数据的,所以对于ViewGroup来说其必须实现增、删、查的算法。下面我们就来看看其内部实现。
2.1 添加View的算法
  protected boolean addViewInLayout(View child, int index, LayoutParams params) {
    return addViewInLayout(child, index, params, false);
  }
protected boolean addViewInLayout(View child, int index, LayoutParams params,
      boolean preventRequestLayout) {
    child.mParent = null;
    addViewInner(child, index, params, preventRequestLayout);
    child.mPrivateFlags = (child.mPrivateFlags & ~DIRTY_MASK) | DRAWN;
    return true;
  }
private void addViewInner(View child, int index, LayoutParams params,
      boolean preventRequestLayout) {
    ...
    addInArray(child, index);
    ...
  }
private void addInArray(View child, int index) {
  ...
  }
上面四个方法就是添加View的核心算法的封装,它们是层层调用的关系。而我们通常调用的addView就是最终通过上面那个来最终达到添加到ViewGroup中的。
2.1.1 我们先来分析addViewInner方法:
首先是对子View是否已经包含到一个父容器中,主要的防止添加一个已经有父容器的View,因为添加一个拥有父容器的View时会碰到各种问题。比如记录本身父容器算法的问题、本身被多个父容器包含时更新的处理等等一系列的问题都会出现。
if (child.getParent() != null) {
      throw new IllegalStateException("The specified child already has a parent. " +
          "You must call removeView() on the child's parent first.");
    }
然后就是对子View布局参数的处理。
调用addInArray来添加View
父View为当前的ViewGroup
焦点的处理。
当前View的AttachInfo信息,这个信息是用来在窗口处理中用的。Android的窗口系统就是用过AttachInfo来判断View的所属窗口的,这个了解下就行。详细信息设计到Android框架层的一些东西。
AttachInfo ai = mAttachInfo;
    if (ai != null) {
      boolean lastKeepOn = ai.mKeepScreenOn;
      ai.mKeepScreenOn = false;
      child.dispatchAttachedToWindow(mAttachInfo, (mViewFlags&VISIBILITY_MASK));
      if (ai.mKeepScreenOn) {
        needGlobalAttributesUpdate(true);
      }
      ai.mKeepScreenOn = lastKeepOn;
    }
View树改变的监听
if (mOnHierarchyChangeListener != null) {
      mOnHierarchyChangeListener.onChildViewAdded(this, child);
    }
子View中的mViewFlags的设置:
if ((child.mViewFlags & DUPLICATE_PARENT_STATE) == DUPLICATE_PARENT_STATE) {
      mGroupFlags |= FLAG_NOTIFY_CHILDREN_ON_DRAWABLE_STATE_CHANGE;
    }
2.1.2 addInArray
这个里面的实现主要是有个知识点,以前也没用过arraycopy,这里具体实现就不多加描述了。
System.arraycopy(children, 0, mChildren, 0, index);
System.arraycopy(children, index, mChildren, index + 1, count - index);
2.2 移除View
移除View的几种方式:
(1)移除指定的View。
(2)移除从指定位置的View
(3)移除从指定位置开始的多个View
(4)移除所有的View
其中具体涉及到的方法就有好多了,不过最终对要删除的子View中所做的无非就是下列的事情:
如果拥有焦点则清楚焦点
将要删除的View从当前的window中解除关系。
设置View树改变的事件监听,我们可以通过监听OnHierarchyChangeListener事件来进行一些相应的处理。
从父容器的子容器数组中删除。
具体的内容这里就不一一贴出来了,大家回头看看源码就哦了。
2.3 查询
这个就简单了,就是直接从数组中取出就可以了:
public View getChildAt(int index) {
  try {
    return mChildren[index];
  } catch (IndexOutOfBoundsException ex) {
    return null;
  }
}
分析到这儿,其实我们已经相当于分析了ViewGroup四分之一的代码了,呵呵。
三、onFinishInflate
我们一般使用View的流程是在onCreate中使用setContentView来设置要显示Layout文件或直接创建一个View,在当设置了ContentView之后系统会对这个View进行解析,然后回调当前视图View中的onFinishInflate方法。只有解析了这个View我们才能在这个View容器中获取到拥有Id的组件,同样因为系统解析完View之后才会调用onFinishInflate方法,所以我们自定义组件时可以onFinishInflate方法中获取指定子View的引用。
四、测量组件
在ViewGroup中提供了测量子组件的三个方法。
1、measureChild(View, int, int),为子组件添加Padding
  protected void measureChild(View child, int parentWidthMeasureSpec,
      int parentHeightMeasureSpec) {
    final LayoutParams lp = child.getLayoutParams();

    final int childWidthMeasureSpec = getChildMeasureSpec(parentWidthMeasureSpec,
        mPaddingLeft + mPaddingRight, lp.width);
    final int childHeightMeasureSpec = getChildMeasureSpec(parentHeightMeasureSpec,
        mPaddingTop + mPaddingBottom, lp.height);

    child.measure(childWidthMeasureSpec, childHeightMeasureSpec);
  }
2、measureChildren(int, int)根据指定的高和宽来测量所有子View中显示参数非GONE的组件。
  protected void measureChildren(int widthMeasureSpec, int heightMeasureSpec) {
    final int size = mChildrenCount;
    final View[] children = mChildren;
    for (int i = 0; i < size; ++i) {
      final View child = children[i];
      if ((child.mViewFlags & VISIBILITY_MASK) != GONE) {
        measureChild(child, widthMeasureSpec, heightMeasureSpec);
      }
    }
  }
3、measureChildWithMargins(View, int, int, int, int)测量指定的子组件,为子组件添加Padding和Margin。
  protected void measureChildWithMargins(View child,
      int parentWidthMeasureSpec, int widthUsed,
      int parentHeightMeasureSpec, int heightUsed) {
    final MarginLayoutParams lp = (MarginLayoutParams) child.getLayoutParams();

    final int childWidthMeasureSpec = getChildMeasureSpec(parentWidthMeasureSpec,
        mPaddingLeft + mPaddingRight + lp.leftMargin + lp.rightMargin
            + widthUsed, lp.width);
    final int childHeightMeasureSpec = getChildMeasureSpec(parentHeightMeasureSpec,
        mPaddingTop + mPaddingBottom + lp.topMargin + lp.bottomMargin
            + heightUsed, lp.height);

    child.measure(childWidthMeasureSpec, childHeightMeasureSpec);
  }
上面三个方法都是为子组件设置了布局参数。最终调用的方法是子组件的measure方法。在View中我们知道这个调用实际上就是设置了子组件的布局参数并且调用onMeasure方法,最终设置了View测量后的高度和宽度。
五、onLayout
这个函数是一个抽象函数,要求实现ViewGroup的函数必须实现这个函数,这也就是ViewGroup是一个抽象函数的原因。因为各种组件实现的布局方式不一样,而onLayout是必须被重载的函数。
@Override
protected abstract void onLayout(boolean changed,
    int l, int t, int r, int b);
来看View中layout方法:
public final void layout(int l, int t, int r, int b) {
  boolean changed = setFrame(l, t, r, b);
  if (changed || (mPrivateFlags & LAYOUT_REQUIRED) == LAYOUT_REQUIRED) {
    if (ViewDebug.TRACE_HIERARCHY) {
      ViewDebug.trace(this, ViewDebug.HierarchyTraceType.ON_LAYOUT);
    }

    onLayout(changed, l, t, r, b);
    mPrivateFlags &= ~LAYOUT_REQUIRED;
  }
  mPrivateFlags &= ~FORCE_LAYOUT;
}
在这个方法中调用了setFrame方法,这个方法是用来设置View中的上下左右边距用的
  protected boolean setFrame(int left, int top, int right, int bottom) {
    boolean changed = false;
    //.......
    if (mLeft != left || mRight != right || mTop != top || mBottom != bottom) {
      changed = true;

      // Remember our drawn bit
      int drawn = mPrivateFlags & DRAWN;

      // Invalidate our old position
      invalidate();


      int oldWidth = mRight - mLeft;
      int oldHeight = mBottom - mTop;

      mLeft = left;
      mTop = top;
      mRight = right;
      mBottom = bottom;

      mPrivateFlags |= HAS_BOUNDS;

      int newWidth = right - left;
      int newHeight = bottom - top;

      if (newWidth != oldWidth || newHeight != oldHeight) {
        onSizeChanged(newWidth, newHeight, oldWidth, oldHeight);
      }

      if ((mViewFlags & VISIBILITY_MASK) == VISIBLE) {
        // If we are visible, force the DRAWN bit to on so that
        // this invalidate will go through (at least to our parent).
        // This is because someone may have invalidated this view
        // before this call to setFrame came in, therby clearing
        // the DRAWN bit.
        mPrivateFlags |= DRAWN;
        invalidate();
      }

      // Reset drawn bit to original value (invalidate turns it off)
      mPrivateFlags |= drawn;

      mBackgroundSizeChanged = true;
    }
    return changed;
  }
我们可以看到如果新的高度和宽度改变之后会调用重新设置View的四个参数:
(1)protected int mLeft;
(2)protected int mRight;
(3)protected int mTop;
(4)protected int mBottom;
这四个参数指定了View将要布局的位置。而绘制的时候是通过这四个参数来绘制,所以我们在View中调用layout方法可以实现指定子View中布局。
六、ViewGroup的绘制。
ViewGroup的绘制实际上是调用的dispatchDraw,绘制时需要考虑动画问题,而动画的实现实际上就通过dispatchDraw来实现的。
我们不用理会太多的细节,直接看其绘制子组件调用的是drawChild方法,这个里面具体的东西就多了,涉及到动画效果的处理,如果有机会的话再写,我们只要知道这个方法的功能就行。
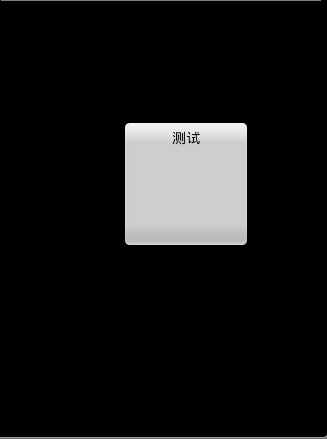
这里有个demo贴出其中的代码大家可以测试下。
public ViewGroup01(Context context)
{
  super(context);
  Button mButton = new Button(context);
  mButton.setText("测试");
  addView(mButton);
}

@Override
protected void onLayout(boolean changed, int l, int t, int r, int b)
{
  View v = getChildAt(0);
  if(v != null)
    {
    v.layout(120, 120, 250, 250);
    }
}
@Override
protected void dispatchDraw(Canvas canvas)
{
  super.dispatchDraw(canvas);
  View v = getChildAt(0);
  if(v != null)
    {
    drawChild(canvas, v, getDrawingTime());
    }
}
效果图片:
七、ViewGroup的事件分发机制
我们用手指去触摸Android手机屏幕,就会产生一个触摸事件,但是这个触摸事件在底层是怎么分发的呢?这个我还真不知道,这里涉及到操作硬件(手机屏幕)方面的知识,也就是Linux内核方面的知识,我也没有了解过这方面的东西,所以我们可能就往上层来分析分析,我们知道Android中负责与用户交互,与用户操作紧密相关的四大组件之一是Activity, 所以我们有理由相信Activity中存在分发事件的方法,这个方法就是dispatchTouchEvent(),我们先看其源码吧
public boolean dispatchTouchEvent(MotionEvent ev) {

    //如果是按下状态就调用onUserInteraction()方法,onUserInteraction()方法
    //是个空的方法, 我们直接跳过这里看下面的实现
    if (ev.getAction() == MotionEvent.ACTION_DOWN) {
      onUserInteraction();
    }

    if (getWindow().superDispatchTouchEvent(ev)) {
      return true;
    }

    //getWindow().superDispatchTouchEvent(ev)返回false,这个事件就交给Activity
    //来处理, Activity的onTouchEvent()方法直接返回了false
    return onTouchEvent(ev);
  }
这个方法中我们还是比较关心getWindow()的superDispatchTouchEvent()方法,getWindow()返回当前Activity的顶层窗口Window对象,我们直接看Window API的superDispatchTouchEvent()方法
/**
   * Used by custom windows, such as Dialog, to pass the touch screen event
   * further down the view hierarchy. Application developers should
   * not need to implement or call this.
   *
   */
  public abstract boolean superDispatchTouchEvent(MotionEvent event);
这个是个抽象方法,所以我们直接找到其子类来看看superDispatchTouchEvent()方法的具体逻辑实现,Window的唯一子类是PhoneWindow,我们就看看PhoneWindow的superDispatchTouchEvent()方法
public boolean superDispatchTouchEvent(KeyEvent event) {
    return mDecor.superDispatcTouchEvent(event);
  }
里面直接调用DecorView类的superDispatchTouchEvent()方法,或许很多人不了解DecorView这个类,DecorView是PhoneWindow的一个final的内部类并且继承FrameLayout的,也是Window界面的最顶层的View对象,这是什么意思呢?别着急,我们接着往下看
我们先新建一个项目,取名AndroidTouchEvent,然后直接用模拟器运行项目, MainActivity的布局文件为
<RelativeLayout xmlns:android="http://schemas.android.com/apk/res/android"
  xmlns:tools="http://schemas.android.com/tools"
  android:layout_width="match_parent"
  android:layout_height="match_parent"
  tools:context=".MainActivity" >

  <TextView
    android:layout_width="wrap_content"
    android:layout_height="wrap_content"
    android:layout_centerHorizontal="true"
    android:layout_centerVertical="true"
    android:text="@string/hello_world" />

</RelativeLayout>
利用hierarchyviewer工具来查看下MainActivity的View的层次结构,如下图
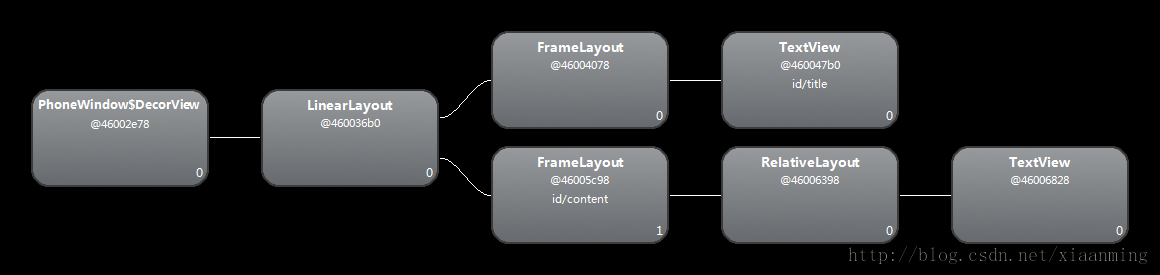
我们看到最顶层就是PhoneWindow$DecorView,接着DecorView下面有一个LinearLayout, LinearLayout下面有两个FrameLayout
上面那个FrameLayout是用来显示标题栏的,这个Demo中是一个TextView,当然我们还可以定制我们的标题栏,利用getWindow().setFeatureInt(Window.FEATURE_CUSTOM_TITLE,R.layout.XXX); xxx就是我们自定义标题栏的布局XML文件
下面的FrameLayout是用来装载ContentView的,也就是我们在Activity中利用setContentView()方法设置的View,现在我们知道了,原来我们利用setContentView()设置Activity的View的外面还嵌套了这么多的东西
我们来理清下思路,Activity的最顶层窗体是PhoneWindow,而PhoneWindow的最顶层View是DecorView,接下来我们就看DecorView类的superDispatchTouchEvent()方法
public boolean superDispatchTouchEvent(MotionEvent event) {
      return super.dispatchTouchEvent(event);
    }
在里面调用了父类FrameLayout的dispatchTouchEvent()方法,而FrameLayout中并没有dispatchTouchEvent()方法,所以我们直接看ViewGroup的dispatchTouchEvent()方法
/**
  * {@inheritDoc}
  */
  @Override
  public boolean dispatchTouchEvent(MotionEvent ev) {
    final int action = ev.getAction();
    final float xf = ev.getX();
    final float yf = ev.getY();
    final float scrolledXFloat = xf + mScrollX;
    final float scrolledYFloat = yf + mScrollY;
    final Rect frame = mTempRect;

    //这个值默认是false, 然后我们可以通过requestDisallowInterceptTouchEvent(boolean disallowIntercept)方法
    //来改变disallowIntercept的值
    boolean disallowIntercept = (mGroupFlags & FLAG_DISALLOW_INTERCEPT) != 0;

    //这里是ACTION_DOWN的处理逻辑
    if (action == MotionEvent.ACTION_DOWN) {
    //清除mMotionTarget, 每次ACTION_DOWN都很设置mMotionTarget为null
      if (mMotionTarget != null) {
        mMotionTarget = null;
      }

      //disallowIntercept默认是false, 就看ViewGroup的onInterceptTouchEvent()方法
      if (disallowIntercept || !onInterceptTouchEvent(ev)) {
        ev.setAction(MotionEvent.ACTION_DOWN);
        final int scrolledXInt = (int) scrolledXFloat;
        final int scrolledYInt = (int) scrolledYFloat;
        final View[] children = mChildren;
        final int count = mChildrenCount;
        //遍历其子View
        for (int i = count - 1; i >= 0; i--) {
          final View child = children[i];

          //如果该子View是VISIBLE或者该子View正在执行动画, 表示该View才
          //可以接受到Touch事件
          if ((child.mViewFlags & VISIBILITY_MASK) == VISIBLE
              || child.getAnimation() != null) {
          //获取子View的位置范围
            child.getHitRect(frame);

            //如Touch到屏幕上的点在该子View上面
            if (frame.contains(scrolledXInt, scrolledYInt)) {
              // offset the event to the view's coordinate system
              final float xc = scrolledXFloat - child.mLeft;
              final float yc = scrolledYFloat - child.mTop;
              ev.setLocation(xc, yc);
              child.mPrivateFlags &= ~CANCEL_NEXT_UP_EVENT;

              //调用该子View的dispatchTouchEvent()方法
              if (child.dispatchTouchEvent(ev)) {
                // 如果child.dispatchTouchEvent(ev)返回true表示
              //该事件被消费了,设置mMotionTarget为该子View
                mMotionTarget = child;
                //直接返回true
                return true;
              }
              // The event didn't get handled, try the next view.
              // Don't reset the event's location, it's not
              // necessary here.
            }
          }
        }
      }
    }

    //判断是否为ACTION_UP或者ACTION_CANCEL
    boolean isUpOrCancel = (action == MotionEvent.ACTION_UP) ||
        (action == MotionEvent.ACTION_CANCEL);

    if (isUpOrCancel) {
      //如果是ACTION_UP或者ACTION_CANCEL, 将disallowIntercept设置为默认的false
    //假如我们调用了requestDisallowInterceptTouchEvent()方法来设置disallowIntercept为true
    //当我们抬起手指或者取消Touch事件的时候要将disallowIntercept重置为false
    //所以说上面的disallowIntercept默认在我们每次ACTION_DOWN的时候都是false
      mGroupFlags &= ~FLAG_DISALLOW_INTERCEPT;
    }

    // The event wasn't an ACTION_DOWN, dispatch it to our target if
    // we have one.
    final View target = mMotionTarget;
    //mMotionTarget为null意味着没有找到消费Touch事件的View, 所以我们需要调用ViewGroup父类的
    //dispatchTouchEvent()方法,也就是View的dispatchTouchEvent()方法
    if (target == null) {
      // We don't have a target, this means we're handling the
      // event as a regular view.
      ev.setLocation(xf, yf);
      if ((mPrivateFlags & CANCEL_NEXT_UP_EVENT) != 0) {
        ev.setAction(MotionEvent.ACTION_CANCEL);
        mPrivateFlags &= ~CANCEL_NEXT_UP_EVENT;
      }
      return super.dispatchTouchEvent(ev);
    }

    //这个if里面的代码ACTION_DOWN不会执行,只有ACTION_MOVE
    //ACTION_UP才会走到这里, 假如在ACTION_MOVE或者ACTION_UP拦截的
    //Touch事件, 将ACTION_CANCEL派发给target,然后直接返回true
    //表示消费了此Touch事件
    if (!disallowIntercept && onInterceptTouchEvent(ev)) {
      final float xc = scrolledXFloat - (float) target.mLeft;
      final float yc = scrolledYFloat - (float) target.mTop;
      mPrivateFlags &= ~CANCEL_NEXT_UP_EVENT;
      ev.setAction(MotionEvent.ACTION_CANCEL);
      ev.setLocation(xc, yc);

      if (!target.dispatchTouchEvent(ev)) {
      }
      // clear the target
      mMotionTarget = null;
      // Don't dispatch this event to our own view, because we already
      // saw it when intercepting; we just want to give the following
      // event to the normal onTouchEvent().
      return true;
    }

    if (isUpOrCancel) {
      mMotionTarget = null;
    }

    // finally offset the event to the target's coordinate system and
    // dispatch the event.
    final float xc = scrolledXFloat - (float) target.mLeft;
    final float yc = scrolledYFloat - (float) target.mTop;
    ev.setLocation(xc, yc);

    if ((target.mPrivateFlags & CANCEL_NEXT_UP_EVENT) != 0) {
      ev.setAction(MotionEvent.ACTION_CANCEL);
      target.mPrivateFlags &= ~CANCEL_NEXT_UP_EVENT;
      mMotionTarget = null;
    }

    //如果没有拦截ACTION_MOVE, ACTION_DOWN的话,直接将Touch事件派发给target
    return target.dispatchTouchEvent(ev);
  }
这个方法相对来说还是蛮长,不过所有的逻辑都写在一起,看起来比较方便,接下来我们就具体来分析一下
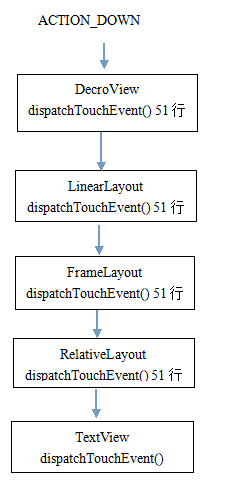
我们点击屏幕上面的TextView来看看Touch是如何分发的,先看看ACTION_DOWN
在DecorView这一层会直接调用ViewGroup的dispatchTouchEvent(), 先看18行,每次ACTION_DOWN都会将mMotionTarget设置为null, mMotionTarget是什么?我们先不管,继续看代码,走到25行, disallowIntercept默认为false,我们再看ViewGroup的onInterceptTouchEvent()方法
public boolean onInterceptTouchEvent(MotionEvent ev) {
   return false;
 }
直接返回false, 继续往下看,循环遍历DecorView里面的Child,从上面的MainActivity的层次结构图我们可以看出,DecorView里面只有一个Child那就是LinearLayout, 第43行判断Touch的位置在不在LinnearLayout上面,这是毫无疑问的,所以直接跳到51行, 调用LinearLayout的dispatchTouchEvent()方法,LinearLayout也没有dispatchTouchEvent()这个方法,所以也是调用ViewGroup的dispatchTouchEvent()方法,所以这个方法卡在51行没有继续下去,而是去先执行LinearLayout的dispatchTouchEvent()
LinearLayout调用dispatchTouchEvent()的逻辑跟DecorView是一样的,所以也是遍历LinearLayout的两个FrameLayout,判断Touch的是哪个FrameLayout,很明显是下面那个,调用下面那个FrameLayout的dispatchTouchEvent(), 所以LinearLayout的dispatchTouchEvent()卡在51也没继续下去
继续调用FrameLayout的dispatchTouchEvent()方法,和上面一样的逻辑,下面的FrameLayout也只有一个Child,就是RelativeLayout,FrameLayout的dispatchTouchEvent()继续卡在51行,先执行RelativeLayout的dispatchTouchEvent()方法
执行RelativeLayout的dispatchTouchEvent()方法逻辑还是一样的,循环遍历 RelativeLayout里面的孩子,里面只有一个TextView, 所以这里就调用TextView的dispatchTouchEvent(), TextView并没有dispatchTouchEvent()这个方法,于是找TextView的父类View,在看View的dispatchTouchEvent()的方法之前,我们先理清下上面这些ViewGroup执行dispatchTouchEvent()的思路,我画了一张图帮大家理清下(这里没有画出onInterceptTouchEvent()方法)