
- 图文详解Android Studio搭建Android集成开发环境的过程
- Android编程设置全屏的方法实例详解
- Android垃圾回收机制及程序优化System.gc
- Android 如何收集已发布程序的崩溃信息
- [Android开发视频教程]02_04_常见控件(七)
- android开发之listView组件用法实例简析
- 解析android中的dip,dp,px,sp和屏幕密度
- android读写sd卡操作写入数据读取数据示例
- Android ListView长按弹出菜单二种实现方式示例
- Eclipse下配置Ant脚本并自动打包带签名的Android apk
- 完美解决EditText和ScrollView的滚动冲突(上)
- Android接收和发送短信处理
- 如何调用百度地图API实现手机自动定位
- android从系统图库中取图片的实例代码
- android系统在静音模式下关闭camera拍照声音的方法
- android使用include调用内部组件的方法
- Android 使用Vitamio打造自己的万能播放器(5)――在线播放(播放优酷视频)
- Android布局之FrameLayout帧布局
- Android实现九宫格(GridView中各项平分空间)的方法
- Android中子线程和UI线程通信详解
- jarsigner重新签名apk无法安装的解决方法
- android编程判断应用是否具有某个权限的方法
- EditText属性深入解析
- Android实现网络多线程文件下载
- 基于Android AppWidgetProvider的使用介绍
- Android开发中实现发送短信的小程序示例
- Android使用VideoView播放本地视频和网络视频的方法
- Android 使用Vitamio打造自己的万能播放器(9)―― 在线播放 (在线电视)
- 学习Android Material Design(RecyclerView代替ListView)
- Android RichText 让Textview轻松的支持富文本(图像ImageSpan、点击效果等等类似QQ微信聊天)
Android从系统Gallery获取图片具体实现
前言
在Android应用中,经常有场景会需要使用到设备上存储的图片,而直接从路径中获取无疑是非常不便利的。所以一般推荐调用系统的Gallery应用,选择图片,然后使用它。本篇博客将讲解如何在Android中通过系统Gallery获取图片。
Gallery应用
Android原生内置了很多App,而Gallery为图库,用于操作设备上的图片,它会在开机的时候主动扫描设备上存储的图片,并可以使用Gallery操作它们。既然要使用Gallery,那么先看看它的AndroidManifest.xml清单文件。
复制代码 代码如下:
<activity android:name="com.android.camera.ImageGallery"
android:label="@string/gallery_label"
android:configChanges="orientation|keyboardHidden"
android:icon="@drawable/ic_launcher_gallery">
<intent-filter>
<action android:name="android.intent.action.MAIN" />
<category android:name="android.intent.category.DEFAULT" />
</intent-filter>
<intent-filter>
<action android:name="android.intent.action.VIEW" />
<category android:name="android.intent.category.DEFAULT" />
<data android:mimeType="vnd.android.cursor.dir/image" />
</intent-filter>
<intent-filter>
<action android:name="android.intent.action.VIEW" />
<category android:name="android.intent.category.DEFAULT" />
<data android:mimeType="vnd.android.cursor.dir/video" />
</intent-filter>
<intent-filter>
<action android:name="android.intent.action.GET_CONTENT" />
<category android:name="android.intent.category.OPENABLE" />
<data android:mimeType="vnd.android.cursor.dir/image" />
</intent-filter>
<intent-filter>
<action android:name="android.intent.action.GET_CONTENT" />
<category android:name="android.intent.category.OPENABLE" />
<category android:name="android.intent.category.DEFAULT" />
<data android:mimeType="image/*" />
<data android:mimeType="video/*" />
</intent-filter>
<intent-filter>
<action android:name="android.intent.action.PICK" />
<category android:name="android.intent.category.DEFAULT" />
<data android:mimeType="image/*" />
<data android:mimeType="video/*" />
</intent-filter>
<intent-filter>
<action android:name="android.intent.action.PICK" />
<category android:name="android.intent.category.DEFAULT" />
<data android:mimeType="vnd.android.cursor.dir/image" />
</intent-filter>
</activity>
上面是Gallery的AndroidManifest.xml文件中的部分代码,展示了ImageGallery,从众多Intent-filter中可以看出,选取图片应该使用"android.intent.action.PICK",它有两个miniType,"image/*"是用来获取图片的、"video/*"是用来获取视频的。Android中众多Action的字符串其实被封装在Intent类中,android.intent.action.PICK也不例外,它是Intent.ACTION_PICK。
既然知道了启动Gallery的Action,那么再看看ImageGallery.java的源码,找找其中选中图片后的返回值。
复制代码 代码如下:
private void launchCropperOrFinish(IImage img) {
Bundle myExtras = getIntent().getExtras();
long size = MenuHelper.getImageFileSize(img);
if (size < 0) {
// Return if the image file is not available.
return;
}
if (size > mVideoSizeLimit) {
DialogInterface.OnClickListener buttonListener =
new DialogInterface.OnClickListener() {
public void onClick(DialogInterface dialog, int which) {
dialog.dismiss();
}
};
new AlertDialog.Builder(this)
.setIcon(android.R.drawable.ic_dialog_info)
.setTitle(R.string.file_info_title)
.setMessage(R.string.video_exceed_mms_limit)
.setNeutralButton(R.string.details_ok, buttonListener)
.show();
return;
}
String cropValue = myExtras != null ? myExtras.getString("crop") : null;
if (cropValue != null) {
Bundle newExtras = new Bundle();
if (cropValue.equals("circle")) {
newExtras.putString("circleCrop", "true");
}
Intent cropIntent = new Intent();
cropIntent.setData(img.fullSizeImageUri());
cropIntent.setClass(this, CropImage.class);
cropIntent.putExtras(newExtras);
/* pass through any extras that were passed in */
cropIntent.putExtras(myExtras);
startActivityForResult(cropIntent, CROP_MSG);
} else {
Intent result = new Intent(null, img.fullSizeImageUri());
if (myExtras != null && myExtras.getBoolean("return-data")) {
// The size of a transaction should be below 100K.
Bitmap bitmap = img.fullSizeBitmap(
IImage.UNCONSTRAINED, 100 * 1024);
if (bitmap != null) {
result.putExtra("data", bitmap);
}
}
setResult(RESULT_OK, result);
finish();
}
}
以上的ImageGallery.java的部分源码,从setResult()方法可以看出,它返回的Intent包含了选中图片的Uri,它是一个content://开头的内容提供者,并且如果传递过去的Intent的Extra中,包含一个name为"return-data"并且值为true的时候,还会往Extra中写入name为"data"的图片缩略图。
Gallery获取图片Demo
既然已经知道了启动Gallery的Action,和它如何返回选中的数据,那么接下来通过一个简单的Demo来演示一下如何从系统Gallery中获取图片,并把获取到的图片展示到界面的一个ImageView中。
复制代码 代码如下:
package cn.bgxt.sysgallerydemo;
import android.net.Uri;
import android.os.Bundle;
import android.util.Log;
import android.view.View;
import android.view.View.OnClickListener;
import android.widget.Button;
import android.widget.ImageView;
import android.app.Activity;
import android.content.Intent;
public class MainActivity extends Activity {
private Button btn_getImage;
private ImageView iv_image;
private final static String TAG = "main";
@Override
protected void onCreate(Bundle savedInstanceState) {
super.onCreate(savedInstanceState);
setContentView(R.layout.activity_main);
btn_getImage = (Button) findViewById(R.id.btn_getImage);
iv_image = (ImageView) findViewById(R.id.iv_image);
btn_getImage.setOnClickListener(getImage);
}
private View.OnClickListener getImage = new OnClickListener() {
@Override
public void onClick(View v) {
// 设定action和miniType
Intent intent = new Intent();
intent.setAction(Intent.ACTION_PICK);
intent.setType("image/*");
// 以需要返回值的模式开启一个Activity
startActivityForResult(intent, 0);
}
};
@Override
protected void onActivityResult(int requestCode, int resultCode, Intent data) {
// 如果获取成功,resultCode为-1
Log.i(TAG, "resultCode:" + resultCode);
if (requestCode == 0 && resultCode == -1) {
// 获取原图的Uri,它是一个内容提供者
Uri uri = data.getData();
iv_image.setImageURI(uri);
}
super.onActivityResult(requestCode, resultCode, data);
}
}
效果展示:
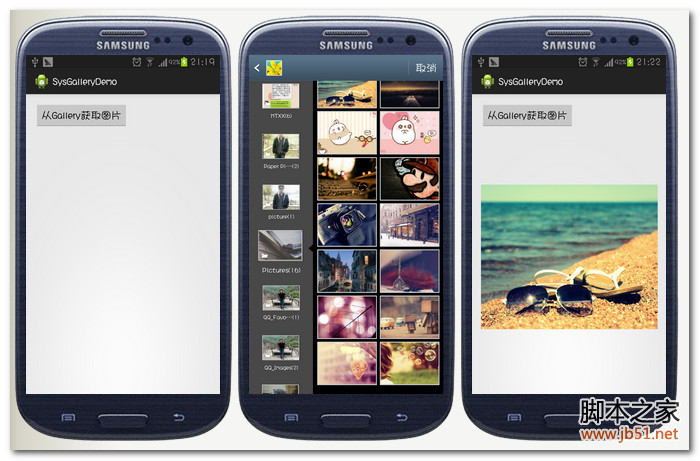
总结
本篇博客到这里就基本上讲解了如何在Android下调用系统Gallery获取图片,其实功能实现很简单,主要是要注意Action和miniType不要写错了,并且返回值是一个Uri。虽然现在越来越多需要用到图片的商业应用,都在自己开发获取设备图片的功能,但是使用系统自带的Gallery来获取不失为一种快速实现功能的解决办法。为了方便起见,系统的Gallery源码,也会一并打包放到源码中,有需要的可以下载来看看。
- Android 5.0彩蛋:机器人版Flappy Bird
- Android入门之TableLayout应用解析(二)
- Android编程实现自定义进度条颜色的方法
- Android Webview使用小结
- Android 定时任务过程详解
- Android实现多线程下载文件的方法
- Android 模拟器(JAVA)与C++ socket 通讯 分